SSH ProxyCommand & ProxyJump

SSH ProxyCommand and ProxyJump to the rescue for jumping through multiple SSH hosts. I was asked by a fellow team member how we access RDP through two Linux hosts recently. I had to think for a moment, and remembered good old ProxyCommand and ProxyJump. So I thought I would post this up as a note to self and anybody else who might find this useful.

In this scenario imagine we are on the outside of a NAT firewall (this could be across the internet of internal network), we need access to a windows host several networks deep with only Linux/ssh hosts to jump across. Similar to the below:

How do we achieve it? Well, we can actually do this several ways with different commands. One way is to SSH to each host in turn and do a local port forward. That seems a bit long winded. Another approach would be to formulate a set of SSH commands in the /etc/ssh_config file, again a bit long winded. Alternatively, a one liner more suited in this situation would see multiple SSH commands nested together with local port forwarding. There are actually also (not surprisingly) several ways we can achieve a one liner using the likes of ProxyCommand, ProxyCommand with nc and newer versions of openssh ProxyJump.

With ProxyCommand this is what our command would look like:

ssh -o "ProxyCommand=ssh -W %h:%p -o 'ProxyCommand=ssh -W %%h:%%p -L 3389:127.0.0.1:3389 root@10.0.0.46' -L 3389:127.0.0.1:3389 root@192.168.2.100" -L 3389:192.168.3.202:3389 root@192.168.3.100 -vv

This will prompt you at each host for the password, unless you use SSH key pair with no password.

There are a couple of key elements in this one liner that we will go through:

-o : This is used to specify the option you want to use, in this case proxycommand.

-W : This is important, as this redirects the std input/output back to your host securely. Two additional options after the -W are %h which is our kali host and %p is our ssh port. This is specified in each proxycommand, note in the second command the %% this is essential to escape the characters. Note -W is not to be confused with lower case -w which is for a completely different task.

-L : This is our regular local port forward, in this case at each jump host we forwarding back 3389.

Another more neat and simpler way to do this is to use the ProxyJump command which is shortened to -J.

ssh -J root@10.0.0.46,root@192.168.2.100 -L 3389:192.168.3.202:3389 root@192.168.3.100

With ProxyJump we are setting our jump hosts in line one after the other comma separated and just setting the local port forward on our final host. This tunnels the port right through from your local box through to the destination server.

All that is left to do now is to use rdesktop or xfreerdp to 127.0.0.1 on 3389 using either proxycommand or proxyjump.

Pretty cool huh.

PowerShell Port Scan

Check your Egress Filtering with a PowerShell port scan script

Firewall Egress Filtering Check with PowerShell

This is just a quick post so I can refer to myself more than anything regarding conducting a  Powershell Port Scan! However this is a useful couple of lines to to conduct a port scan from a windows device with PowerShell. This can be used in a number of situations however is especially ideal to check your egress filtering out to a server on the internet or to a segmented network. In the below few lines we are testing the first 1000 ports this can be bumped up to 65535 if wanted and the server that you are port scanning is listed as X.X.X.X.

1..1000 | % {$test= new-object system.Net.Sockets.TcpClient; 
$wait = $test.beginConnect("X.X.X.X",$_,$null,$null); 
($wait.asyncwaithandle.waitone(50,$false)); if($test.Connected)
{echo "$_ open"}else{echo "$_ closed"}} | select-string " "

This particular script has been pulled from Black Hills Information Security page here. An alternative from Microsoft’s ‘Hey, Scripting Guy! Blog’ can be found here.

The Common Problem

Often organisations lack adequate egress filtering, by this I mean outbound connects that can be established on a number of ports from within the heart of the network. Client machines and typical internal application servers don’t need to access a range of services out on the Internet. Once a nasty exploit has got an attacker onto a network they will look to get a foothold within the network lateral move and phone home to command and control server. Having a range of ports open to clients and servers allows attackers to make an outbound connects from whole host of tools, including PowerShell for that matter.

The Solution

Check you egress filtering and lock down any unwanted open ports out to the internet, your perimeter firewalls should not allow these outbound connections. Obviously certain services are going to need to make outbound connections such as web proxy and email gateways and these rules should be appropriately provisioned. To take this one step further enable your outbound firewall rules on your local hosts, ‘hang on a sec, you must be crazy’ I hear you say, however by doing this you will be help prevent the lateral movement of attackers through your network as well as being able to get off your network back out to the Internet.

Cisco Router Password Recovery

Cisco Router Password Recovery Steps.

Cisco Router Password Recovery

As a mental note to myself more than anything however some one may also find this useful. These are the steps you need to take in order to recover or reset a Cisco Router Password. This was performed on 2800 series router. This may be different for other router models and the break key sequence may also be different for your favorite terminal software, however these are the outline steps required in order to re-gain access to you Cisco Router.

  1. Connect via the console port.
  2. Power cycle the router.
  3. Issue the break sequence command on startup within 60 seconds of power up to put into ROMmon – ‘Ctrl-Break’ or ‘Break’
  4. Change the config register with ‘confreg 0x2142’ command.
  5. Power cycle the router.
  6. skip the initial startup/setup procedure
  7. move into privilege EXEC mode.
  8. Copy the startup configuration to the running configuration.
  9. Check the config with a show run – and change the password.
  10. Change the config register back to the original setting (usually 0x2102) in Global Configuration mode with ‘config-register 0x2102’.
  11. Save your changes and reboot to set the new config register.

Issue a ‘Show version’ to verify you have the correct config register:

Router Configuration register 0x2102

Information Security Defenders

We need more Information Security defenders!

InfoSec DefendersAs an industry we need more information security defenders to play the role of the blueteam in the Enterprise. All too often the IT Team receive a pentest report with a list of red criticals and are immediately overwhelmed with issues to fix. Whilst an organization has regular pentests it has the danger of lulling itself into a feeling of ‘doing the right thing’ however if all they are doing is getting a pentest and not re-mediating the issues then its a waste of time and money. This is a pessimistic view however it is usually the case that more vulnerabilities are released that the IT know what to do with. The IT team tend to either not have enough resource or they don’t have the skills to fix the issues, usually the first being being the case. Penetration testing needs to be more than just a test, it needs to be a more proactive engagement with after test help and support for the enterprise should they need it.
Its easy to criticise the IT department. As Information Security Professionals, we are doped daily with the next new exploit or zero day from the various blogs and podcasts that we listen to. This isn’t a small IT departments main concern or top of their list of to do tasks when they arrive at work, (although it could be argued it should be, with a little more security awareness training). The IT team tend to prioritise keeping those critical business apps or switches up and running (I’ve been that person).

As Information Security Professionals we need to be more involved in fixing and explaining the risks and supporting organisations so that they are better equipped to defend themselves.

The next new shiny security toy in the enterprise may not necessarily be the answer, the existing tools already installed around us could be better used and more creatively used to defend the enterprise.  Getting the latest IDS or implementing the next new NextGen Firewall can tend to be a distraction to getting down to what needs to be done i.e. Getting that MS08-067 patched on that business critical server that’s been there for years or tightening up the existing firewall. Hardening existing systems with group policy, tuning WSUS or SCCM to deploy timely updates and utilising windows logging to alert when a domain admin group is modified for example will generally go far further, and are free.

Hopefully sites like this will help contribute to securing enterprises, and assisting system administrators to better defend their existing environments. Enterprises don’t necessarily need to spend huge amounts of money on new technology, the answer could be in being more creative with what you already have.

Configuring IPSec Site-to-Site VPN Tunnels

Configuring a IPSec Site-to-Site VPN Tunnels on a Cisco Router

I thought I would run through configuring IPSec Site-to-Site VPN Tunnels on a cisco router. I’m going to be covering at high level the basic principles needed to configure a IPSec Site-to-Site VPN. The fundemental principals can be used for the Cisco ASA Firewall or Cisco VPN concentrator. The VPN gateways in our example (the routers) are responsible for encapsulating and encrypting the outbound traffic which in a real world example this would from be from a site to a peer gateway at another site. This could be either through an MPLS network from an ISP or more commonly directly over the Internet. When the receiving gateway receives the traffic it strips away the headers, decrypt’s the content with the pre-shared key and forwards on the traffic to a host network on the inside.

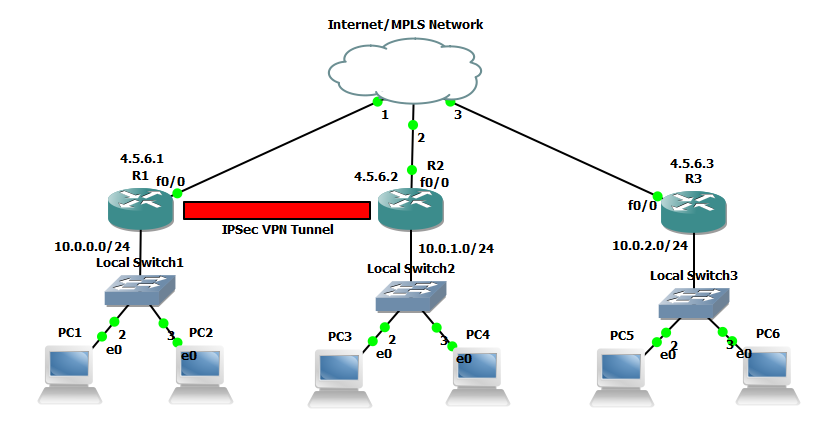
In our example we are going to be using 3 networks with an IPSec VPN tunnel being established between two of the routers. I have added the extra network without the tunnel to demonstrate in wireshark the encrypted vs the non encrypted traffic. All three networks are connected to a switch which we are going to image as our either our Internet or MPLS connection.

IPSec VPN Diagram

An IPSec tunnel consists of 5 stages to establish and terminate its connection these are:

  • An ISAKMP tunnel is initiated when the VPN gateway detects ‘interesting traffic’ which is defined by an ACL.
  • IKE Phase 1 is established through negotiating the ISAKMP SA policy that is defined in the config.
  • IKE Phase 2 is established through negotiating the IPSec SA policy.
  • The IPSec tunnel is created and data can begin to be transferred Encrypted.
  • The IPSec tunnel is teared down when either the lifetime of the session expires or the IPSec SA is removed.

Below is the extra config that is used for each router other than the initial config of a standard GNS3 router, this can simple be copied into global configuration mode. The config is split into three main sections the interface configuration, EIGRP configuration and the IPSEC configuration.

hostname RouterA
interface fa 0/0
 ip address 4.5.6.1 255.255.255.0
 no shutdown
interface fa 0/1
 ip address 10.0.0.1 255.255.255.0
 no shutdown
 exit
router eigrp 111
 network 10.0.0.0
 network 4.5.6.0
 no auto-summary
 exit
# Identify interesting traffic on RouterA to RouterB with the below ACL
access-list 101 permit ip 10.0.0.0 0.0.0.255 10.0.1.0 0.0.0.255 
# Configure the IKE Phase 1 ISAKMP SA policy on RouterA 
crypto isakmp policy 10
 encryption aes 256
 authentication pre-share
 hash sha
 group 5
 exit
crypto isakmp key cisco12345 address 4.5.6.2
# Configure the IKE Phase 2 IPsec SA Policy on RouterA
crypto ipsec transform-set VPN-SET esp-aes esp-sha-hmac
crypto map VPN-MAP 10 ipsec-isakmp
 description VPN Connection from RouterA to RouterB
 set peer 4.5.6.2
 set transform-set VPN-SET
 match address 101
 exit
interface fa0/0
 crypto map VPN-MAP
 exit
hostname RouterB
interface fa 0/0
 ip address 4.5.6.2 255.255.255.0
 no shutdown
interface fa 0/1
 ip address 10.0.1.1 255.255.255.0
 no shutdown
 exit
router eigrp 111
 network 10.0.1.0
 network 4.5.6.0
 no auto-summary
 exit
# Identify interesting traffic on RouterB to RouterA with the below ACL
access-list 101 permit ip 10.0.0.0 0.0.0.255 10.0.1.0 0.0.0.255 
# Configure the IKE Phase 1 ISAKMP SA policy on RouterB
crypto isakmp policy 10
 encryption aes 256
 authentication pre-share
 hash sha
 group 5
 exit
crypto isakmp key cisco12345 address 4.5.6.1
# Configure the IKE Phase 2 IPsec SA Policy on RouterB
crypto ipsec transform-set VPN-SET esp-aes esp-sha-hmac
crypto map VPN-MAP 10 ipsec-isakmp
 description VPN Connection from RouterB to RouterA
 set peer 4.5.6.1
 set transform-set VPN-SET
 match address 101
 exit
interface fa0/0
 crypto map VPN-MAP
 exit
hostname RouterC
interface fa 0/0
 ip address 4.5.6.3 255.255.255.0
 no shutdown
interface fa 0/1
 ip address 10.0.2.1 255.255.255.0
 no shutdown
 exit
router eigrp 111
 network 10.0.2.0
 network 4.5.6.0
 no auto-summary
 exit
# Note there is no IPSec configuration on this router

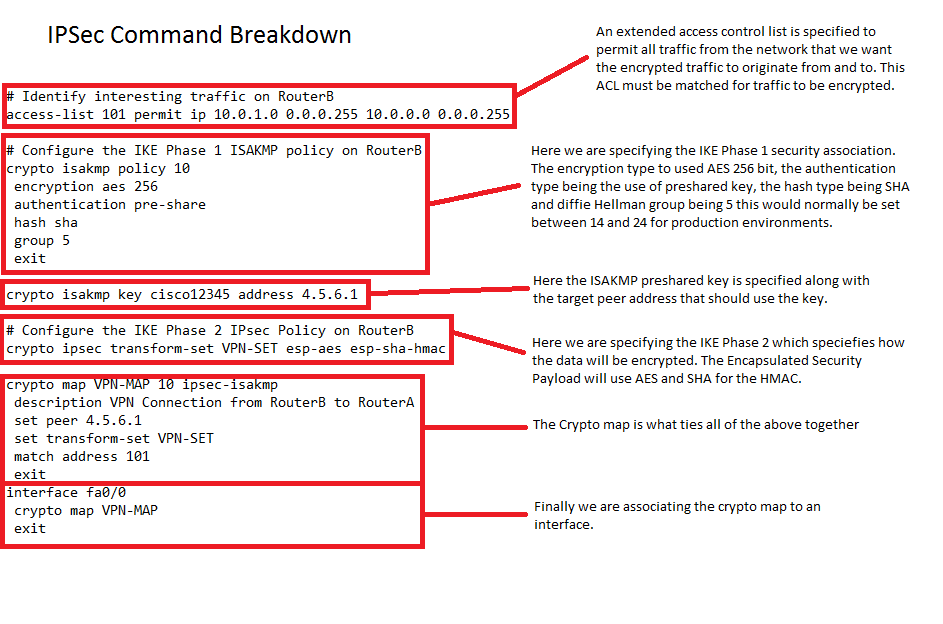
I’ve broken down just one of the IPSec configuration below to explain what the various elements are, these need to match at both sites:

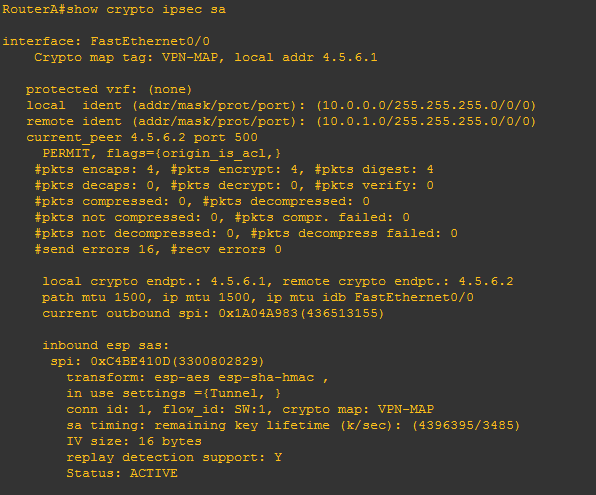
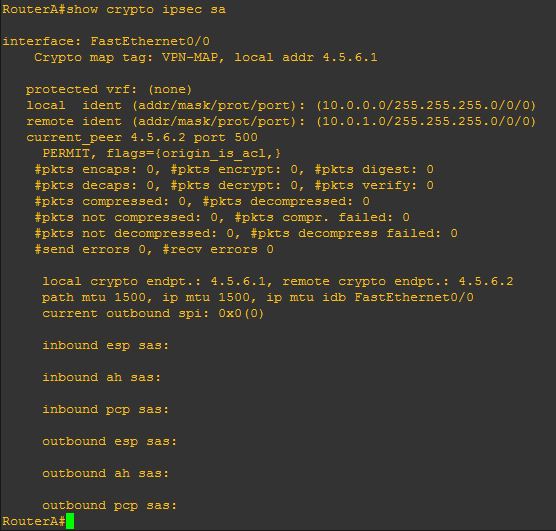
ipsec command breakdownBefore generating any interesting traffic if we execute ‘show crypto ipsec sa’ from RouterA we can clearly see there has been no traffic captured by the ACL.

before ipsec traffic

If we now generate some ‘interesting traffic’ such as a ping from PC1 10.0.0.2 to PC3 10.0.1.2 which will match our ACL that is specified in our crypto map, then re-issue ‘show crypto ipsec sa’ we will see from the stats that packets have been encrypted. Further to this we will see the inbound and outbound session will be ‘ACTIVE’.

After ipsec traffic

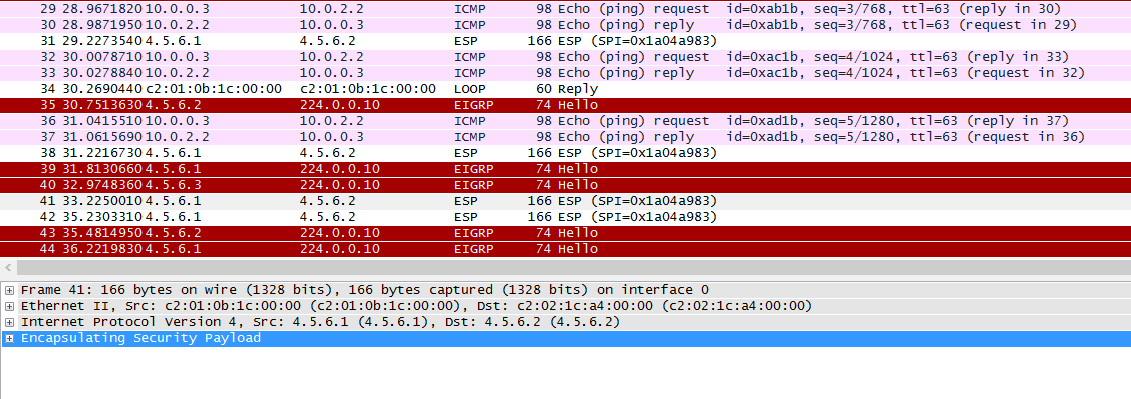
To take this one stage further we will demonstrate the difference in the Encrypted IPSec traffic and ordinary traffic using wireshark. The capture will be taken from the link between RouterA and the core network. We will ping out from PC1 to PC3 (the encrypted traffic caught by our ACL) and PC2 to PC5 (the non-encrypted traffic that doesn’t match our ACL) simultaneously. This is what we see:

IPSec traffic in wireshark.

As we can see from the wireshark capture our encrypted traffic is shown in the Encapsulated Security Payload and our non encrypted traffic in the clear (the ping request and reply).

CCNA Security – Implementing Cisco Network Security Lab

I thought I would share with you the Lab I have been mostly working with for CCNA  Security (CCNAS) – Implementing Cisco Network Security (210-260) exam that I have recently took and passed. I have also used several smaller lab setups for specific testing however this is the main lab to piece everything together.

CCNAS - Implementing Cisco Network Security Lab
CCNAS – Implementing Cisco Network Security Lab

The lab has been built to accommodate the many elements on the exam and covers off most of the practical procedures that you need to be comfortable with. Using GNS3 and VirtualBox we are able to lab most of the practical exercises bar the L2 switching portions which I achieved through physical equipment (Catalyst 3750, 3550 x2 and 2950 switches). The exam does cover many topics in theory that you must know, these aren’t covered here, however can be found on the Cisco website.

The lab contains several client machines for managing the routers and ASA firewalls from putty, cisco configuration professional and ASDM as well as testing PAT through the ASA with a breakout to the internet. There is an Active Directory Domain Controller with the Network Access Protection role installed for use with AAA/radius and NTP. A separate syslog server. A DMZ with web server for testing NAT and outside firewall rules. There is also an ASA 5520 at each of the three sites for testing VPN site-to-site Ipsec connections, clients at all sites for testing end to end connectivity. There is also an outside remote client for testing the Anyconnect and client-less vpn options which takes advantage of the AAA radius service.

Using this lab we are able to address the following practical elements for the CCNAS exam:

2.0 Secure Access

2.1   Secure management

  • 2.1.b Configure secure network management
  • 2.1.c Configure and verify secure access through SNMP v3 using an ACL
  • 2.1.d Configure and verify security for NTP
  • 2.1.e Use SCP for file transfer

2.2 AAA concepts

  • 2.2.b Configure administrative access on a Cisco router and ASA using RADIUS
  • 2.2.c Verify connectivity on a Cisco router and ASA to a RADIUS server
3.0 VPN

3.2 Remote access VPN

  • 3.2.a Implement basic clientless SSL VPN using ASDM
  • 3.2.b Verify clientless connection
  • 3.2.c Implement basic AnyConnect SSL VPN using ASDM
  • 3.2.d Verify AnyConnect connection
  • 3.2.e Identify endpoint posture assessment

3.3 Site-to-site VPN

  • 3.3.a Implement an IPsec site-to-site VPN with pre-shared key authentication on Cisco routers and ASA firewalls
  • 3.3.b Verify an IPsec site-to-site VPN
4.0 Secure Routing and Switching

4.1 Security on Cisco routers

  • 4.1.a Configure multiple privilege levels
  • 4.1.b Configure Cisco IOS role-based CLI access
  • 4.1.c Implement Cisco IOS resilient configuration

4.2 Securing routing protocols

  • 4.2.a Implement routing update authentication on OSPF
5.0 Cisco Firewall Technologies

5.3 Implement NAT on Cisco ASA 9.x

  • 5.3.a Static
  • 5.3.b Dynamic
  • 5.3.c PAT
  • 5.3.d Policy NAT
  • 5.3 e Verify NAT operations

5.4 Implement zone-based firewall

  • 5.4.a Zone to zone
  • 5.4.b Self zone

5.5 Firewall features on the Cisco Adaptive Security Appliance (ASA) 9.x

  • 5.5.a Configure ASA access management
  • 5.5.b Configure security access policies
  • 5.5.c Configure Cisco ASA interface security levels
  • 5.5.d Configure default Cisco Modular Policy Framework (MPF)

Well what next, CCNP Security of course.

Greetings!

Greetings! Welcome to my InfoSec Site!

Here I will be mostly be talking to myself about Information Security Topics, News, and mini guides. Feel free to join in and comment!

I am also going to be sharing some of the latest Labs and Projects that I am currently working on, short tutorials that I have been through and had to learn along the way. This will be both Windows and Linux based. I will also be sharing some Security techniques, not only in an effort to raise awareness for Information Security, but also to use as my own quick lookup when I need to remember something!

I was inspired to create this site after listening to Defensive Security Podcast and subsequently reading an article titled How to build a successful information security career on their site.