Move across a network by pivoting with netsh in windows!
Just a quick post to demonstrating pivoting with netsh in Windows. More specifically port forwarding with netsh in Windows (Windows 7 and above). This really is great as your not having to upload any tools to the target system. It is limited in its functionality however, is a great option for say a single port such as 445 or 3389.
Now if you don’t have interactive logon rights but you have a PSEXEC, PTH or even a meterpreter session you can add a port forward on you target system and pivot to your next target with SMB/445. This is especially great when you think of tools like PSEXEC module in Metasploit or the main other remote CMD tools available. Now you could use the autoroute or route add function in Metasploit but its nice to have a backup plan if you didn’t have Metasploit!
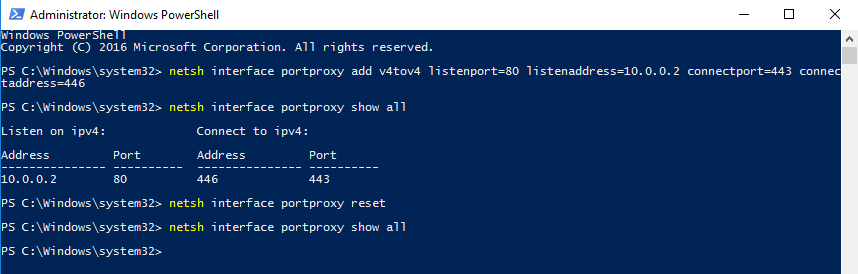
You can use the below to display your port forwarding rules:
netsh interface portproxy show all
Just remember to clear down your port forwarding rules when your finished with:
netsh interface portproxy reset
This all comes together like the below: (you can see here i have just used random ports just to give you an example how it looks).
Just a quick post on how to configure VLAN tagging in Kali Linux 2.0. If we have a trunk port presented to us, how do we utilise it?
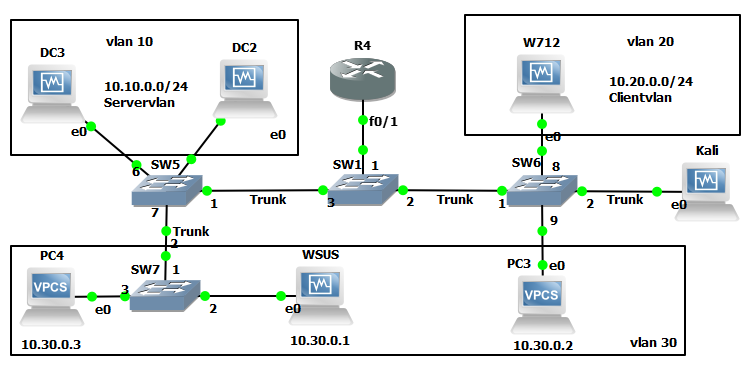
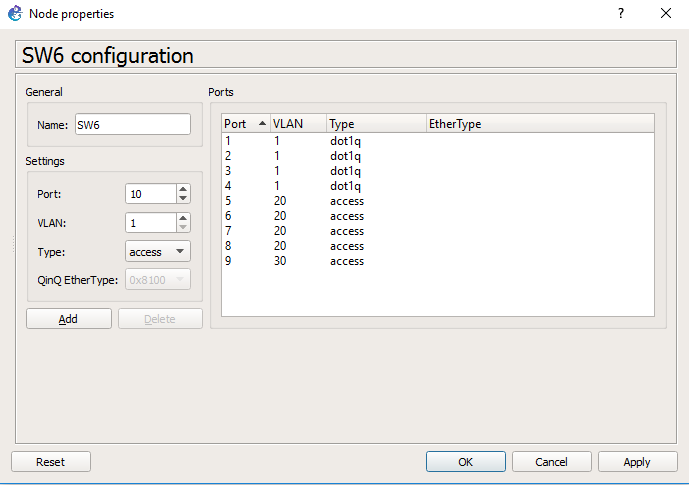
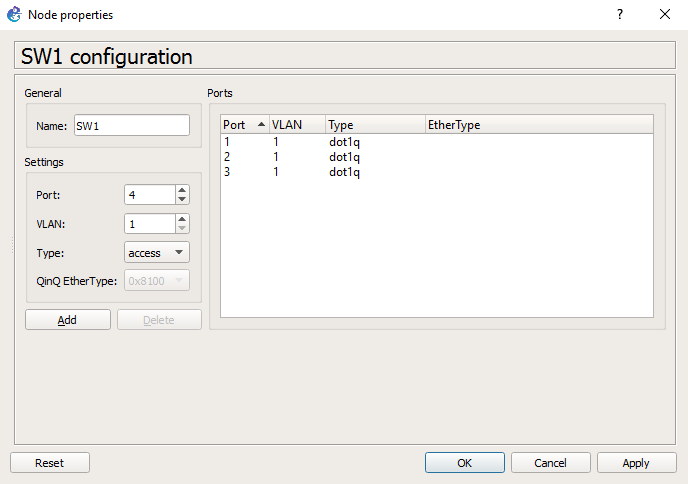
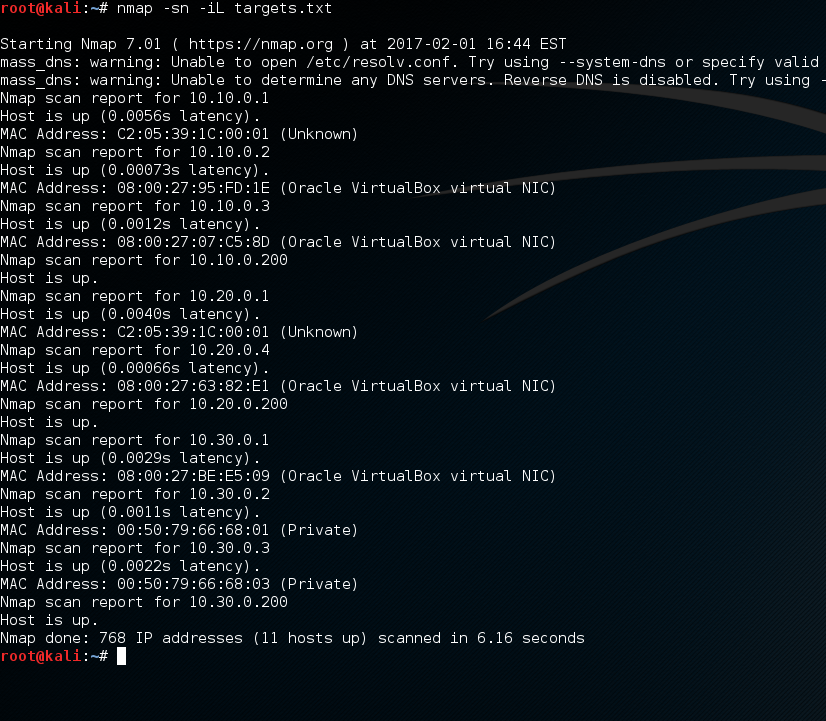
To setup vlan tagging in Kali Linux 2.0 is pretty straight forward, to set the scene and demonstrate this further we need a lab. The below lab is our ‘test.local’ environment set up in GNS3. There are 3 vlans, 10 20 and 30. 10 and 20 are routable, vlan 30 is isolated from 10 and 20. In the lab we have a ‘router on stick’ configured at R4, fa0/1 is sub interfaced with vlans 10 and 20. utilising DHCP, vlan 10 for servers and vlan 20 for clients. All devices in vlan 30 are statically assigned IP addresses and not routable to the 10 and 20 vlan networks. In all switches there are a variety of 802.1q trunked and access ports.
The idea of the lab is that vlan 30 can’t talk to vlan 10 or 20. However as a trunked port is presented to the Kali vm, it will be able to communicate to all vlans.
This is how it looks:
Lets look at how we would configure Kali to test all hosts in the different vlans, first via CLI and then via GUI in Network Manager:
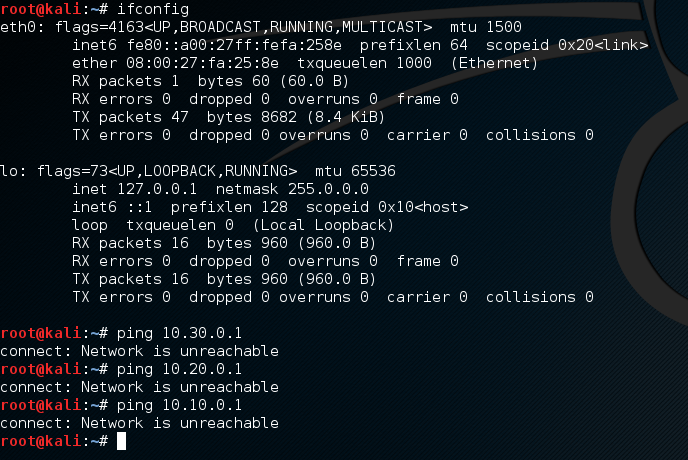
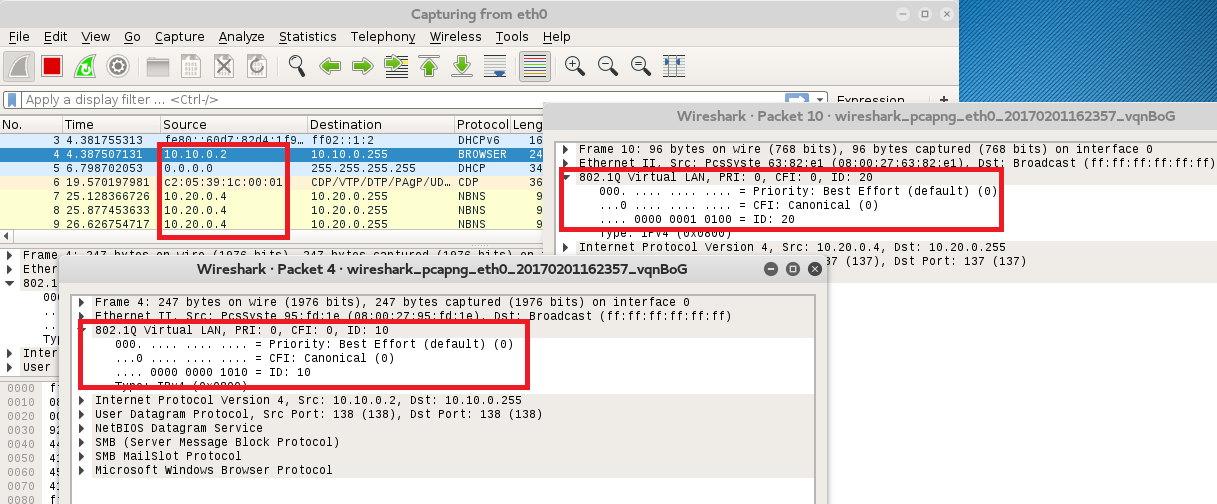
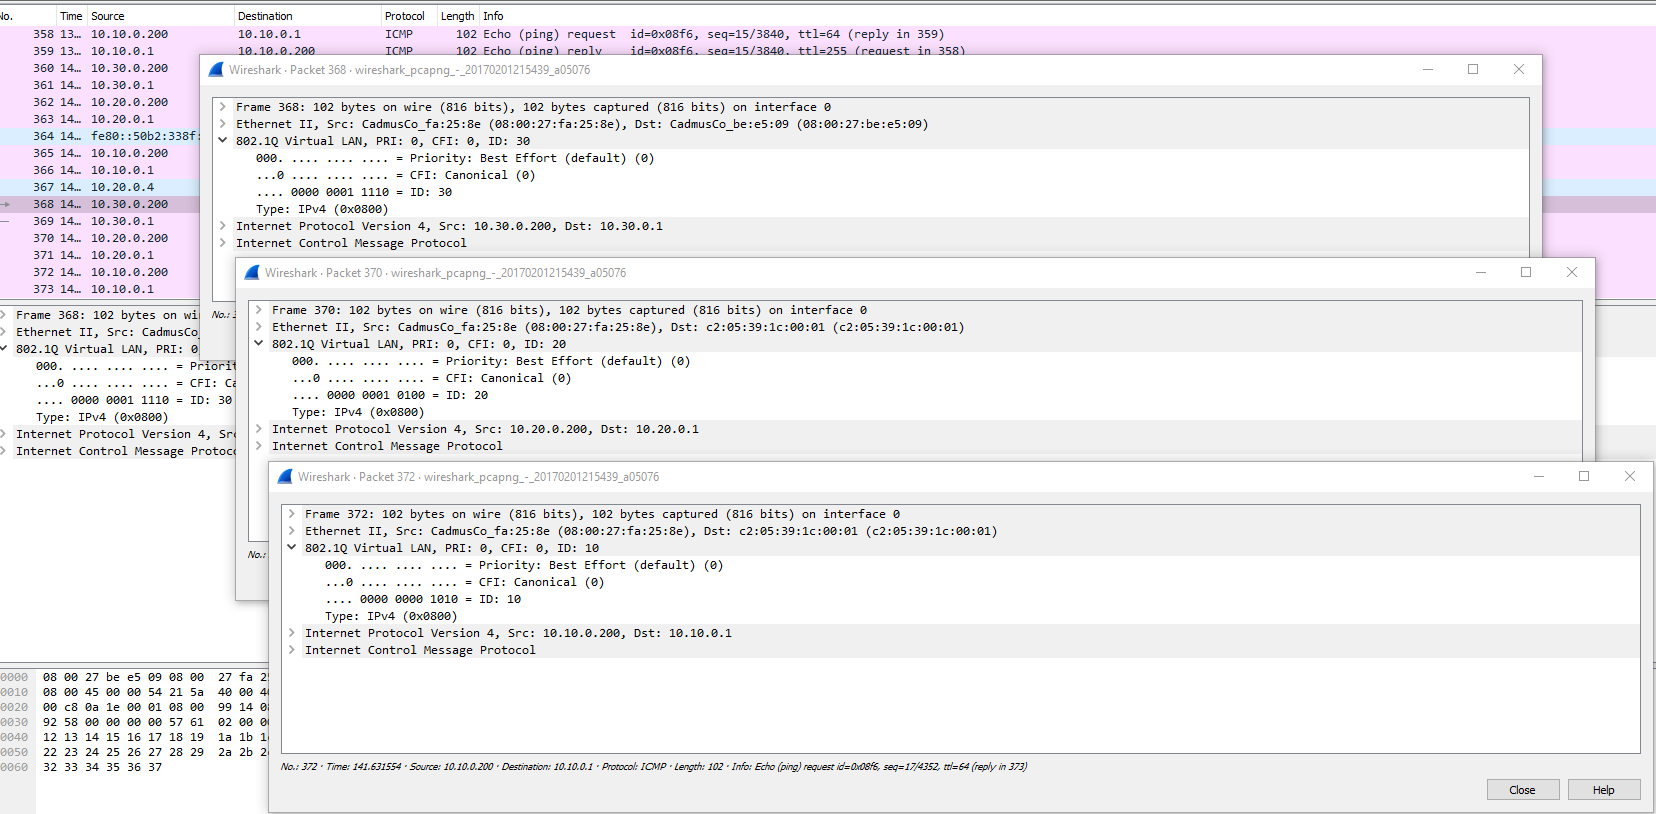
As you can see with the current trunk connection we can’t access any of the networks, however a quick Wireshark does reveal we can see traffic and the different vlans…
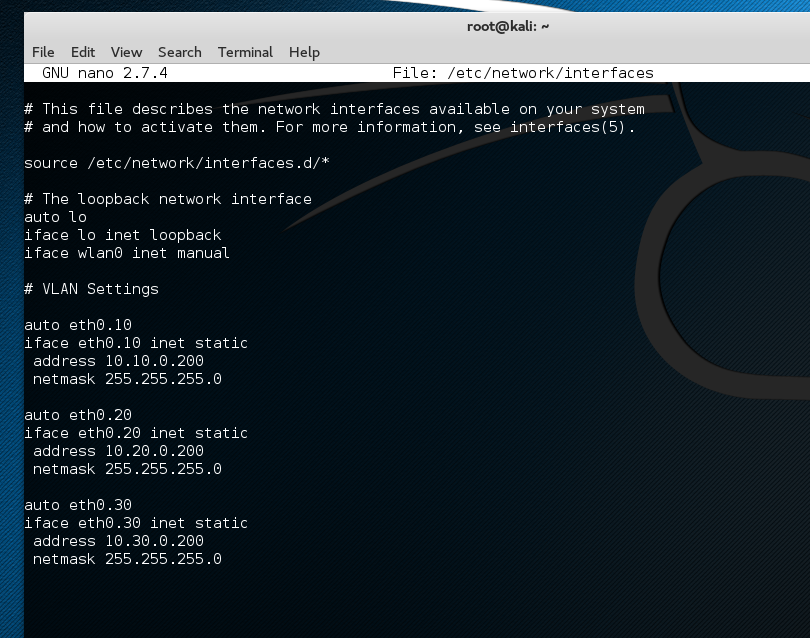
First lets open up ‘/etc/network/interfaces’ in nano and add our interfaces. The idea is very similar to a cisco router we are essentially sub interfacing our network connection in the interfaces file:
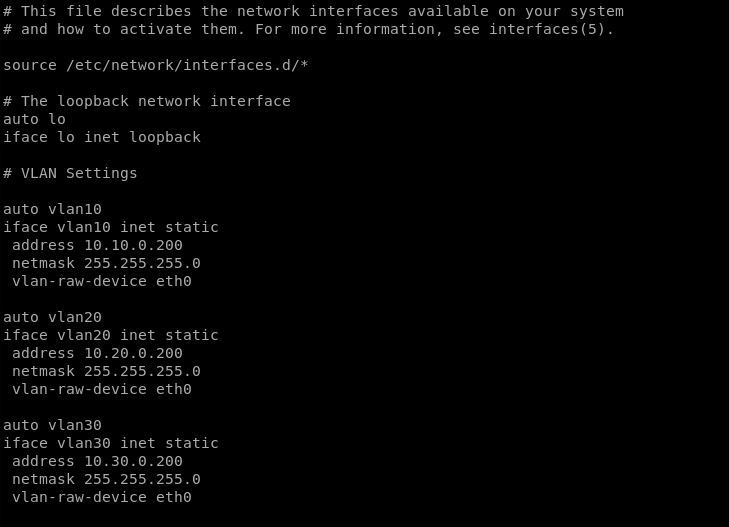
An alternative configuration for the interfaces file which I have used as well is the following, both work just as well:
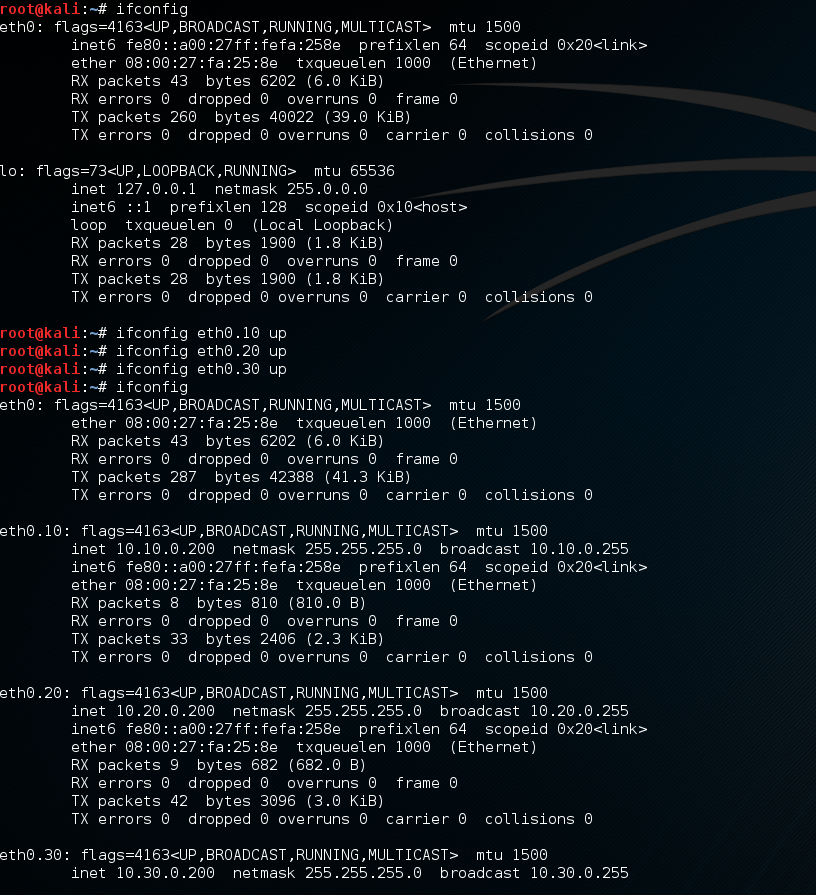
Save our file restart the networking service and then simply bring up the sub-interfaces with ‘ifconfig XXX up’ where XXX is our subinterface so:
‘ifconfig vlan10 up’ or ‘ifconfig eth0.10 up’ as below:
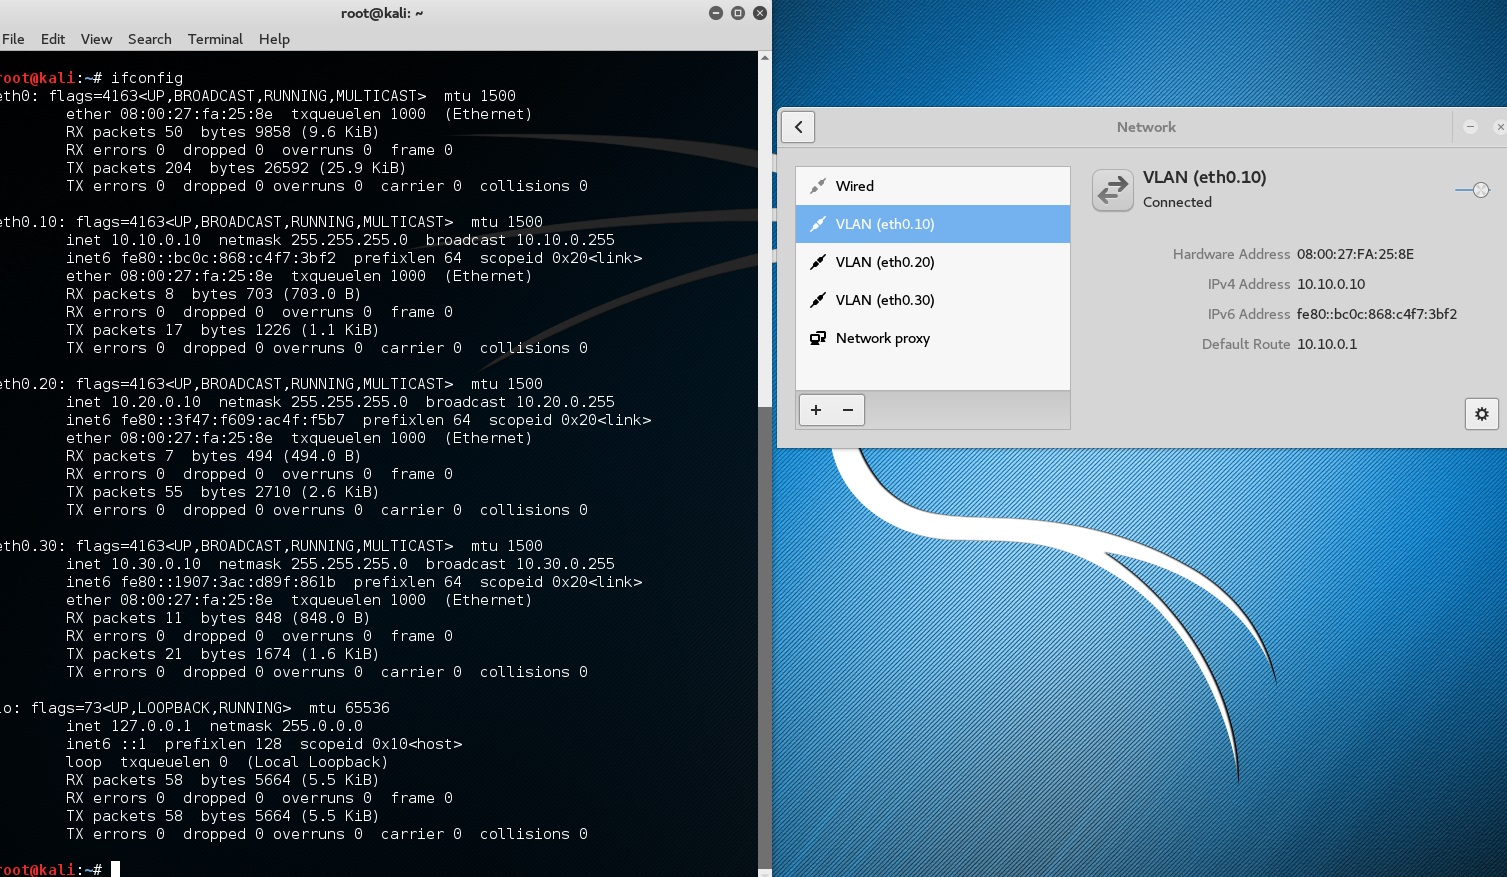
We can now access all of our vlans in question.
Further to this, if we set off a ping to each network and Wireshark the trunk connection we can see our tagged packets. Hooray.
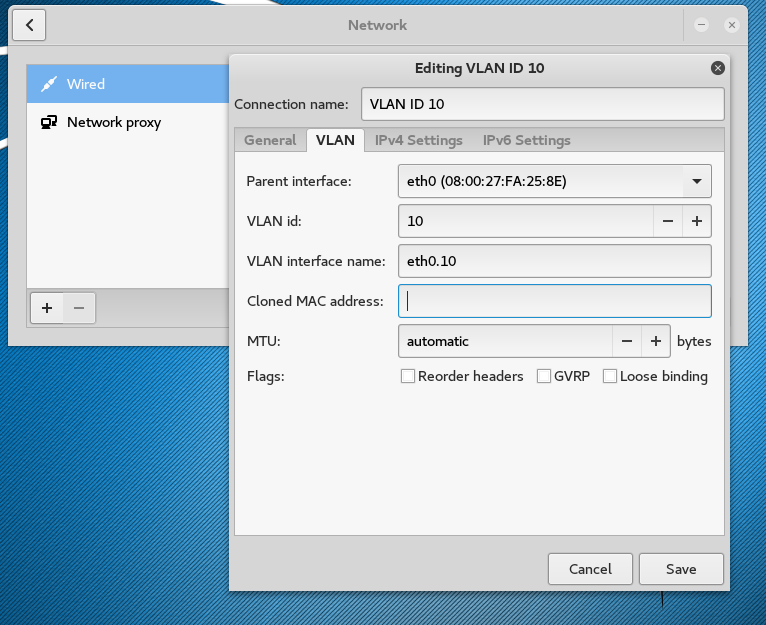
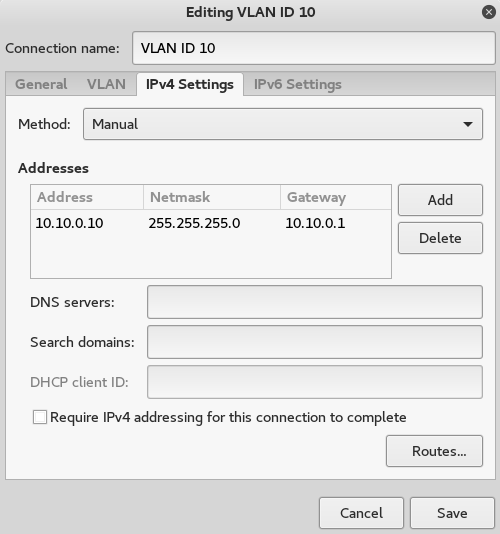
The Gui is even easier, lets configure it via the Network Manager. We will do this via opening up our network connections/Network Manager, simple click on the ‘+’ sign, select ‘VLAN’ fill in the details on the vlan tab as well as the ‘IPv4Settings’ tab:
The Exploit-db.com needs no introduction. Most penetration testers will be well versed in the use of Exploit-db and its uses. However for new-comers, this is an excellent and ‘the go to’ resource when looking for exploits and exploit code for use in test labs on vulnerable systems. It goes without saying though when looking through code that is published on the internet the following precautions should be taken;
Review the code. Understand what the code is doing.
Modify the code if needed to suit your situation, especially any shellcode snippets.
Understand what lanuguage the code is written in.
Don’t run code from the internet without knowing what the code is going to do. You don’t want to create a reverse shell back to a C&C server do you.
Always test code in a lab, isolated from the internet and production systems.
Understand that some code such as C++ and C for example will most likely need compiling and need dependancies.
Exploit-db.com
Searching Exploit-db.com
There are several ways to search the Exploit-db such as:
Via the exploit-db site: https://www.exploit-db.com/ however when searching for exploits you will have to use their captcher form in order to proceed with a search.
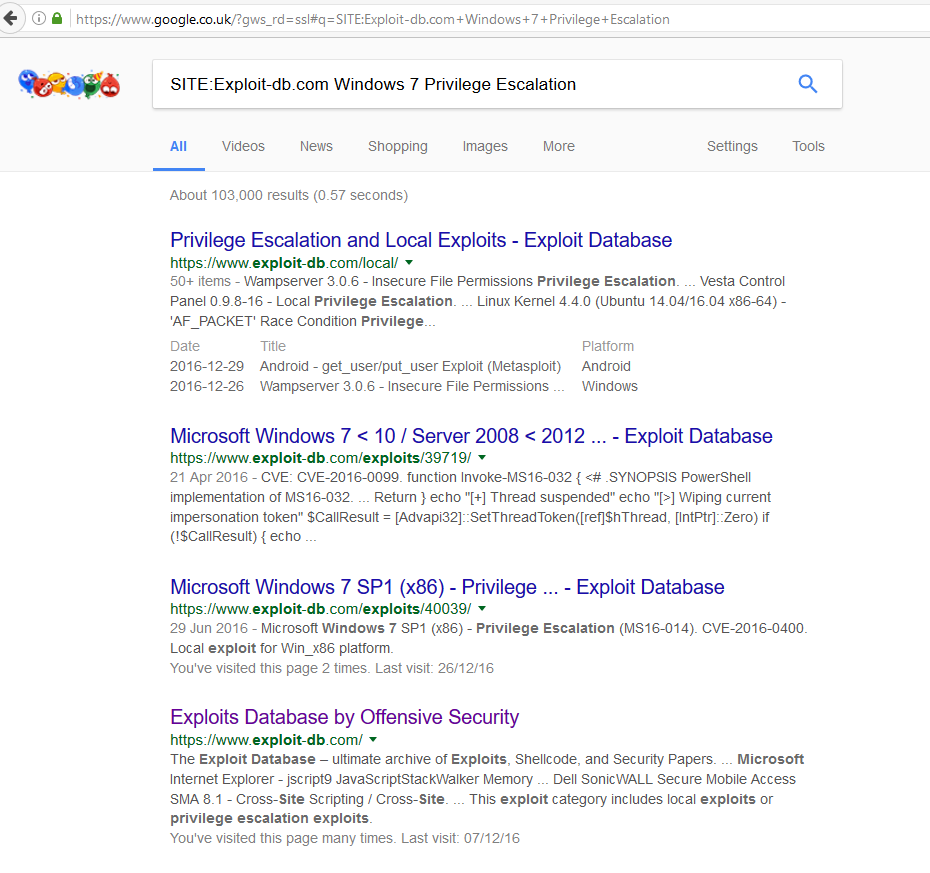
Via Google search engine using the syntax: ‘SITE:Exploit-db.com Windows Privilege Escalation’
Google search of the Exploit-DB
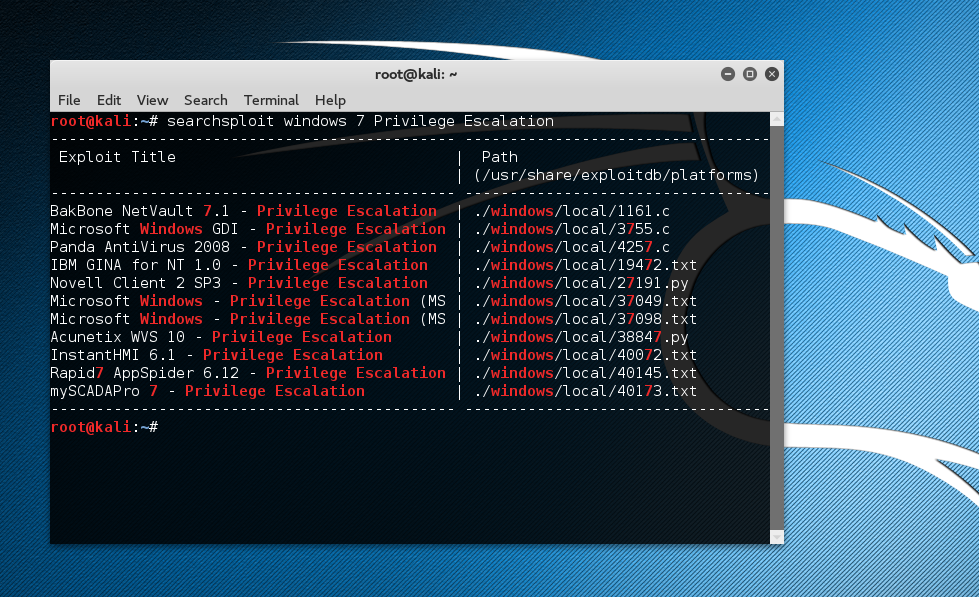
Using searchsploit built into Kali Linux like below, this has the added benefit that the databse is offline:
root@kali:~# searchsploit windows 7 Privilege Escalation
In this post we will be using Python to generate all hex characters for use with Buffer Overflows when writing exploit code. I came across a requirement whilst writing some exploit code to generate all hex characters available. The reason for this was to find all bad characters in a piece of shell code. This was needed as to not mangle the code when it is loaded into memory on the stack.
There are a few other tools built into Kali that can do this however the following python code will do the trick for us nicely, listing all hex characters :
#!/usr/bin/python
import sys
for x in range(1,256):
        sys.stdout.write ("\\x" + '{:02x}'.format(x))
All we need to do is run the python code and hey presto we have the hex characters ready to send to out application. You can simply copy the above text. Open up your favourite text editor in Linux, I like to use Nano. Copy the text into Nano, save the file out as youfile.py. You will need to then modify the permissions of your new file and run the file with Python, python yourfile.py.
Of course if you don’t want a script to list all the hex characters you can always copy them from here: 🙂
Just a quick post regarding creating username lists.
Often during an engagement if you have discovered a service that is brute-force able such as smb then it would be advantageous to create a semi-valid username list. We can do this fairly easily with the harvester. Once we have this list we probably want to manipulate the forname and surname to create a valid username to suit our target. I came across this python script which quickly gives us the output we need. Full props to Harold Rodriguezsuperkojiman for his code: https://gist.github.com/superkojiman/11076951. I have found that just removing the various outputs that you don’t want works best if you know the target username combination, and if you don’t run with all options. I’ve found the password/username spraying technique with a single password works best and is the smart option to avoid account lockouts.
#!/usr/bin/env python
import sys

if __name__ == "__main__":
	if len(sys.argv) != 2:
		print "usage: %s names.txt" % (sys.argv[0])
		sys.exit(0)

	for line in open(sys.argv[1]):
		name = ''.join([c for c in line if  c == " " or  c.isalpha()])

		tokens = name.lower().split()
		fname = tokens[0]
		lname = tokens[-1]

		print fname + lname		# johndoe
		print lname + fname		# doejohn
		print fname + "." + lname	# john.doe
		print lname + "." + fname	# doe.john
		print lname + fname[0]		# doej
		print fname[0] + lname		# jdoe
		print lname[0] + fname		# djoe
		print fname[0] + "." + lname	# j.doe
		print lname[0] + "." + fname	# d.john
		print fname			# john
                print lname                     # joe
In this post I’m going to be talking about LLMNR and NBT-NS. That’s Link Local Multicast Name Resolution (LLMNR) and Netbios Name Service (NBT-NS). They are backup name resolution processes that take place by default in windows networking to help your PC resolve names it requests. However are they really helping you or actually causing you more harm! I’l talk about why its bad, and why we should look to disable it.
Ok so what is LLMNR and NBT-NS, whats it all about?
Link Local Multicast Name Resolution (LLMNR) and Netbios Name Service (NBT-NS) are processes that take place by default in windows networking to help your PC resolve names it requests. When you PC needs to resolve the name or a server for example to an IP address it firstly uses the DNS server it has been assigned. If the DNS Server doesn’t have the record you requested, your PC will use LLMNR and then NBT-NS. With LLMNR your PC will broadcast across the local subnet and ask other machines if they have a record for the name you are trying to resolve. If no-one answers, your PC will then try NBT-NS in the same manner.
Lets see it in action, in the below wireshark we can see 10.0.2.2 (Windows 7 domain joined machine) querying 10.0.2.10 ( Windows Active Directory DNS Server) for the record of DC2. DC2 doesn’t exist, and as we can see the DNS server responds ‘No such name..’. The PC then proceeds to use LLMNR and broadcasts across the subnet. No response is given. The PC then tries NBT-NS and again broadcasts across the subnet, no response is given. No response is given as no-one on the subnet has that record, I just made it up to demonstrate LLMNR and NBT-NS.
Ok so why is this bad, surely its a good thing right..?
Well yes and no, more no these days. Ordinary and back some 10 years ago LLMNR and NBT-NS were used in helping resolve names. If the DNS Server was unavailable local hosts on the same subnet would help resolve names. However lets face it if your PC can’t use DNS its pretty much not going to be doing alot in terms of network connectivity and services. LLMNR and NBT-NS are just not needed anymore (usually). Attackers can take advantage of the LLMNR and NBT-NS broadcasts by replying to them with poisoned responses. The poisoned response can essentially trick the PC into thinking that it knows where the resource is. The PC then attampts to setup an SMB challenge response, in doing so sends its credentials along to the attackers machine. An attacker is able to capture the username and LM, NTLMv1 or NTLMv2 hash of the user making the request. This can then be subject to an offline brute force attack using several different programs such as John the Ripper or OCLhashcat. Or be reused in a PassTheHash or SMB relay attack.
Lets see it in action from wireshark.
We can see our usual DNS request, then an LLMNR broadcast goes out, as the DNS server has no record. Our attacker on 10.0.2.3 (a kali linux machine using Responder) sends a response back to our PC ‘Standard query response, DC3 is at 10.0.2.3’ this is actually the attackers machine fooling the PC. NBT-NS request hasn’t gone out at this stage as a response is received to the LLMNR. The PC is fooled into thinking the resource is at 10.0.2.3 and starts to negotiate an SMB session, passing along its credentials to the attackers machine.
What can we do to fix it?
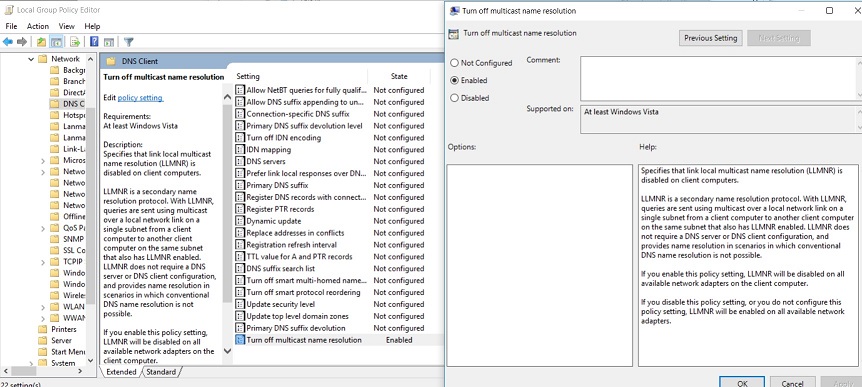
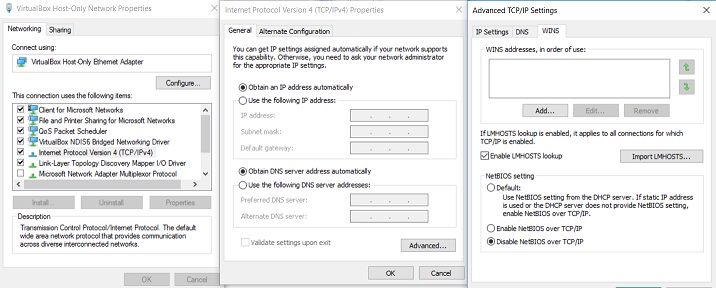
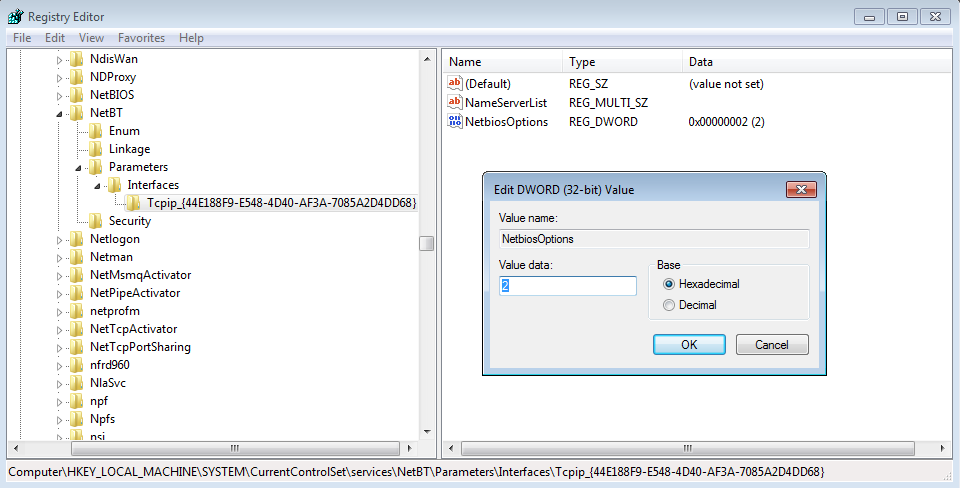
LLMNR and NBT-NS are old methods for name resolution. You may have legacy applications in your environment that may potentially still use LLMNR and NBT-NS for broadcast name resolution. Due to this thorough testing should be carried out first. If this is the case get onto the vendor for some answers as to why! Otherwise we can disable both via GPO and DHCP options. For LLMNR there is native GPO setting. For NBT-NS there is no native setting however it can be set in the registry. The registry key references an interface name which has its own unique GUID so can’t be changed in GPO via a registry key change (as the key will be different every time), however we can use powershell and do a ‘catch all’ on that key and thus script and then run via GPO. I’ll demonstrate below.
You can disable LLMNR via Group Policy in your domain or locally, go to:
The process for disabling both are in the below video:
It obviously goes without saying the appropriate testing, change control and usual roll out procedures should apply especially with a change like this.
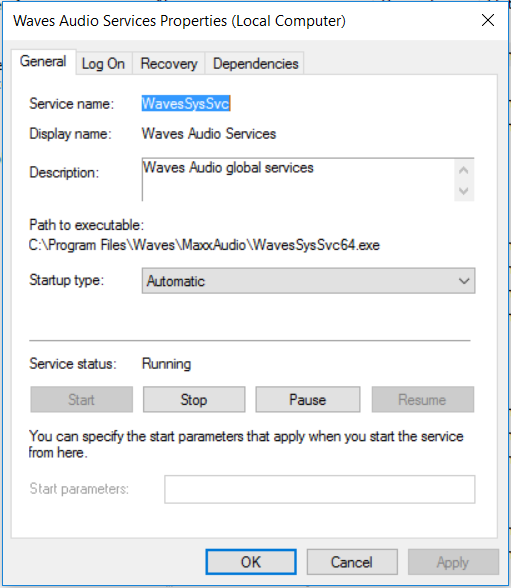
This is just a short write up on unquoted service paths, what they are, why they are bad and how we can fix them. A vulnerabilty scanner will often find these on an ‘Authenticated’ type of scan. However we can search for them via WMI (Windows Managment Interface) query or by manually looking through the services one by one. So what is an unquoted service path? It is the path/file location of the service-exe for a given service that isn’t wrapped in quotes, like in the picture.
OK, so what? Why are these bad?
The problem with unquoted service paths is that as windows starts up or as the service is started Windows needs to locate the service-exe for that service. (I keep saying ‘service-exe’, well we’ll come on to that in a sec!). It looks for the service-exe in the path specified in the ‘Path to executable:’ field of the service. If the path is quoted and contains white space in the path windows knows to go directly to the location. If the path is unquoted and contains white space, Windows will essentially query the different locations in the path until the service-exe is found.
Where the service path contains white space and is unquoted, an attacker can use this to escalate privileges from a standard user account. For example if the service is running as SYSTEM, an attacker can create a service-exe to say create an account and drop it in the local administrators group. The attacker would also need to have ntfs permissions as the standard user in the location in the path so ‘C:\’ might not be viable however further down the path might be. The attacker then restarts the service and the new service-exe will be executed by the service running as SYSTEM.
The service-exe I keep refereing to is special type of executable file that is used by services, its not any old exe you can’t just drop cmd.exe in the path unfortunatly…
If I can’t do an Authenticated Vulnerability Scan how can I find them..?
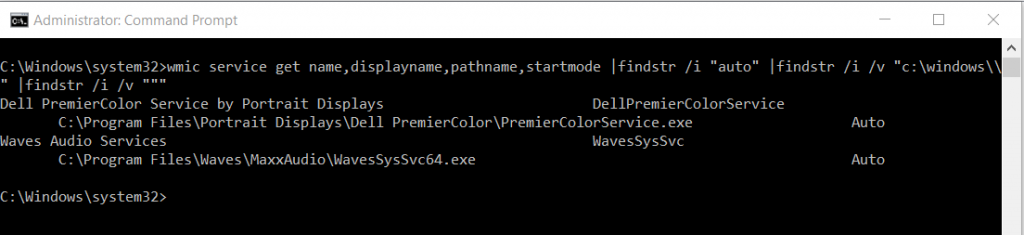
We can use two methods, we can either use WMI query or manually open up each service and check each one, then check the ntfs permissions of each location. We can use the follwoing WMI command from Common Exploits; this will filter out the automatic service and also look for unquoted service paths:
wmic service get name,displayname,pathname,startmode |findstr /i "auto" |findstr /i /v "c:\windows\\" |findstr /i /v """
Running the above wmi query will display something like the the following if present:
As we can see large mainstream manufactures still implment unquoted service paths!
I’ve found one, how do I fix it?
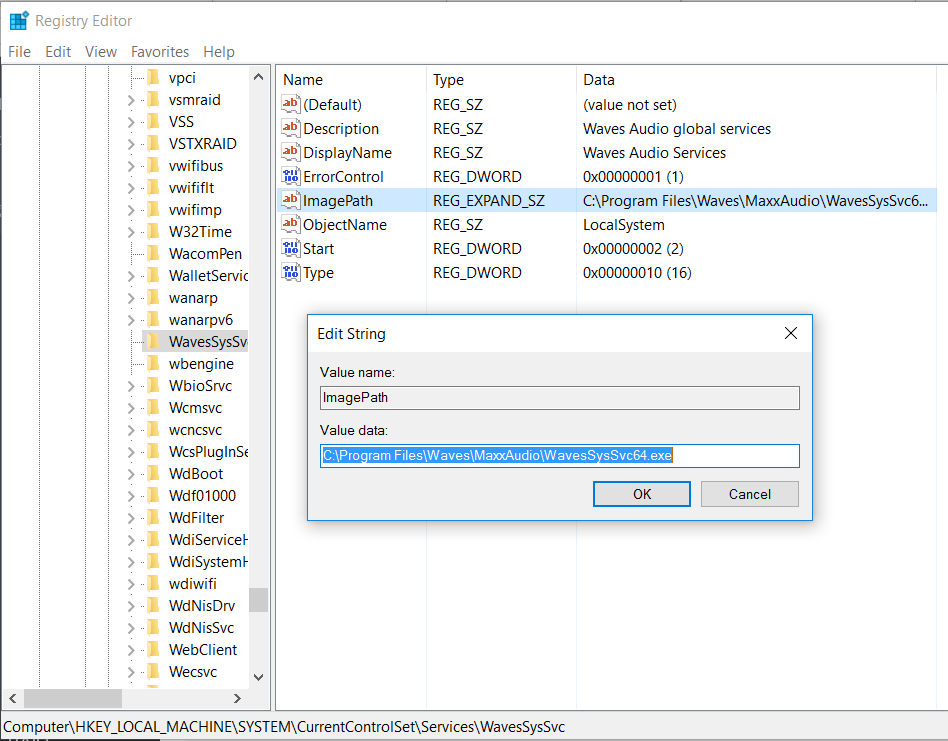
This is relatively straight forward however this should be tested before being rolled out into production (goes without saying). We need to add the quotes to our service path so windows know where to go for the service-exe directly immediatly, rather than searching each directory. We can do this through the registry.
Fire up the registry and navigate to the service as below:
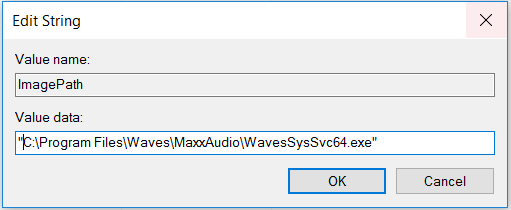
Open up the ImagePath string and simple add the quotes as below:
Restart the service and ensure the service starts properly. We can also open up the service and also re run the WMI query to ensure our affected service now has quotes. This will ensure any attackers should they manage to compromise the machine as a standard user, stop them being able to escalte privileges in this manner!
Hopefully this post will help you resolve the uquoted service path issue.
Check your Egress Filtering with a PowerShell port scan script
This is just a quick post so I can refer to myself more than anything regarding conducting a Powershell Port Scan! However this is a useful couple of lines to to conduct a port scan from a windows device with PowerShell. This can be used in a number of situations however is especially ideal to check your egress filtering out to a server on the internet or to a segmented network. In the below few lines we are testing the first 1000 ports this can be bumped up to 65535 if wanted and the server that you are port scanning is listed as X.X.X.X.
This particular script has been pulled from Black Hills Information Security page here. An alternative from Microsoft’s ‘Hey, Scripting Guy! Blog’ can be found here.
The Common Problem
Often organisations lack adequate egress filtering, by this I mean outbound connects that can be established on a number of ports from within the heart of the network. Client machines and typical internal application servers don’t need to access a range of services out on the Internet. Once a nasty exploit has got an attacker onto a network they will look to get a foothold within the network lateral move and phone home to command and control server. Having a range of ports open to clients and servers allows attackers to make an outbound connects from whole host of tools, including PowerShell for that matter.
The Solution
Check you egress filtering and lock down any unwanted open ports out to the internet, your perimeter firewalls should not allow these outbound connections. Obviously certain services are going to need to make outbound connections such as web proxy and email gateways and these rules should be appropriately provisioned. To take this one step further enable your outbound firewall rules on your local hosts, ‘hang on a sec, you must be crazy’ I hear you say, however by doing this you will be help prevent the lateral movement of attackers through your network as well as being able to get off your network back out to the Internet.
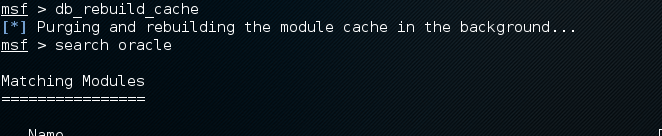
Just a quick reminder to myself and others of how to fix the Metasploit database cache not built issue. When we use Metasploit the search is super slow and returns the ‘slow search warning’ This where you find either the database isn’t connected or when you try to search for a vulnerability the return is ‘[!] Module database cache not built yet, using slow search’ due to the database not being connected like below: This doesn’t seem to be a huge issue and the search still works however its a fairly easy fix and makes the searching significantly quicker. I’ve posted this as I’m usually finding myself having forgotten the syntax to fix it after rebuilding a kali vm, and searching around various other posts on the internet for it, so here it is:
If we check the database in Metasploit with db_status we find the below error:
So to fix the issue:
Start the postgresql service and ensure it starts at startup:
Initialize the msf database with:
Load msfconsole and recheck the database you should find this is now connected:
Finally rebuild the db cache, give it a few minutes and you should find the search instantaneous :
OK so with a my new website up my first thought was ‘right lets secure it!’. Now if only more people thought this way surely we wouldn’t see half the info sec issues we see today. So I’m probably slightly biased on the subject being a Pentester. Not sure if biased or paranoid is better word.
I’m supposed to be on holiday in wales for the bank holiday however 8 hours into the site build and can’t help but think, security. A few tasks later and I navigate to Qualys, lets see where we currently stand, 10 minuets later and I’m building a Kali 2.0 virtual machine in Virtual Box on my laptop in the hopes of pentesting it over 3G!
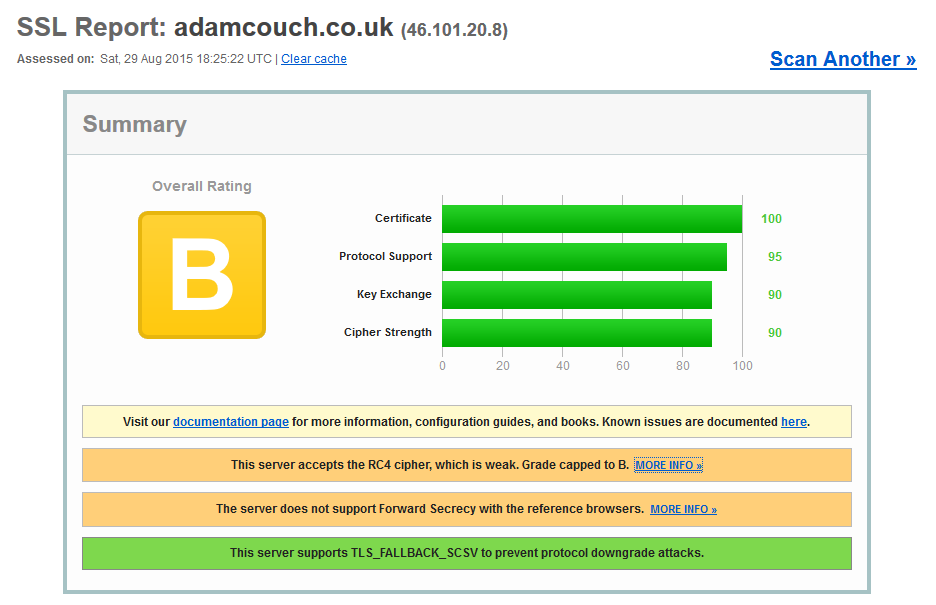
So a Grade B on ssllabs.com . A little work needed I think.
Qualys.com is a great resource for scanning URL’s to see what SSL/TLS cipher suites are in use. Check it out!
Disabling SSL v2, v3 and also RC4 in Apache2.
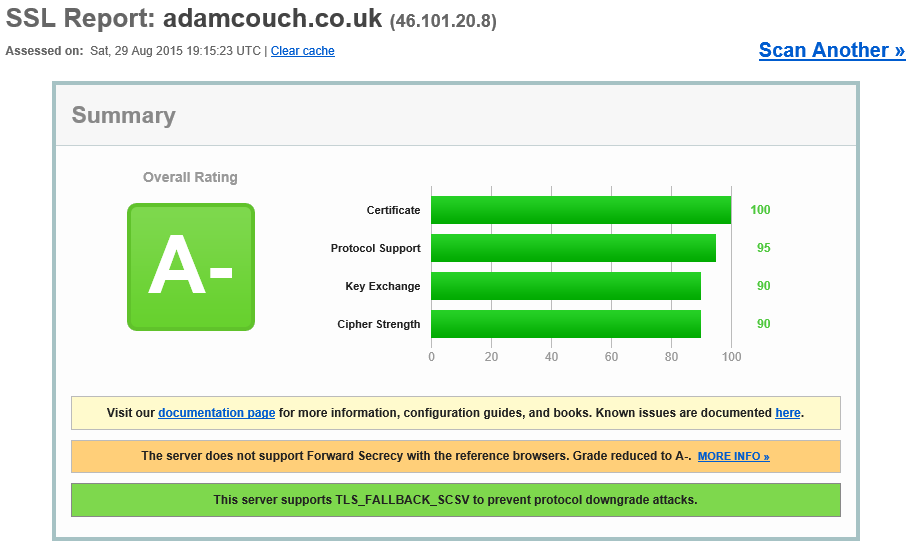
By the time I had finished typing this post I was up to a A- having disabled RC4 in the SSL.conf file in mods-enabled folder be appending the ‘SSLCipherSuite’ with :!RC4. Disabling SSL v2 and v3 is also a simple step by appending the ‘SSLProtocol’ line with ‘-SSLv3 -SSLv2’ in the same file.
This is very much only a small step towards securing a site, although a good start!


 In this post we will be using Python to generate all hex characters for use with Buffer Overflows when writing exploit code. I came across a requirement whilst writing some exploit code to generate all hex characters available. The reason for this was to find all bad characters in a piece of shell code. This was needed as to not mangle the code when it is loaded into memory on the stack.