Active Directory Delegation of Control

No you don’t all need ‘Domain Admin’ rights, that includes you Mr IT Manager!

Users in the IT Helpdesk don’t all need ‘Domain Admin’ rights to perform daily tasks like password resets, user group changes and logging into users workstations for fixes. In addition to this they should also elevate rights and authenticate with another account in order to perform Active Directory (AD) administrative tasks, I wrote about this here. We can delegate special permissions to a security group in order for that group of members to be able to reset passwords and perform other AD related tasks. We can delegate this level of control on specific Organisation Units (OU), so for example all users under that OU can be managed by different levels of IT Support and there corresponding AD security group, i.e. a group for 1st line IT Support called ‘IT Helpdesk ‘, ‘2nd line IT support’ and ‘3rd line IT support’ and so on, so we can have different levels of control. This means we give the permission to a group and in turn members of that group can perform special functions on the users that reside in that particular OU. Thankfully Microsoft have thought about this and there is a fairly straightforward way of achieving it by setting a set of stock permissions on the OU. To do this we can use the ‘Delegation of Control’ wizard in AD Users and Computers.

Delegation of Control Wizard

Ideally we want to split out our standard domain user accounts for standard non privilege duties like reading email and using Microsoft Word, then have a separate admin accounts ie ‘Adam-adm’ or ‘Adamadmin’ for the administrative privileges. These admin accounts can then be used to rdp directly to a separate management server which has the various tools installed. Tools like the Remote Server Administration tool set which has Active Directory Users and computers, DHCP and DNS etc.

Don’t use security groups you already have in your environment, create new groups. This might seem like it adds an extra complexity and more groups. However, if you botch your permissions on a group you are using for another function its not going to end well. If you later need to reverse changes or delete the group you can without fear of affecting other functionality.

Create a group for the help desk ie ‘IT Helpdesk’ for 1 st line staff. This should be used for password resets and group modifications etc.

Create a group for 2nd line support ie, ‘2nd line IT Support’. This should be used for all of the above including all other additional user account modification activities.

You may want to combine the first two groups into just one ‘IT Support’ group for smaller IT Teams. The point here really is to split out the duties so your helpdesk staff don’t have Domain Admin rights, and you’re not running elevated domain rights on your daily laptop/desktop, the principle of least privilege first should apply here. Only give the minimum required, no more.

Create a group for full Admins/3rd line support ie ‘3rd line IT Support’. This should effectively be used for all of the above tasks and any additional.

Keep the below points in mind when using the Delegation of Control wizard in Active Directory:

  • Always delegate permissions on a new AD group, not on one that is already in use.
  • Once applied to an OU there is no wizard to undo the changes. Changes will need to be manually undone.
  • You can re-run the delegation wizard again on the same OU to add additional permission, just not take away.
  • You can remove a newly added group from the security tab of an OU if needs be, (effectively reversing the changes).
  • Avoid setting permissions on individual user objects even if there is only one user, add the user to a group and make the changes on the group not the user. This is in case you need to revert changes. In addition to this you can always remove the user from the group.

Lets walk though an example.

As an example of how we can achieve this lets walk through the below lab. In this example we are going to delegate control in AD for password resets and user group changes for the ‘IT Helpdesk’ group, so that members of this group can carry out these tasks on domain users in the HR OU.

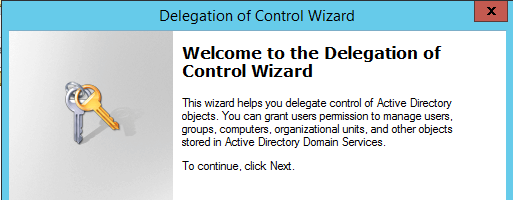
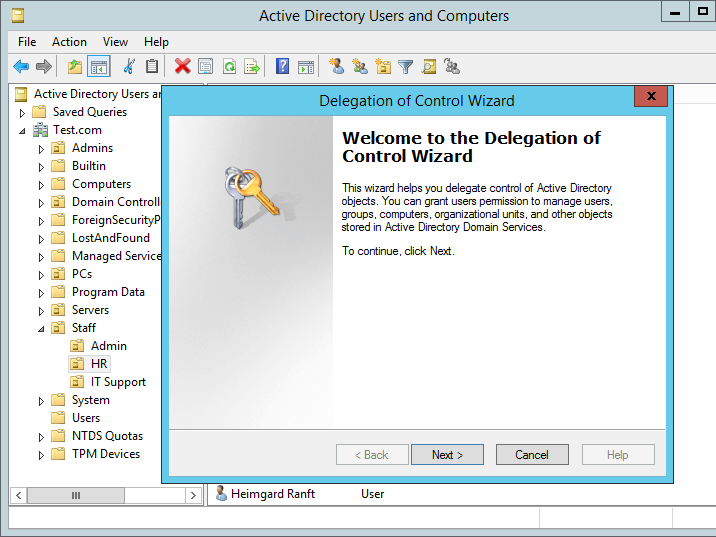
Right click on the HR OU and select the top option ‘Delegate Control…’ the wizard should pop up like below:

AD Delegation of Control Wizard

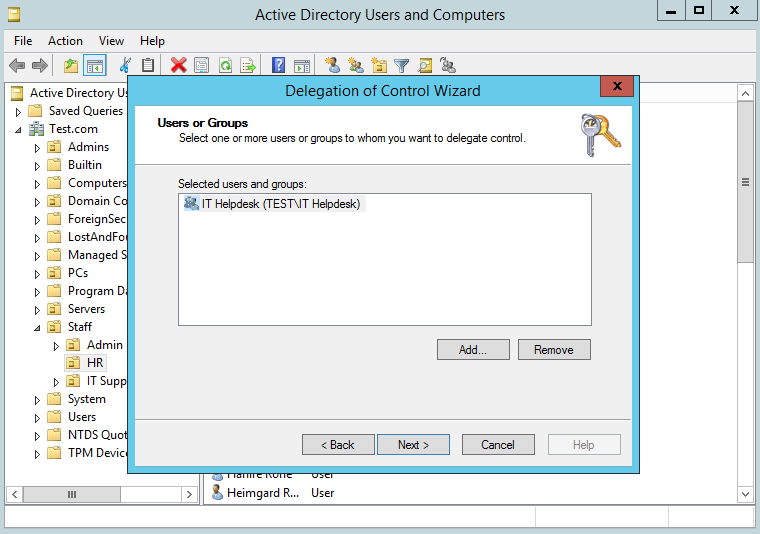
Select Next, and you will be prompted to add the group you want to grant the permissions too. In this case we will grant permissions to ‘IT Helpdesk’ as below:

AD Delegation of Control Wizard add group

Select Next. Now we will add the specific permissions that we want the ‘IT Helpdesk’ to have on users in the HR OU.

In this instance we are going to select the top five check boxes as these are a reasonable set of tasks that we would want our helpdesk staff to be able to perform. This obviously may be different from organisation to organisation depending on size and separation of duties. We will go with this as an example for now. Microsoft makes this very easy by grouping these tasks together in the form of the check boxes. We can go more granular than this if needs be,  however for now we will continue with the pre-defined options.

AD Delegation add permissions

Select Next, then Finish.

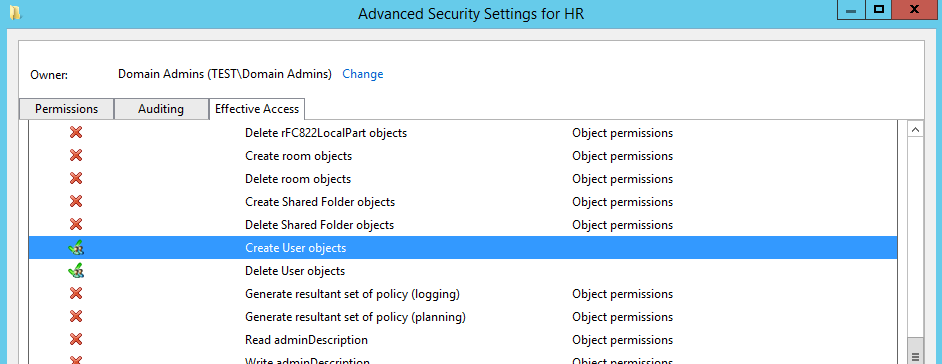
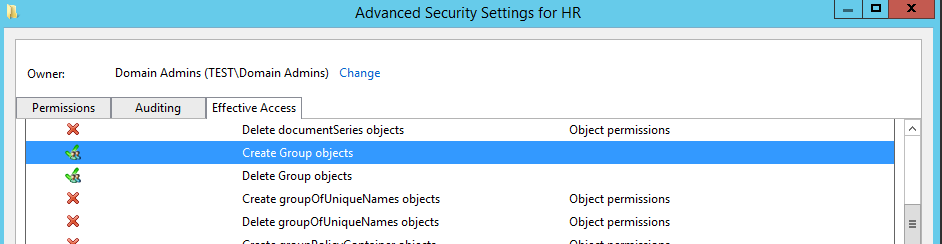
You can verify your permissions be selecting the OU right clicking on properties, selecting the ‘Security’ tab, the group in question should have ‘special permissions’, select advanced, your will then be able to view the permissions. The top four Access Control Entries (ACE) will have been added.

AD Delegation permissions

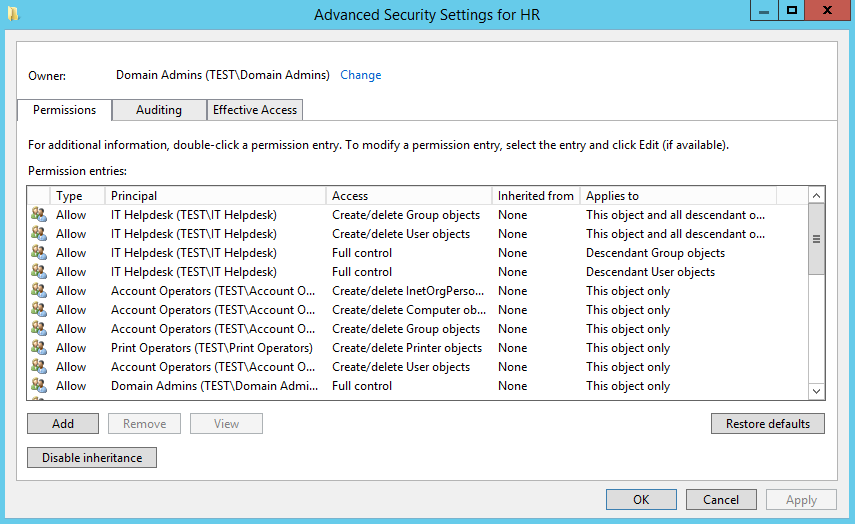
In addition to this, select the ‘Effective Access’ tab, add the group and verify that the four permissions Create/delete Group objects and Create/delete User objects have a green tick next to them. (they are spread out, so scroll down)

AD Delegation permissions

AD Delegation permissions

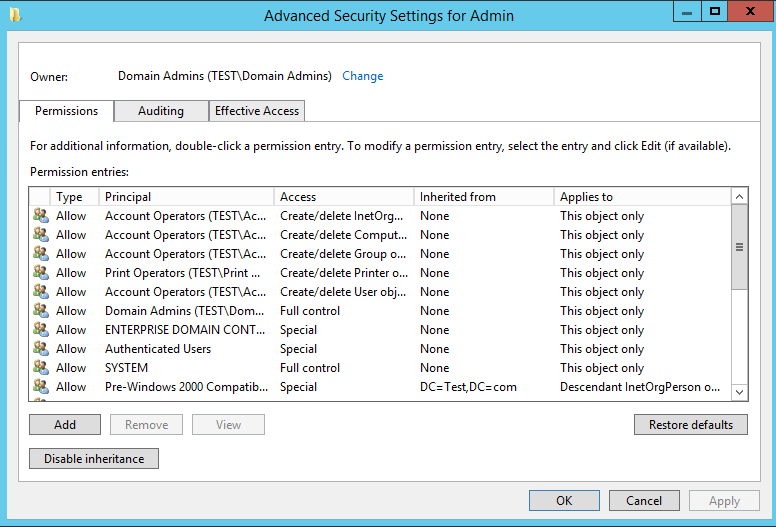
As opposed to an alternative OU such as our ‘Admin’ OU which doesn’t have any delegation on it. The default permissions are as below:

AD Delegation permissions

AD Delegation permissions


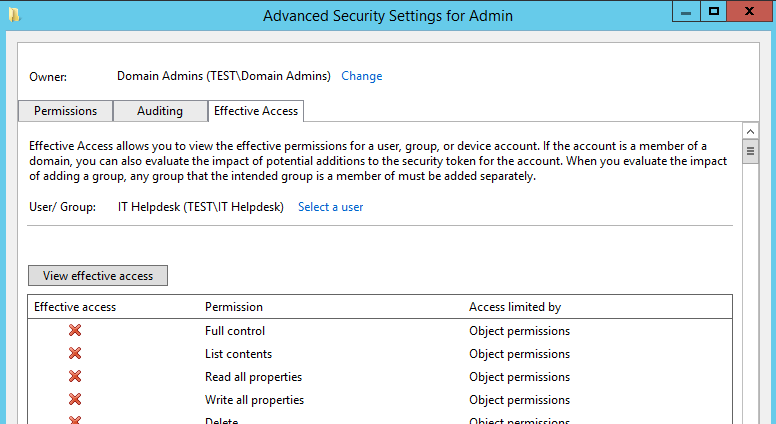
The next thing to do is test the effective permissions to ensure the new ‘adm’ users of the ‘IT Helpdesk’ group can for example change a password of a user under the HR OU. It also worth testing this on a user account that isn’t in that OU so you can see the difference and error message that you will receive if you don’t have permission.

Et voila. I hope this helps. Remember test test test.

Stopping mimikatz from dumping clear text credentials.

This post aims to demystify what can be done to restrict mimikatz from running successfully in Windows. Specifically how we can mitigate clear text credentials being dumped out of memory. My aim is to demonstrate what can be done to the operating system configuration to help reduce this from happening. In a follow up post perhaps we will look into how we might be able to identify if this has or is happening to a machine on the network.

Once a user logs on to a windows system the credentials are stored in the Local Security Authority Subsystem Service (LSASS). Once creds are cached, from here, with various tools, not just mimikatz, credentials in the form of clear text and hashed passwords can be extracted.

Mimikatz for a pen tester is a really great tool, like wise also unfortunately for hackers. Created by Benjamin Delphy ‘gentilkiwi’ allows one to dump clear text credentials out of memory. It can do all sorts of other pretty cool things like perform pass-the-hash, pass-the-ticket or build Golden tickets, among others. Some of which I may walk through in the future.

Mimikatz can be executed from different sources. Either directly from an executable and also from powershell. The later being the more desirable as no files are ever touching the hard disk drive. A typical screen shot of successful dumping would look like this, this is what we are trying to avoid:

Here you can see the local account ‘Adam’ and the clear text password being displayed. This is clearly bad news for organizations, and an IT teams worst nightmare. An adversary would have to initially compromise a workstation or server and gain admin or SYSTEM level privileges. This might be through a classic remote code execution vulnerability like MS08-069. Or through some other weakness in the software, or mis-configuration in the operating system. An attacker from here on would move laterally from system to system dumping creds. Ultimately with the aim of snagging a Domain Admin, or capturing that key piece of business data.

This post isn’t necessarily concerned with showing you how to use mimikatz, rather it’s, to better inform IT teams how they can prevent clear text credentials being dumped. Any tester worth their weight will already know how to use it.

I’m going to test by running  mimikatz natively on a couple of Windows operating systems in my test environment, make changes to the system then re-run.

I’ll run through executing Mimikatz and the preventative measures we can use to stop the software interacting with LSASS and dumping creds. Lets start with Windows Server 2012 R2.

Windows Server 2012 R2

When we run Mimikatz on a fully up to date system we get the following results:

Restricting Mimikatz

Note where the ‘Password’ field is for wdigest and kerberos , this would normally reveal the clear text password however in this case a ‘(null)’ value is displayed. This is default behavior in Windows Server 2012 R2 and Windows 8.1 and above, sadly for older operating systems such as Windows 7 the credentials are in displayed here in clear text. The NTLM hashes are still present here which still isn’t great and so can potentially be used in ‘pass the hash’ type attacks (PTH on the rid 500 account) or cracked offline using large password lists. Lets see what we can do to harden our systems further.

With Windows Server 2012 R2 and 8.1 there is a new feature called LSA (Local Security Authority) Protection according to the following Microsoft page we are able to run LSASS as a protected process. This essentially prevents mimikatz from working correctly out of the box. Although with some tweaking you can get mimikatz to run however a driver would need to added into the mix for it to work properly. The following registry change can be made at HKEY_LOCAL_MACHINE\SYSTEM\CurrentControlSet\Control\Lsa adding a new DWORD entry of “RunAsPPL”  with a value of 1. This does require a reboot however. Lets see this in action on the same Windows Server 2012 R2 Server. First the registry key:

Restricting Mimikatz WDigest

Lets reboot, and now lets see what happens when Mimikatz is executed:

Restricting mimikatz WDigest

Thats more like it! Now we are getting somewhere. This is only going to slow attackers down. It is however also going to generate noise on the network when the attacker reboots the server.

Windows 7 Professional

A patch was released by Microsoft which allowed you to control the clear text credentials from the wdigest for earlier systems. This same functionality can be utilized by tweaking the registry for earlier versions of Windows. This is available for Windows 7,8,2008 and is kb2871997. Once this patch is installed it allows you control how WDigest credentials are stored in memory. According to the following Microsoft Security Advisor;  to prevent WDigest credentials from being stored in memory. A reg key can be set via Group policy and thus applied to your estate. The registry key is new DWord with the name UseLogonCredential under the following subkey:

HKEY_LOCAL_MACHINE\System\CurrentControlSet\Control\SecurityProviders\WDigest

If the UseLogonCredential value is set to 0, WDigest will not store credentials in memory.

If the UseLogonCredential value is set to 1, WDigest will store credentials in memory.

Lets see how this works in Windows 7, first we will run Mimikatz to verify default behavior then we will add the WDigest registry key, reboot, test, then add the RunAsPPL registry key, reboot one last time and test again, lets do this!:

As with the standard behavior below we get clear text creds and hashes:

Restricting Mimikatz WDigest

Now lets add the HKEY_LOCAL_MACHINE\System\CurrentControlSet\Control\SecurityProviders\WDigest\ UseLogonCredential and set it 0:

Restricting Mimikatz WDigest

Lets reboot, and retry Mimikatz.

As we can see the password fields no longer contain our clear text password, and have the (null) value instead. This is a significantly better position to be in, this still does however, reveal the NTLM hash which is still not ideal.  Unfortunately the RunAsPPL registry key, cannot be utilized in Windows 7.

Windows Server 2008 R2

Lets try the same with Windows Server 2008 R2. When we run mimikatz natively this is the result:

As we can see the local administrators account password for the wdigest field is in displayed in clear text. Now lets see if we can apply the same  HKEY_LOCAL_MACHINE\System\CurrentControlSet\Control\SecurityProviders\WDigest\ UseLogonCredential registry key and at least mitigate the clear text password. First the registry key then a reboot.

After a reboot we rerun mimikatz and as we can see from the below screenshot we have successfully mitigated from the at least the clear text password being displayed, although the hash is still available:

However… this wouldn’t stop an attacker from changing the reg key back logging off and waiting for credentials to be cached.

Conclusion:

So far we have tested using mimikatz natively from the windows server 2012 R2 and successfully stopped mimikatz from executing the same should apply here for Windows 8.1 and above, however you should carry out your own due diligence and try this out to satisfy yourself. Windows 7 and Windows Server 2008 are slightly different and we can only go so far in stopping or slowing down this type of attack, to not displaying the clear text password only the hash.

Unfortunately with different versions of Windows there are different fixes and varying degrees of success in reducing the impact of mimikatz being run on a system.

As you will agree though this is significantly better than allowing the default configuration to remain. I hope this helps slow down your adversaries!


Pivoting with netsh in Windows – post exploitation goodness!

Move across a network by pivoting with netsh in windows!

Just a quick post to demonstrating pivoting with netsh in Windows. More specifically port forwarding with netsh in Windows (Windows 7 and above). This really is great as your not having to upload any tools to the target system. It is limited in its functionality however, is a great option for say a single port such as 445 or 3389.

netsh interface portproxy add v4tov4 listenport=<LPORT> listenaddress=0.0.0.0 connectport=<RPORT> connectaddress=<RHOST>

Now if you don’t have interactive logon rights but you have a PSEXEC, PTH or even a meterpreter session you can add a port forward on you target system and pivot to your next target with SMB/445. This is especially great when you think of tools like PSEXEC module in Metasploit or the main other remote CMD tools available. Now you could use the autoroute or route add function in Metasploit but its nice to have a backup plan if you didn’t have Metasploit!

You can use the below to display your port forwarding rules:

netsh interface portproxy show all

Just remember to clear down your port forwarding rules when your finished with:

netsh interface portproxy reset

This all comes together like the below: (you can see here i have just used random ports just to give you an example how it looks).

Pivoting with netsh in Windows

Enjoy!

Running MBSA on a remote machine.

Running MBSA on remote machine that is in a workgroup or different domain.

I thought I would share my findings on using MBSA (Microsoft Baseline Security Analyser) for targeting remote machines that are not part of the same domain or in a workgroup. This really is a great tool for enumerating OS patch levels.

We have two scenarios to run through; the first, running MBSA on remote machine that is in a different domain from the machine that it is installed on. The second, running MBSA on a machine that is in a workgroup. Ok no problem. Here is what we do.

First Scenario

In the first scenario our target machine is a Windows Server 2012 R2 machine that is in a different domain to our MBSA host (Windows 7 Pro 64bit). Fire up a cmd prompt with admin privileges from the machine that you are running MBSA from, and run the following syntax:

runas /netonly /user:test\administrator "mbsacli.exe /target 192.168.56.104 /nvc /nd /wi"

A second command prompt will pop up and run, running the syntax as above:

MBSA remote1

If you wait a short while the MBSA command prompt will disappear when finished, from here you can open up MBSA and view the report:

mbsa remote2

In this example the target machine was in my virtualbox lab, in a domain called ‘Test’. The machine I ran MBSA from was a Windows 7 Pro machine in a workgroup (no relationship) other than IP connectivity. The cli syntax I used here was used to speed up the check, clearly only use this if you have the latest scan catalogue:

/wi – Show all updates even if not approved by wsus.
/nvc – Do not check for a new version of MBSA.
/nd – Do not download any files from MS update site when scanning.

Additional options:

/target <Target-IP>

/listfile C:\tmp\targets.txt

/catalog C:\tmp\wsusscn2.cab

Add: ‘>C:\tmp\MBSADC1.txt’ to the end of the syntax for a handy output to a text file.

As an example you might use:

runas /netonly /user:test\administrator "mbsacli /catalog C:\tmp\wsusscn2.cab /target 192.168.56.104 /nvc /nd /wi"

The Second Scenario

The second scenarios is a Windows Server 2003 machine that is in workgroup. The syntax is actually the same however your specifying the local machine name rather than the domain name. I have mixed this one up a little here by not using the cli, by just specifying MBSA the command simple fires up MBSA GUI as the account specified. The only thing to remember here is to add the IP address into the GUI.

runas /netonly /user:test\administrator mbsa

mbsa remote3

And again after the scan has finished the results can be view in the GUI.

mbsa remote4

I haven’t successfully managed to do this from a Windows 10 client yet, various forums would suggest it isn’t supposed to work with 10 however if you know please feel free to drop me an email or comment.


Windows Client/Server Hardening Part 2: Securing Remote Desktop with Certificates.

Securing Remote Desktop with Certificates from your Internal CA.

Implementing Remote Desktop with Certificates

In this post I’m going to be following on from Part 1 located here, talking about further hardening the Windows Remote Desktop Protocol (RDP) with a certificate based system. The certificate is generated and signed by an internal Active Directory Certificate Authority (CA). The issue here being that you have no way of verifying the server or PC that you are trying to connect to via RDP. The machine that you are supposedly connecting to usually presents you with a certificate that is signed by itself, funnily enough known as a ‘self signed certificate’.

The Attack…

The play by an attacker here being that should they have exploited a vulnerability and been able to access your internal network (not for this discussion, however..), they could essentially respond to ARP request by modifying responses sent by an attackers machine. This is done by flooding the network with bad ARP responses, known as ARP poising, the whole attack is known as a Man In The Middle (MITM). There are many ways of carrying out a MITM attack, this just one of them. Once a MITM attack is in play and your arp cache is then poisoned you would essentially be connecting to an attackers machine. The attacker can then sniff the network traffic and all sorts of other rather bad things can happen, like stealing credentials.

A typical self signed certificate presented through RDP looks like the picture above, and clearly states the certificate is not from a trusted certificate authority. If your PC can trust the certificate that is presented by the machine you are connecting too, through the use of a bonafide signed certificate from your internal CA you would know whether or not the machine you are connecting to is genuine. More importantly, through the use of Group Policy you can specify that you are not able to connect to it unless you trust it. Thus preventing any bad MITM rdp sessions.

How do we fix it…

Carlos Perez has written up an excellent ‘how to’ guide from start to finish on how to setup this up. He walks through the certificate templates required for the RDP service. Also setting up group policy to deploy the certificate. This is a great guide so I’m not going to re-regurgitate his excellent work going through all the various screen shots, you can view it here at http://www.darkoperator.com/blog/2015/3/26/rdp-tls-certificate-deployment-using-gpo .

PowerShell Port Scan

Check your Egress Filtering with a PowerShell port scan script

Firewall Egress Filtering Check with PowerShell

This is just a quick post so I can refer to myself more than anything regarding conducting a  Powershell Port Scan! However this is a useful couple of lines to to conduct a port scan from a windows device with PowerShell. This can be used in a number of situations however is especially ideal to check your egress filtering out to a server on the internet or to a segmented network. In the below few lines we are testing the first 1000 ports this can be bumped up to 65535 if wanted and the server that you are port scanning is listed as X.X.X.X.

1..1000 | % {$test= new-object system.Net.Sockets.TcpClient; 
$wait = $test.beginConnect("X.X.X.X",$_,$null,$null); 
($wait.asyncwaithandle.waitone(50,$false)); if($test.Connected)
{echo "$_ open"}else{echo "$_ closed"}} | select-string " "

This particular script has been pulled from Black Hills Information Security page here. An alternative from Microsoft’s ‘Hey, Scripting Guy! Blog’ can be found here.

The Common Problem

Often organisations lack adequate egress filtering, by this I mean outbound connects that can be established on a number of ports from within the heart of the network. Client machines and typical internal application servers don’t need to access a range of services out on the Internet. Once a nasty exploit has got an attacker onto a network they will look to get a foothold within the network lateral move and phone home to command and control server. Having a range of ports open to clients and servers allows attackers to make an outbound connects from whole host of tools, including PowerShell for that matter.

The Solution

Check you egress filtering and lock down any unwanted open ports out to the internet, your perimeter firewalls should not allow these outbound connections. Obviously certain services are going to need to make outbound connections such as web proxy and email gateways and these rules should be appropriately provisioned. To take this one step further enable your outbound firewall rules on your local hosts, ‘hang on a sec, you must be crazy’ I hear you say, however by doing this you will be help prevent the lateral movement of attackers through your network as well as being able to get off your network back out to the Internet.

Monitoring Domain Admins with PowerShell! Free and Easy

Free Active Directory Monitoring with PowerShell, keep an eye on those high privilege level groups!

Keeping an eye on privileged Active Directory groups is Important. We can do this by Monitoring Domain Admins with PowerShell. Groups such as ‘Domain Admins’ (DA) and ‘Enterprise Admins’ (EA) in Active Directory (AD) is vitally important within your IT shop. You need to be aware of any changes happening to high privilege level groups. Especially ones that have the level of access that DA and EA groups have. This of course also extends further than just administering AD privilege groups. In addition to these you may also want to monitor your high privilege level application groups. Such as Lync and SCCM. The worst case scenario is you find a username you not aware of has been dropped in your DA group. As soon as this happens you want to know and investigate immediately. You don’t need any fancy tools to monitor active directory groups. You just need a few lines of PowerShell coupled with the Send-MailMessage feature. Very quickly you have some powerful alerting.

Solution:

I’ve just pulled the below script  together in a few minutes which very simple pulls the DA group and emails the contents to the desired location in the script.

$EmailBody = "The Domain Admin group has the following members verify these are correct:
              $currentmembers "

$currentmembers = (Get-ADGroupMember -Identity "Domain Admins").name | out-file -filepath C:\temp\currentmembers.txt

$Email = @{ 
            'From' = 'Active Directory Administrator <admin@test.lab>' 
            'To' = 'adam@test.lab'
            'Subject' = 'Current Domain Admin Members' 
            'SmtpServer' = 'my.smtpserver' 
            'Body' = $EmailBody 
        } 
        Send-MailMessage @Email

This is just a simple script to query the contents of a group and mail it. What you would ideally want is a comparison of a before and after state. In addition some intelligence within the script. This would be to either; email you if any changes have been made including the additions. O alternatively do nothing if no changes have been made. Then schedule the script to run every 5 minutes with Task Scheduler. This allows you to have pretty good overview of your high privilege accounts.  Such a script thankfully already exists over at TechNet https://gallery.technet.microsoft.com/scriptcenter/Detect-Changes-to-AD-Group-012c3ffa

Alternative tools do exist such as SolarWinds LEM and ChangeAuditor. However using PowerShell is free after all and requires very little effort to implement! As a bonus you’ll boost your PowerShell skills.

Information Security Defenders

We need more Information Security defenders!

InfoSec DefendersAs an industry we need more information security defenders to play the role of the blueteam in the Enterprise. All too often the IT Team receive a pentest report with a list of red criticals and are immediately overwhelmed with issues to fix. Whilst an organization has regular pentests it has the danger of lulling itself into a feeling of ‘doing the right thing’ however if all they are doing is getting a pentest and not re-mediating the issues then its a waste of time and money. This is a pessimistic view however it is usually the case that more vulnerabilities are released that the IT know what to do with. The IT team tend to either not have enough resource or they don’t have the skills to fix the issues, usually the first being being the case. Penetration testing needs to be more than just a test, it needs to be a more proactive engagement with after test help and support for the enterprise should they need it.

Its easy to criticise the IT department. As Information Security Professionals, we are doped daily with the next new exploit or zero day from the various blogs and podcasts that we listen to. This isn’t a small IT departments main concern or top of their list of to do tasks when they arrive at work, (although it could be argued it should be, with a little more security awareness training). The IT team tend to prioritise keeping those critical business apps or switches up and running (I’ve been that person).

As Information Security Professionals we need to be more involved in fixing and explaining the risks and supporting organisations so that they are better equipped to defend themselves.

The next new shiny security toy in the enterprise may not necessarily be the answer, the existing tools already installed around us could be better used and more creatively used to defend the enterprise.  Getting the latest IDS or implementing the next new NextGen Firewall can tend to be a distraction to getting down to what needs to be done i.e. Getting that MS08-067 patched on that business critical server that’s been there for years or tightening up the existing firewall. Hardening existing systems with group policy, tuning WSUS or SCCM to deploy timely updates and utilising windows logging to alert when a domain admin group is modified for example will generally go far further, and are free.

Hopefully sites like this will help contribute to securing enterprises, and assisting system administrators to better defend their existing environments. Enterprises don’t necessarily need to spend huge amounts of money on new technology, the answer could be in being more creative with what you already have.

Server Hardening: HTTP TRACE TRACK Methods Allowed – Part1 Apache

HTTP TRACE / TRACK Methods AllowedMany vulnerability scanners will often bring back HTTP TRACE TRACK Methods Allowed against Apache and Microsoft web servers of the older generation. TRACE is usually associated with Apache and TRACK for Microsoft. This has a CVSS score of 4.3 and is a relatively easy fix. Clearly the older generation operating systems should be migrated to a supported platform, both the later distributions of Ubuntu and Microsoft 2012 R2 do not allow these methods to be used. However a simple way to validate this finding is to use telnet to connect to the web server on port 80, once connected you can type something similar to the following for each method. The ‘Host’, ‘TestA’ and ‘TestB’ aren’t needed however if you use some custom text you will be sure to see it echoed back by the web server if trace is enabled.

TRACE / HTTP/1.1
Host: 192.168.0.29
TestA: Is this correct?
TestB: Are we sure?

Tap return twice to send.

Which would look something like the below as you can see the user input was returned, the web server accepting the method:

HTTP Trace enabled on Apache

Remediation:

As I said the HTTP TRACK / TRACE issue is this is relatively straight forward to fix, simple add ‘TraceEnable off’ somewhere in your main Apache config file outside of the vhost configuration.

Once implemented retesting should reveal that the method is not allowed:

after adding 'TraceEnable off' HTTP Trace disabled on Apache
After adding ‘TraceEnable off’

Cisco AAA Authentication with RADIUS against Active Directory 2012 NPS

AAA and RADIUS through the Network Policy Server (NPS) role in Windows Server 2012 R2

I thought I would cover a quick post to demonstrate setting up Active Directory authentication for a Cisco router or switch IOS login. This will be using AAA and RADIUS through the Network Policy Server (NPS) role in Windows Server 2012 R2 to authenticate users in Active Directory on Cisco IOS devices.

As with all my labs a picture paints a thousand words so here is the GNS3 Network topology we will be using, this is also being used for 802.1x which will be covered in later post:

Cisco AAA Authentication with RADIUS against Active Directory GNS3 Topology

So here is quick run down on the gear we will be using just for this lab:

R1: Cisco IOS (C7200-ADVENTERPRISEk9-M), Version 15.2(4)S4

Server 2012 DC: Windows Server 2012 R2 ( Active Directory Domain Services and Network Policy Server role.

Just to demonstrate a lab as simple as the below could also be used to test this:

radius lab

Active Directory Configuration:

I will be assuming that AD and the NPS role have already been installed. Prior to jumping into the NPS configuration you will need to create an AD group for the users that will be logging into the Cisco equipment, add a couple of test users to this group. In my case I have simply created a group called ‘Radius’ and have added the user ‘Adam’.

Open the NPS console.

Right click on the NPS(Local) tree node and select ‘Register server in Active Directory’:

Now create the Radius clients, in our this case this is R1:

Radius Clients, New

New Radius Client Settings

New Radius Client Advanced Screen


Now we need to configure the Network policy:

New Network Policy

New Network Policy name

Add our ‘Radius’ AD group. You can tighten the control here by specifying further conditions such as the ‘friendly name’ (R1)  or the local IPV4 address of the radius client, in a production environment you would want to lock this down further for now we are just going to add the the user group to authenticate:

New Network Policy - Add

Grant Access for this group:

New Network Policy Access Granted

Configure the appropriate authentication methods:

New Network Policy - Configure Authentication Methods

Change the Standard Radius Attributes by removing ‘Framed-Protocol – PPP’. Edit the ‘Service-Type’ value to ‘Login’:

New Network Policy - Standard Radius Attributes

Add a Vendor specific attribute, this allows the radius server to pass the privilege level though the cisco router which we shall see later in the debugging. The value needs to read ‘shell:priv-lvl=15′.

You can create several policies for the different privilege levels. For example you could create a group in AD called ‘Cisco Users Priv 1’, associate this group to a policy and in the below option use the value ‘shell:priv-lvl=1′. When that user logs in the policy will match that user and the NPS use the matched policy passing privilege level 1 through to the router or switch.

New Network Policy - Vendor Specific Radius Attributes

Then Finish:

New Network Policy - Finish

Cisco IOS configuration

Create a a user with privilege level 15, we wil use this as our fall back should the router not be able to contact the radius server it will use the local AAA database.

R1(config)#username Admin privilege 15 secret cisco12345

Enable AAA:

R1(config)#aaa new-model

Now we will setup the main parts to the radius configuration, tell the switch we would like to use radius and the group RAD_SERVERS:

R1(config)#aaa group server radius RAD_SERVERS

Specify the radius server that we would like to use in our case 10.0.0.2 is our NPS, the auth and acc ports and also the secure key we used:

R1(config-sg-radius)#server-private 10.0.0.2 auth-port 1812 acct-port 1813 key cisco
R1(config-sg-radius)#exit

Specify that for  the default login  for authentication an authorization that we want to use the group called RAD_SERVERS that we have just created and if that fails we use the local database. This is particularly important so we do not lock ourselves out on the router:

R1(config)#aaa authentication login default group RAD_SERVERS local
R1(config)#aaa authorization exec default group RAD_SERVERS local if-authenticated

All together this looks like the below:

R1(config)#aaa group server radius RAD_SERVERS
R1(config-sg-radius)#server-private 10.0.0.2 auth-port 1812 acct-port 1813 key cisco
R1(config-sg-radius)#exit
R1(config)#aaa authentication login default group RAD_SERVERS local
R1(config)#aaa authorization exec default group RAD_SERVERS local if-authenticated
R1(config)#aaa authorization console

We can test simply by logging out and back in.

Troubleshooting

It obviously goes without saying you need to test the authentication to the Radius server, exit right out of the console and log back in using your AD credentials.

If all has been configured correctly you should be able to login. its also worth testing the fall back option configured for local AAA authentication. We can do this just simply stopping the NPS service then try the local credentials, again all being configured correctly you should be able to login.

There are a few useful debugging commands we can use  to monitor and troubleshoot the authentication these being:

R1#debug aaa authentication
AAA Authentication debugging is on
R1#debug aaa authorization
AAA Authorization debugging is on
R1#debug radius
Radius protocol debugging is on
Radius protocol brief debugging is off
Radius protocol verbose debugging is off
Radius packet hex dump debugging is off
Radius packet protocol debugging is on
Radius elog debugging debugging is off
Radius packet retransmission debugging is off
Radius server fail-over debugging is off
Radius elog debugging debugging is off
R1#

This time when we login we can see the debug information for an attempted login, it should look similar to this, note the highlighted area’s:

radterm

I hope this has been informative.