Problems with VirtualBox Guest Additions in Kali – Quick Tip!

Problems with VirtualBox Guest Additions in Kali. This post serves more of a reminder to myself however this might also serve as help to others. Troubleshooting problems/issues with VirtualBox Guest Additions. I think its safe to say I use VirtualBox a lot, I will be lucky if a day goes by where I’m not in VirtualBox using a VM. I also therefore use and rely on Guest Additions working correctly features such as, mapped drives back to the host, USB, display options are all useful to name a few. It can be frustrating sometimes when Guest Additions breaks, either a mapped network drive disappears or your display has shrunk. Once all the usual checks have been done to troubleshoot I normally move on to VirtualBox Guest Additions. I also use Kali, where its also fair to say I have the most issues, now this might be because I probably use it the most in terms of a VirtualBox VM or that Kali 2.0 is rolling and thus based on Debian Testing. As such we have a multitude of updates happening constantly both to packages and underlying operating system. The following is my usual check list and 99% of the time sorts out the issue for Kali 2:

  1. Update VirtualBox to the latest version.
  2. Then update VirtualBox Guest Additions to also the latest edition.
  3. Update Kali; apt-get update & apt-get upgrade -y
  4. Update kali; apt-get dist-upgrade -y
  5. Update the Kernel headers: apt-get update && apt-get install -y linux-headers-$(uname -r)
  6. Re-install VirtualBox Guest Additions directly from VirtualBox:

cp -r /media/cdrom0/ /tmp/
cd /tmp/cdrom0

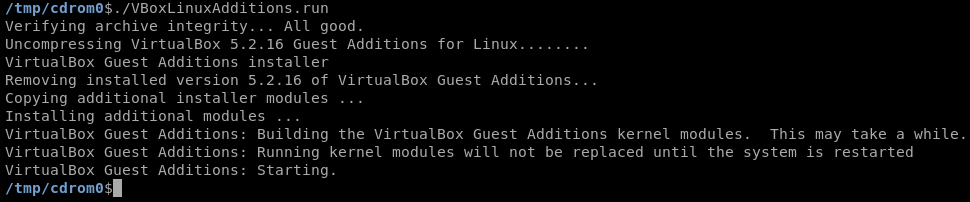
Make the VBoxLinuxAdditions.run file executable:

chmod u+x VBoxLinuxAdditions.run

Install it:
./VBoxLinuxAdditions.run

If successfully your output should be similar to this:

VirtualBox Guest Additions Installtion Kali

If you get errors in the installation you will need to work back through the errors ensuring the above steps have been executed and are successful.

Well I hope this helps someone out in a jam.

Resizing a VirtualBox Linux disk.

Resizing a Linux Disk in VirtualBox

I came across a need to expand the hdd on Linux virtual machine, as I had run out of space. I thought I would share my experience by walking through the steps I took in resizing a VirtualBox Linux disk for the Debian based OS that I had. The process involves expanding the virtual image file then using GParted to expand the partition. This is actually relatively painless. My particular disk image was in VMDK that I needed to increase by an additional 10Gb. I actually tested this out for a non trivial virtual machine first, this is how I got on:

First like me if your using a VMDK you will need to convert the disk image to either a VDI or VHD file. This can be done at the command line (with Admin privs) like below. If you try to expand the a VMDK with VirtualBox you get a nice error as below:

converting VMDK to VDI


The next stage is optional: Take the new VDI file and create a new virtual machine using the new HDD file. I personally would then boot the machine just to check it boots and everything is in order however this is optional, while I was there I took a quick snip of the HDD space. /dev/sda1 is 29Gb we will increase to 40Gb.

VDI image size

Resize the VDI file at the command line (with Admin privs) like below:

VirtualBox VDI resize


At this point the vm will still boot just fine, however the hdd partition won’t have increased. We will need to extend the partition using a program like Gparted. So we mount the GParted ISO into the guest CD drive. You will also need to enable EFI from the system page in order to boot into the latest GParted GUI, this will need to be unchecked after we have finished to boot back into our Debian os.

live boot gparted

Start the vm, allow GParted to boot. Select the first option and allow GParted to continue to load, accept the default settings pressing ‘enter’ three times.


live boot gparted 1

Once booted into GParted you will be presented with the following screen:

live boot gparted 2

We need to remove ‘/dev/sda2’ (the swap file and recreate it later) in order to extend the partition into the unallocated space. Once this is complete we can then select ‘/dev/sda1’ select ‘Resize/Move’ from the menu, drag the slider bar all the way to the right hand side like below and select ‘Resize/Move’.

live boot gparted 4

Select ‘Apply’ from the menu, and after a short pause we can see all operations were successful. Once this is complete close the ‘Apply pending operations’ and shutdown.

live boot gparted 5

Remember to disable the EFI option in the VirtualBox machine settings for our Debian based system. Boot the machine up and recheck the size; voila, we can see our /dev/sda1 is now 39Gb!

After size

Installing VirtualBox Guest Additions in Kali Linux v1.x

A brief summary of the commands needed to install VirtualBox Guest Additions in Kali Linux v1.x. Having the Guest Additions installed is very useful, being able to copy and paste text like bash lines like the below is extremely useful. There is also the extra screen options such as the transparency mode. Being able to copy files in and out of the system into the host is also very useful.

Linux headers need to be updated.

#apt-get update && apt-get install -y linux-headers-$(uname -r)

Copy the VBoxLinuxAdditions.run file to the Desktop.

Restart.

#cp /media/cdrom/VBoxLinuxAdditions.run /root/Desktop/
#cd /root/Desktop/

Make it executable:

#chmod 755 VBoxLinuxAdditions.run

Install it:

#./VBoxLinuxAdditions.run
kali Virtualbox
Installing VirtualBox Guest Additions on Kali Linux version 1.x

Reboot for a final time.

After it has successfully installed you will now be able to go full screen, add in file sharing options, copy and paste and clipboard functionality. Enjoy.