Symmetric Encryption Techniques – Block and Stream Ciphers.
Two types of symmetric encryption techniques that are used are Block and Stream Ciphers, in this post I will cover them both in a high level comparison.
Block Ciphers
Block ciphers take a section of plaintext (a block) and turns them into block of ciphertext of 64 or 128 bits. The block size is how much data is encrypted in one go.
The output from a block cipher is usually larger than the input data, due to the ciphertext being a multiple of the orginal block size.
Common modes of operation block ciphers are Cipher Block Chaining (CBC) and Electronic Codebook (ECB). Block ciphers include DES with a 64-bit block size and AES with a 128-bit block size.
Stream Ciphers
Stream ciphers encrypt plaintext one byte or one bit at a time, as opposed to a block of data at a time as with a block cipher. With a stream cipher, the conversion of these smaller plaintext sections of data can vary, depending on when they are viewed during the encryption process. Stream ciphers can be much faster than block ciphers, and usually do not increase the message size, because they can encrypt an any specific number of bits.
Stream ciphers include RC4 (and the RC series) ciphers. DES can also be used in stream cipher mode.
Configuring a IPSec Site-to-Site VPN Tunnels on a Cisco Router
I thought I would run through configuring IPSec Site-to-Site VPN Tunnels on a cisco router. I’m going to be covering at high level the basic principles needed to configure a IPSec Site-to-Site VPN. The fundemental principals can be used for the Cisco ASA Firewall or Cisco VPN concentrator. The VPN gateways in our example (the routers) are responsible for encapsulating and encrypting the outbound traffic which in a real world example this would from be from a site to a peer gateway at another site. This could be either through an MPLS network from an ISP or more commonly directly over the Internet. When the receiving gateway receives the traffic it strips away the headers, decrypt’s the content with the pre-shared key and forwards on the traffic to a host network on the inside.
In our example we are going to be using 3 networks with an IPSec VPN tunnel being established between two of the routers. I have added the extra network without the tunnel to demonstrate in wireshark the encrypted vs the non encrypted traffic. All three networks are connected to a switch which we are going to image as our either our Internet or MPLS connection.
An IPSec tunnel consists of 5 stages to establish and terminate its connection these are:
An ISAKMP tunnel is initiated when the VPN gateway detects ‘interesting traffic’ which is defined by an ACL.
IKE Phase 1 is established through negotiating the ISAKMP SA policy that is defined in the config.
IKE Phase 2 is established through negotiating the IPSec SA policy.
The IPSec tunnel is created and data can begin to be transferred Encrypted.
The IPSec tunnel is teared down when either the lifetime of the session expires or the IPSec SA is removed.
Below is the extra config that is used for each router other than the initial config of a standard GNS3 router, this can simple be copied into global configuration mode. The config is split into three main sections the interface configuration, EIGRP configuration and the IPSEC configuration.
hostname RouterA
interface fa 0/0
 ip address 4.5.6.1 255.255.255.0
 no shutdown
interface fa 0/1
 ip address 10.0.0.1 255.255.255.0
 no shutdown
 exit
router eigrp 111
 network 10.0.0.0
 network 4.5.6.0
 no auto-summary
 exit
# Identify interesting traffic on RouterA to RouterB with the below ACL
access-list 101 permit ip 10.0.0.0 0.0.0.255 10.0.1.0 0.0.0.255
# Configure the IKE Phase 1 ISAKMP SA policy on RouterA
crypto isakmp policy 10
 encryption aes 256
 authentication pre-share
 hash sha
 group 5
 exit
crypto isakmp key cisco12345 address 4.5.6.2
# Configure the IKE Phase 2 IPsec SA Policy on RouterA
crypto ipsec transform-set VPN-SET esp-aes esp-sha-hmac
crypto map VPN-MAP 10 ipsec-isakmp
 description VPN Connection from RouterA to RouterB
 set peer 4.5.6.2
 set transform-set VPN-SET
 match address 101
 exit
interface fa0/0
 crypto map VPN-MAP
 exit
hostname RouterB
interface fa 0/0
 ip address 4.5.6.2 255.255.255.0
 no shutdown
interface fa 0/1
 ip address 10.0.1.1 255.255.255.0
 no shutdown
 exit
router eigrp 111
 network 10.0.1.0
 network 4.5.6.0
 no auto-summary
 exit
# Identify interesting traffic on RouterB to RouterA with the below ACL
access-list 101 permit ip 10.0.0.0 0.0.0.255 10.0.1.0 0.0.0.255
# Configure the IKE Phase 1 ISAKMP SA policy on RouterB
crypto isakmp policy 10
 encryption aes 256
 authentication pre-share
 hash sha
 group 5
 exit
crypto isakmp key cisco12345 address 4.5.6.1
# Configure the IKE Phase 2 IPsec SA Policy on RouterB
crypto ipsec transform-set VPN-SET esp-aes esp-sha-hmac
crypto map VPN-MAP 10 ipsec-isakmp
 description VPN Connection from RouterB to RouterA
 set peer 4.5.6.1
 set transform-set VPN-SET
 match address 101
 exit
interface fa0/0
 crypto map VPN-MAP
 exit
hostname RouterC
interface fa 0/0
 ip address 4.5.6.3 255.255.255.0
 no shutdown
interface fa 0/1
 ip address 10.0.2.1 255.255.255.0
 no shutdown
 exit
router eigrp 111
 network 10.0.2.0
 network 4.5.6.0
 no auto-summary
 exit
# Note there is no IPSec configuration on this router
I’ve broken down just one of the IPSec configuration below to explain what the various elements are, these need to match at both sites:
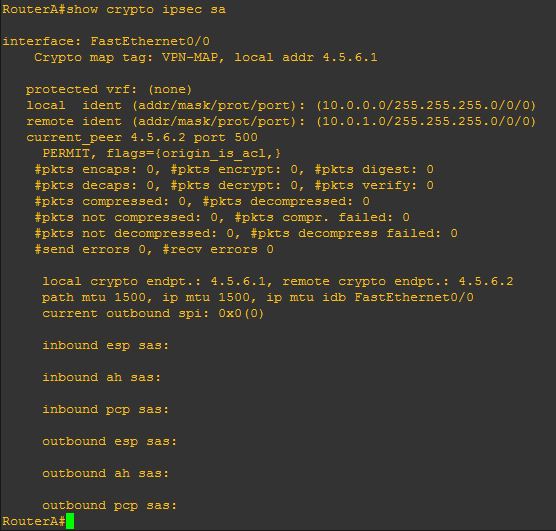
Before generating any interesting traffic if we execute ‘show crypto ipsec sa’ from RouterA we can clearly see there has been no traffic captured by the ACL.
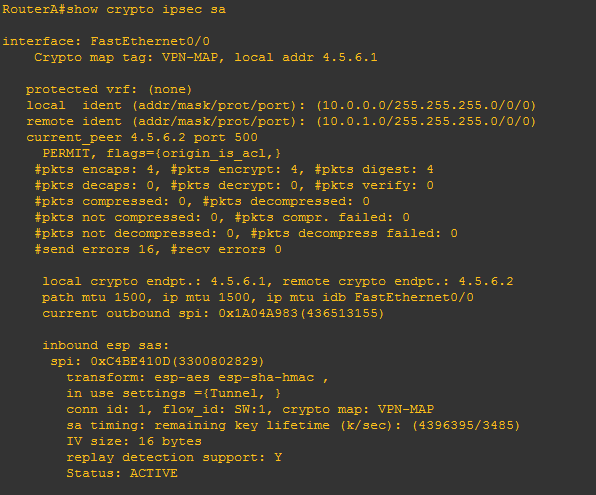
If we now generate some ‘interesting traffic’ such as a ping from PC1 10.0.0.2 to PC3 10.0.1.2 which will match our ACL that is specified in our crypto map, then re-issue ‘show crypto ipsec sa’ we will see from the stats that packets have been encrypted. Further to this we will see the inbound and outbound session will be ‘ACTIVE’.
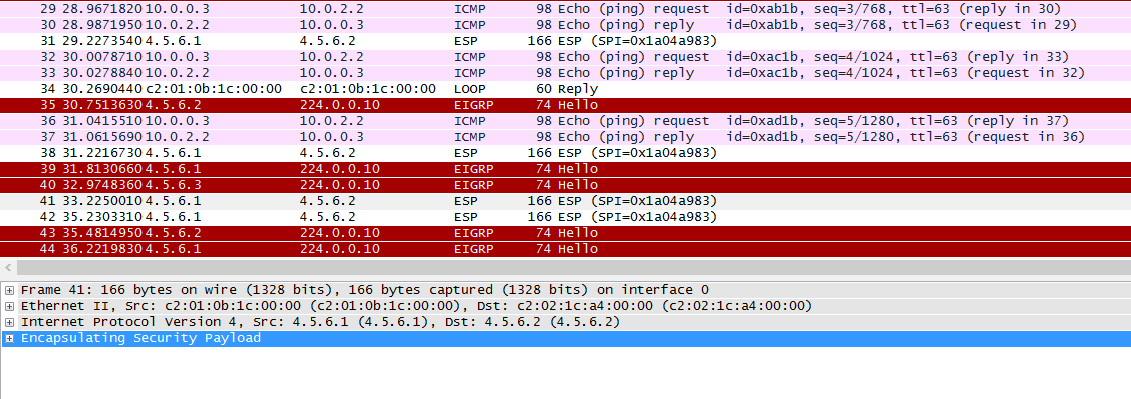
To take this one stage further we will demonstrate the difference in the Encrypted IPSec traffic and ordinary traffic using wireshark. The capture will be taken from the link between RouterA and the core network. We will ping out from PC1 to PC3 (the encrypted traffic caught by our ACL) and PC2 to PC5 (the non-encrypted traffic that doesn’t match our ACL) simultaneously. This is what we see:
As we can see from the wireshark capture our encrypted traffic is shown in the Encapsulated Security Payload and our non encrypted traffic in the clear (the ping request and reply).
I thought I would share with you the Lab I have been mostly working with for CCNA Security (CCNAS) – Implementing Cisco Network Security (210-260) exam that I have recently took and passed. I have also used several smaller lab setups for specific testing however this is the main lab to piece everything together.
CCNAS – Implementing Cisco Network Security Lab
The lab has been built to accommodate the many elements on the exam and covers off most of the practical procedures that you need to be comfortable with. Using GNS3 and VirtualBox we are able to lab most of the practical exercises bar the L2 switching portions which I achieved through physical equipment (Catalyst 3750, 3550 x2 and 2950 switches). The exam does cover many topics in theory that you must know, these aren’t covered here, however can be found on the Cisco website.
The lab contains several client machines for managing the routers and ASA firewalls from putty, cisco configuration professional and ASDM as well as testing PAT through the ASA with a breakout to the internet. There is an Active Directory Domain Controller with the Network Access Protection role installed for use with AAA/radius and NTP. A separate syslog server. A DMZ with web server for testing NAT and outside firewall rules. There is also an ASA 5520 at each of the three sites for testing VPN site-to-site Ipsec connections, clients at all sites for testing end to end connectivity. There is also an outside remote client for testing the Anyconnect and client-less vpn options which takes advantage of the AAA radius service.
Using this lab we are able to address the following practical elements for the CCNAS exam:
2.0 Secure Access
2.1 Secure management
2.1.b Configure secure network management
2.1.c Configure and verify secure access through SNMP v3 using an ACL
2.1.d Configure and verify security for NTP
2.1.e Use SCP for file transfer
2.2 AAA concepts
2.2.b Configure administrative access on a Cisco router and ASA using RADIUS
2.2.c Verify connectivity on a Cisco router and ASA to a RADIUS server
3.0 VPN
3.2 Remote access VPN
3.2.a Implement basic clientless SSL VPN using ASDM
3.2.b Verify clientless connection
3.2.c Implement basic AnyConnect SSL VPN using ASDM
3.2.d Verify AnyConnect connection
3.2.e Identify endpoint posture assessment
3.3 Site-to-site VPN
3.3.a Implement an IPsec site-to-site VPN with pre-shared key authentication on Cisco routers and ASA firewalls
3.3.b Verify an IPsec site-to-site VPN
4.0 Secure Routing and Switching
4.1 Security on Cisco routers
4.1.a Configure multiple privilege levels
4.1.b Configure Cisco IOS role-based CLI access
4.1.c Implement Cisco IOS resilient configuration
4.2 Securing routing protocols
4.2.a Implement routing update authentication on OSPF
5.0 Cisco Firewall Technologies
5.3 Implement NAT on Cisco ASA 9.x
5.3.a Static
5.3.b Dynamic
5.3.c PAT
5.3.d Policy NAT
5.3 e Verify NAT operations
5.4 Implement zone-based firewall
5.4.a Zone to zone
5.4.b Self zone
5.5 Firewall features on the Cisco Adaptive Security Appliance (ASA) 9.x
We can harden the Windows Client/Server Remote Desktop Protocol (RDP) in several ways using either local settings or preferable through Group Policy. As a minimum we should harden RDP in the following ways:
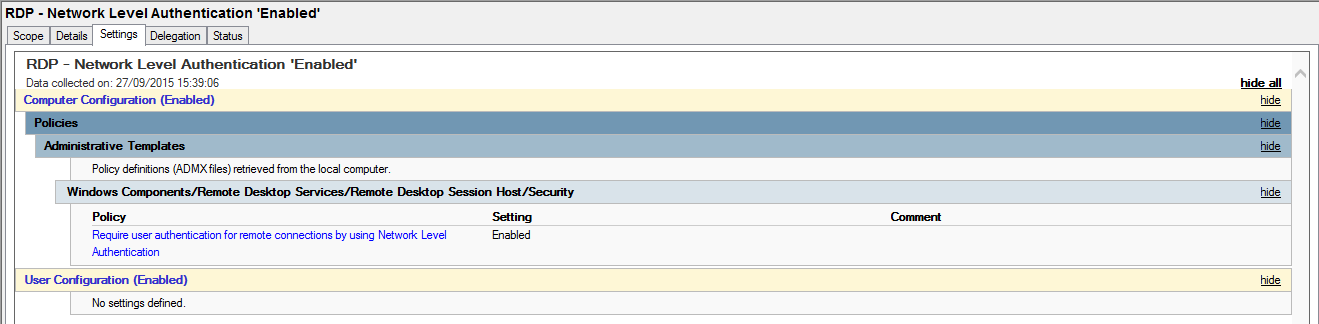
Using Network Level Authentication (NLA).
Setting Terminal Services Encryption Level to High.
Force the use of TLS 1.0 protocol as a transport layer for the service.
Setting the local security policy of the either the server or client to use only FIPS-140 compliant cryptography.
This post will we go through how we can accomplish these tasks.
Network Level Authentication (NLA)
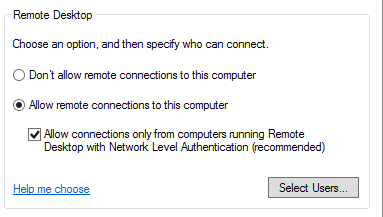
Network level authentication allows the client to authenticate earlier in the remote connection process rather than the normal process. This option is most commonly seen in the Remote Desktop settings in the system properties as below:
This can be applied to both Servers and workstations from Windows Vista and above.
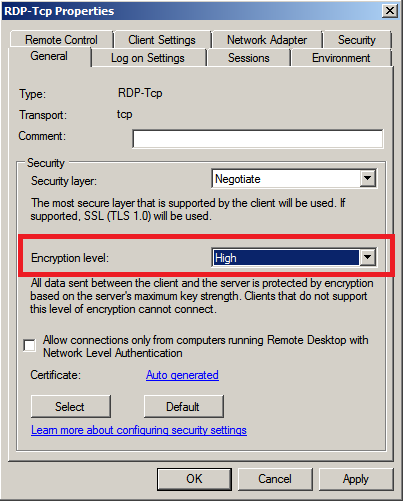
Setting Terminal Services Encryption Level to High
Setting the Encryption level to High encrypts data sent from client to server and server to clients using 128 bit encryption. Like with the above example we can set the Terminal Services Encryption level to High either locally on the server or via Group Policy. In a domain environment the GPO is the way to go. With windows server 2008 this could be set locally through the GUI by navigating from the start menu–>Administrative Tools–>Remote Desktop Services–>Remote Desktop Session Host Configuration, then double clicking on the ‘RDP-TCP’ connection in the middle of the screen. The Encryption level can be found on the General tab as below:
Remote Desktop Services – Encryption Level ‘High’
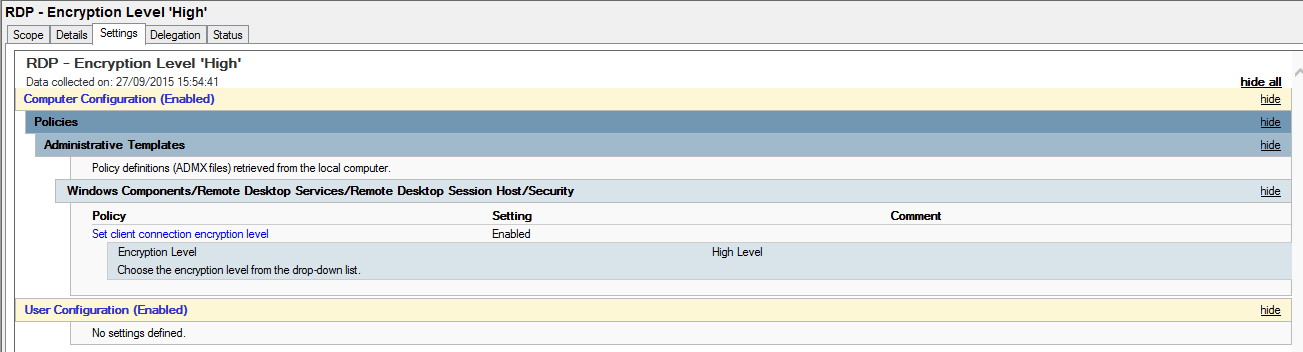
Unfortunately Microsoft removed the ‘RD Session Host Configuration’ options as standard with Server 2012 R2. Rather than adding in the whole RDS role to apply this option in the GUI you can apply it via GPO which will in turn apply to both 2008 and 2012 as below:
Remote Desktop Services – Encryption Level High GPO
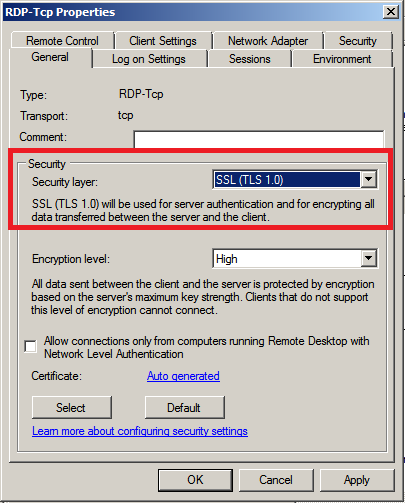
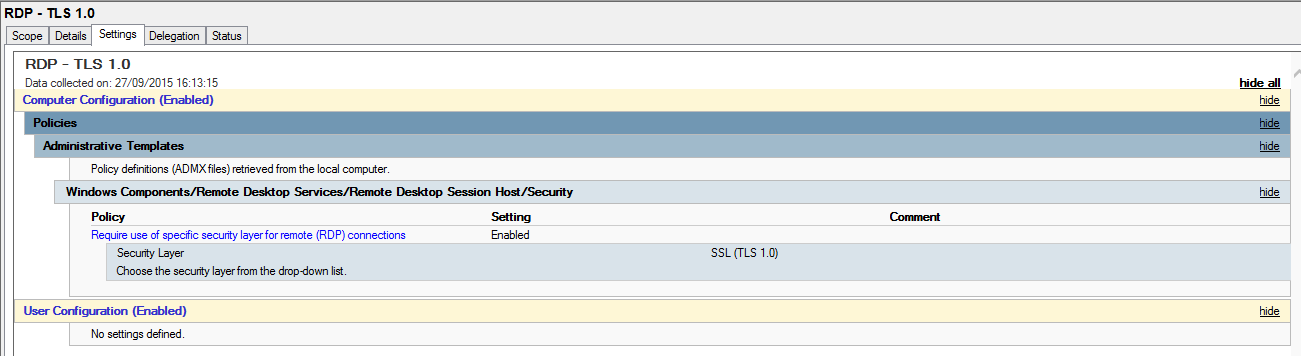
Force the use of TLS 1.0 protocol as a transport layer for the service
Forcing the use of TLS 1.0 mitigates the risks associated with SSL 3.0 protocol. Like with the previous option this can only be set in the GUI locally on Windows Server 2008. With this being said, and from a management perspective GPO is our preferred option, in order to apply this setting to both Windows Server 2008 and 2012.
This option is set in Windows Server 2008 locally by navigating from the start menu–>Administrative Tools–>Remote Desktop Services–>Remote Desktop Session Host Configuration, then double clicking on the ‘RDP-TCP’ connection in the middle of the screen as below:
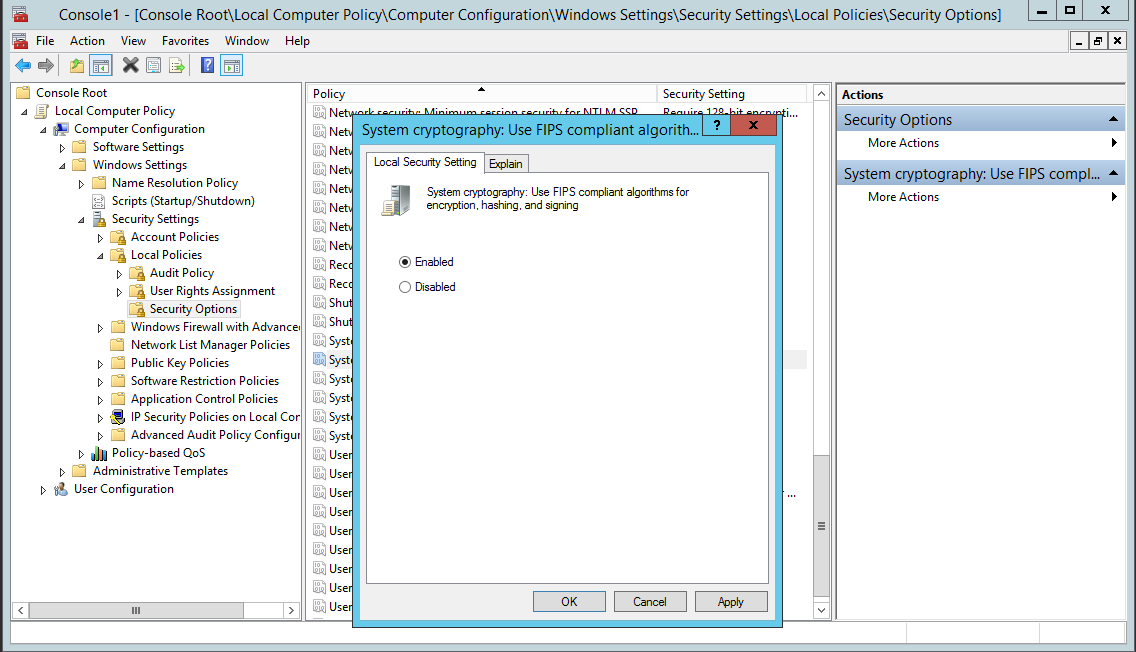
Setting the local security policy of the either the server or client to use only FIPS-140 compliant cryptography
This hardening technique can be accomplished by enabling the ‘System Cryptography’ through the Local computer policy editor or through GPO via the domain. It will force the use of FIPS-140 compliant cryptography for either the client or server across the system. This is windows system setting rather than an RDP setting, however by setting this you will be forcing the use of FIPS-140 compliant cryptography for Remote Desktop settings. If this setting is enabled only the FIPS-140 approved cryptographic algorithms are used: 3DES and AES for encryption, RSA or ECC public key for TLS key exchange and SHA256, SHA284 and SHA512 for TLS hashing. In the case of Remote Desktop it will only use 3DES.
Adding through the local computer policy can be achieved by opening a Microsoft Managment Console (MMC) adding a snap in; Group Policy Object Editor. As below:
Remote Desktop Services – FIPS-140 ‘Enabled’
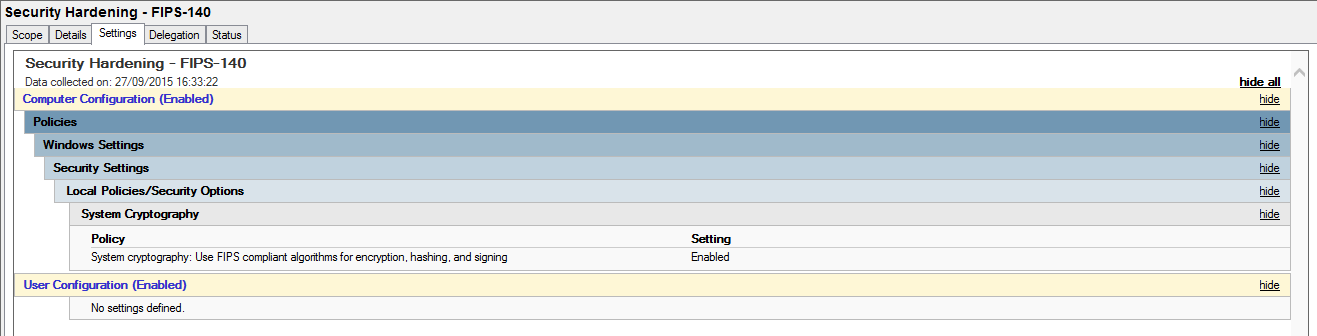
Setting via GPO can be achieved as below:
Remote Desktop Services – FIPS-140 GPO
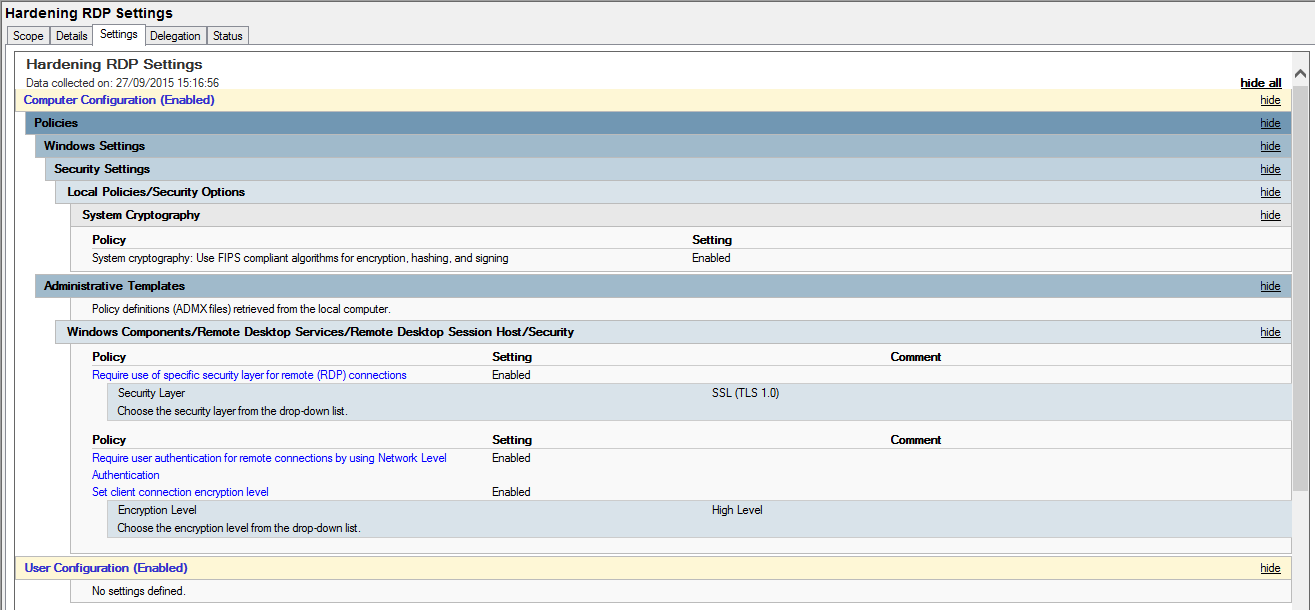
Hardening RDP – GPO Settings
Putting all these settings together in one GPO would look something like this:
Hardening RDP – GPO settings
It clearly goes without saying you should first test these methods out for yourself in a safe test environment first before diving into your main production domain or web servers. Adding higher grade encryption to your communications across the domain may have extra computation costs in terms of performance on your network.
How do I know which cipher suites to select for my web server?
This is a common issue, sysadmins have their web servers up or vpn servers configured. However they are often using older SSL protocols and older cipher suites that are now vulnerable to attack in certain scenarios. We need to understand what a cipher suite is actually doing in order to select the correct ones.
For SSL/TLS connections a cipher suite is selected based on a number of tasks that it has to perform, the client uses a preferred cipher suite list and the server will normally honor this unless it also has a preferred list, set by the sysadmin.
Initial Key Exchange, the Asymmetric Encryption: This will most commonly be RSA, however the following are options; RSA ( Ron Rivest, Adi Shamir, and Leonard Adleman), DH (Diffie-Hellman) or ECDH (Elliptic Curve Diffie-Hellman).
RSA key length should be 2048 bit minimum. ECDH and others should be an equal strength, note the ECDH key length will be significantly lower due to the way the algorithm works! The Asymmetric Encryption is only being used in the initial key exchange and for the session symmetric encryption key. The Asymmetric encryption method could be used for the data transfer however the computational power needed is far higher than the symmetric Encryption due to the key size.
Session data, the Symmetric Encryption: The most commonly used three ciphers we see in use being RC4, 3DES and AES, careful selection of ciphers is required here:
RC4 (Rivest Cipher 4) although used almost everywhere is now considered weak, and being phased out by Microsoft. This should be avoided.
3Des (Triple Data Encryption Standard) uses DES and encrypts three times hence the ‘triple’. The original DES uses a weak key length and is considered weak.
AES (Advanced Encryption Standard) 128 bit block size using 128, 192 and 256 bit keys to encrypt data, is all good.
Many other options are available that are not so common include Blowfish, Twofish, Serpent etc. I won’t be going into the different ciphers here or the difference between Block (3DES+ AES) and Stream (RC4) on this page, I’ll save this for another blog.
Digital Signature – The digital signature is used to verify the server.
Integrity check – Here SHA-2 or SHA 256 (Secure Hash Algorithm) should be used. MD5 and SHA1 are being phased out due to weaknesses. SHA1 will still be seen on certificates however Google Chrome will now show a warning for this since October 2014. Microsoft has a deprecation policy indicating SHA1 issued certificates should not be used after 1/1/2017.
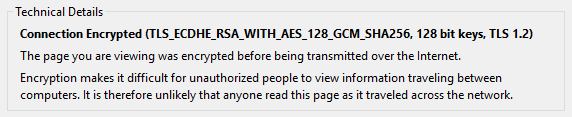
With all that being said, lets look at a typical cipher suite. Below is what you might commonly see in the likes of Firefox if you click on the padlock in the address bar and then click on more information.
Cipher suite in use in Firefox
Lets look at the cipher suite below for an example. We’ll break down the individual blocks to see what it actually all means.
TLS_ECDHE_ECDSA_WITH_AES_128_GCM_SHA256
TLS – The protocol in use ECDHE – Elliptic Curve Diffie-Hellman key-exchange using ephemeral keys. More on ephemeral keys later, however this is what is going to give you that all important ‘Perfect Forward Secrecy’. Marked with the E at the front or behind for Ephemeral. ECDSA – Elliptic Curve Digital Signature Algorithm, used to create the digital signature for authentication. AES_128 – Advanced Encryption Standard 128 bit key size, used for the session encryption method for data. GCM – Galois/Counter Mode an operation for block ciphers designed to provide both data authenticity (integrity) and confidentiality. GCMAC – provides authentication only. SHA256 – Secure hashing Algorithm 256bit used for message integrity.
With the above knowledge and knowing the current vulnerabilities in SSL and TLS we can now make an informed decision and build the cipher suites we would like to use in Windows and Linux.
I have added a basic guide for changing SSL TLS cipher suites that Windows Server IIS and Linux Ubuntu Apache2 use. Allowing only secure ciphers to be negotiated between your web server and client is essential. This guide will go through how to change and select the different ciphers for both Windows server 2012 R2 and Ubuntu 14.04 in order to help mitigate some of the vulnerabilities in the SSL/TLS protocols.
Read further on the Resource page for changing SSL TLS Cipher Suites here.