WSUS clients not reporting in? No problem check this out.

Are you having difficulty with your WSUS clients not reporting in? I recently posted about running Microsoft Baseline Security Analyser to check your systems are getting the right patches in this post. If your haveing issues with clients not checking in this may help. If you have gone through the basic troubleshooting steps and believe you have everything in place continue on. In this instance we have recognised that our Automatic update agent store is corrupt or that your clients may have a matched susclient ID in WSUS. More info on troubleshooting the basics first can be read about in this article by Microsoft.

This script will help your clients check back in to WSUS. If the agent store is corrupt or the client agent susclient id is botched. In my experience that a few other issues this tends to be the most common issue that crops up. Issues with Clients having the Same SUSclient ID usually happens as a result of an imaging process.

Save the below txt into a batch file, then run with elevated privileges in an Administrative command prompt on your target machine.

REM stop the Windows Updates service
net stop wuauserv
REM Delete SusClientID and AccountDomainSid registry keys
SET WU_KEY=HKLM\SOFTWARE\Microsoft\Windows\CurrentVersion\WindowsUpdate
reg delete %WU_KEY% /v SusClientID /f
reg delete %WU_KEY% /v  AccountDomainSid /f
REM Delete registry keys may contain old SUS info
reg delete “HKEY_LOCAL_MACHINE\SOFTWARE\Microsoft\Windows\CurrentVersion\WindowsUpdate\Auto Update” /f
REM Start the Windows Updates service
net start wuauserv
REM Initiate the WU Client…
wuauclt /resetauthorization /detectnow

Hope this helps as this can be frustrating waiting for clients to check back in.

Microsoft LAPS (Local Administrator Password Solution) Deployment

Password re-use… ah such a bad idea.

During a penetration test one of the most common vulnerabilities I see is the local administrators account having the same password used across all client machines in the estate, usually one for servers and one for clients. So a classic scenario I see a lot goes something like this; a vulnerability is identified in an environment lets say a nasty remote code execution, it gets exploited giving SYSTEM level privileges, you then dump creds from the box and boom you have the local administrators password, even if you don’t get the clear text password you might get the hash. You use the creds/hash with something like hydra or medusa to try a few more workstations in the environment, and hey presto your screen lights up with successful smb authentications. You now have the ability to move laterally across the network logging into workstation after workstation either dumping more creds with mimikatz or stealing tokens with incognito until you reach a domain admin account.

There are in fact a few ways in which we can contain or should I say slow down lateral movement by an attacker, one being to use a different local administrators password on every device, I’m going to walk through how we can achieve this using Microsoft LAPS (Local Administrator Password Solution). This essentially allows you set a unique local administrators password on every workstation in the domain. Thus stopping password reuse and pass the hash type attacks. Granted this is only half the problem solved however does shutdown this avenue of attack.

OK, how do we set this up?

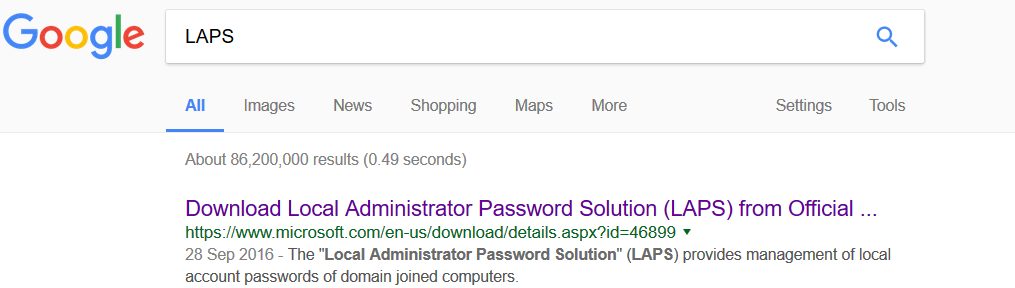
A quick search on google for LAPS and you will find the free download from Microsoft.

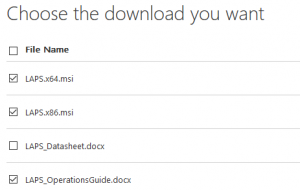
Go ahead and download the 32 & 64 bit downloads as well as the ops guide for reference.

For this demo I’m going to be using the trusty Blue Team Security lab in GNS3, you can see from the below diagram we have our Domain Controller and a few windows 7 clients to play with, great:

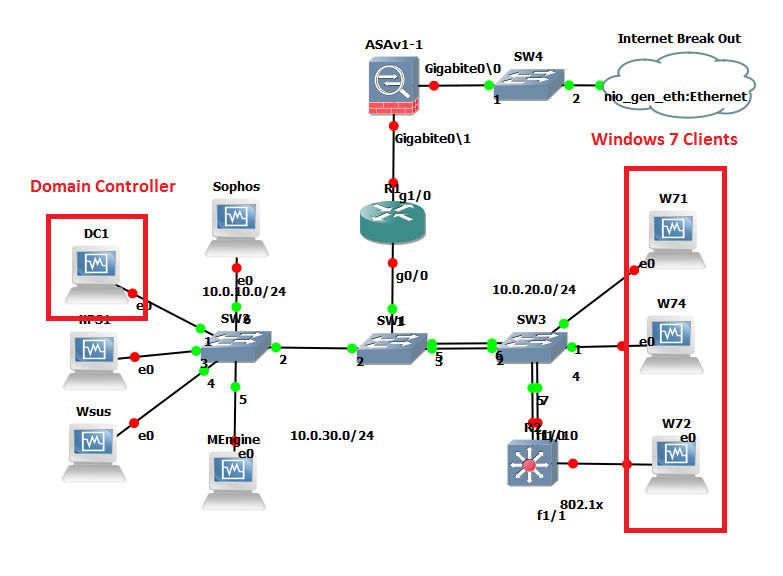
LAPS works by having what Microsoft refers to as clients and management computers within your domain. Passwords are stored in Active Directory as a computer object attribute this does mean that the password is stored in clear text. However transmission is encrypted. Management computers and its user will have the ability to fetch the password of any given client, so its important to delegate this responsibility carefully i.e to a specific security group. The msi we downloaded is the same for both client and management computers, the install has different options selected for each type. The default options being for clients. For the management computers I’m going to use ‘W71’ this is a standard Windows 7 Pro domain joined client.  For the client computers we are going to use W74 and W72, again just standard domain joined Windows 7 Pro builds.

When we talk about management machines we are talking about user admin machines so where your helpdesk or second line staff can access.

There are a couple of pre-requisites; the first is a schema update which adds two new attributes to AD these are to store the password and timestamp for password expiry. The second are some permissions that need to be setup for our clients and the users that can see these attributes.

Let’s first install the management software and tackle the schema update.

On our management computer lets go ahead and double click on the msi in my case 64 bit so ‘LAPS.x64’

Click Next.

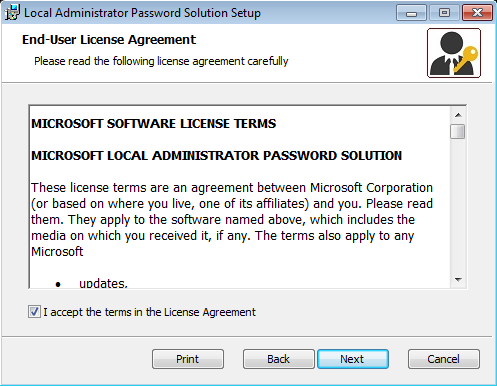
Accept the End-User License Agreement and click next.

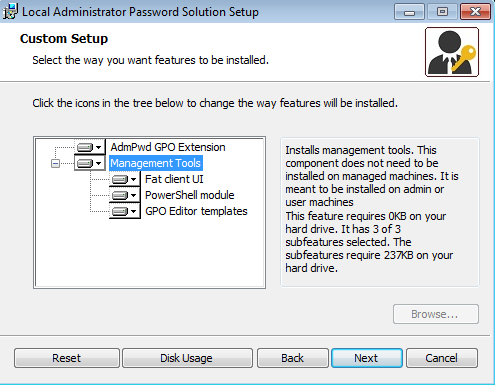
Select the ‘Managment Tools’ and select to install to all the computer and click next.

That it management install complete.

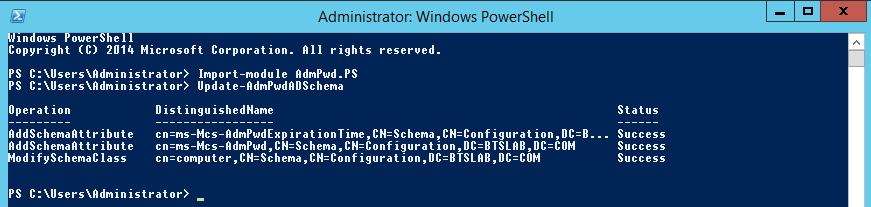
Onto our scheme update, open up an elevated PowerShell prompt with an appropriate scheme admin account, import the module and then update the schema like below:

Import-module AdmPwd.PS

Update-AdmPwdADSchema

Onto our permissions. Basically, the client machines need to be able to update the password and timestamp expiry attributes. Using the module that we have previously imported, or in the same window as before run:

Set-AdmPwdComputerSelfPermission -OrgUnit <name of the OU to delegate permissions>

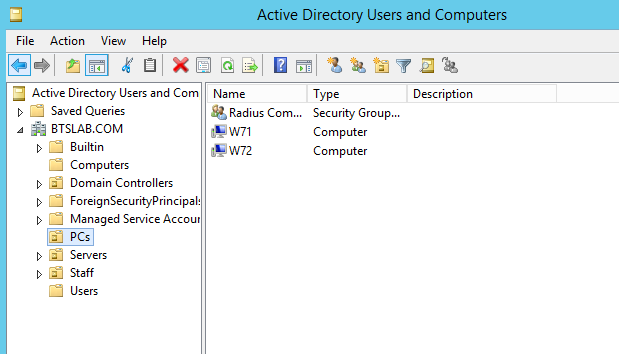
In the Blue Team Security lab this would be on the ‘PCs’ OU:

So the command would be:

Set-AdmPwdComputerSelfPermission -OrgUnit PCs

Next we will create a User Group that we can assign read permissions for the new attributes. This will essentially allow the new group and its users the ability to read the password field of the computer objects. In this case I have created a group called ‘LAPS Admins.’ The comand is:

Set-AdmPwdReadPasswordPermission -OrgUnit <name of the OU to delegate permissions> -AllowedPrincipals <users or groups>

In the Blue Team Security Lab our command would be:

Set-AdmPwdReadPasswordPermission -OrgUnit PCs -AllowedPrincipals ‘LAPS Admins’

The same again for the expiry field:

Set-AdmPwdResetPasswordPermission -OrgUnit PCs -AllowedPrincipals ‘LAPS Admins’

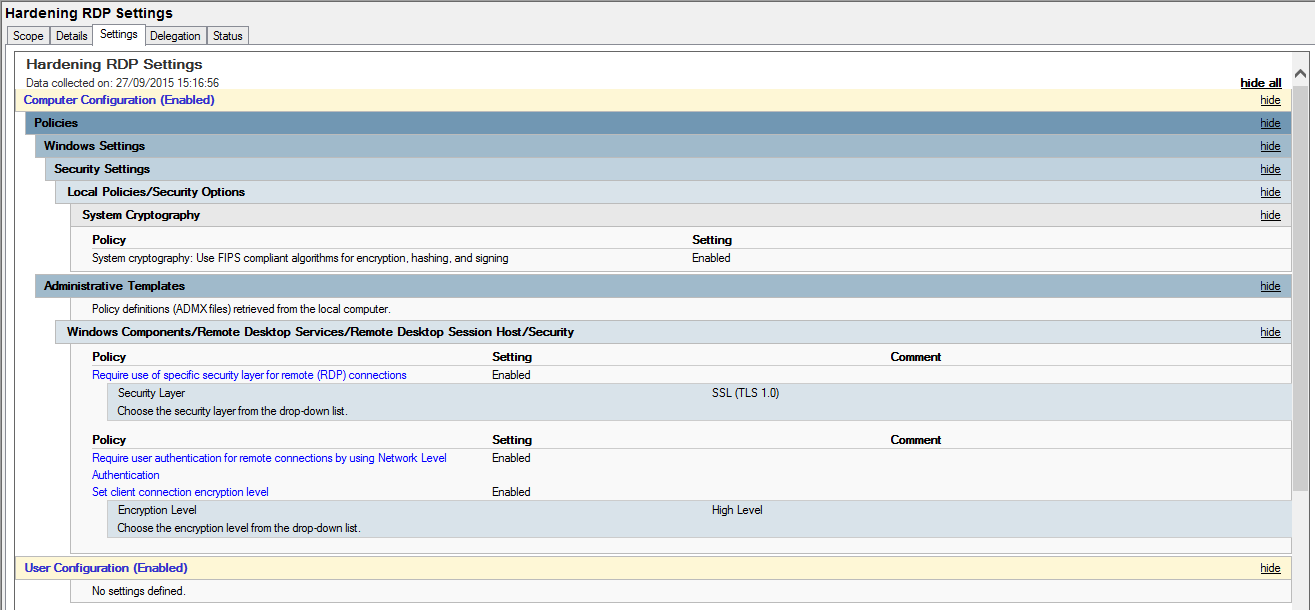
Managing clients; telling them we want to control their local administrator password is done through group policy. The policy we want to configure is a computer policy under administrative templates called LAPS, this will have been imported when the management computer software was installed. Using our management machine, in our group policy management console we want to create a new GPO under the container where our client machines are, just like below:

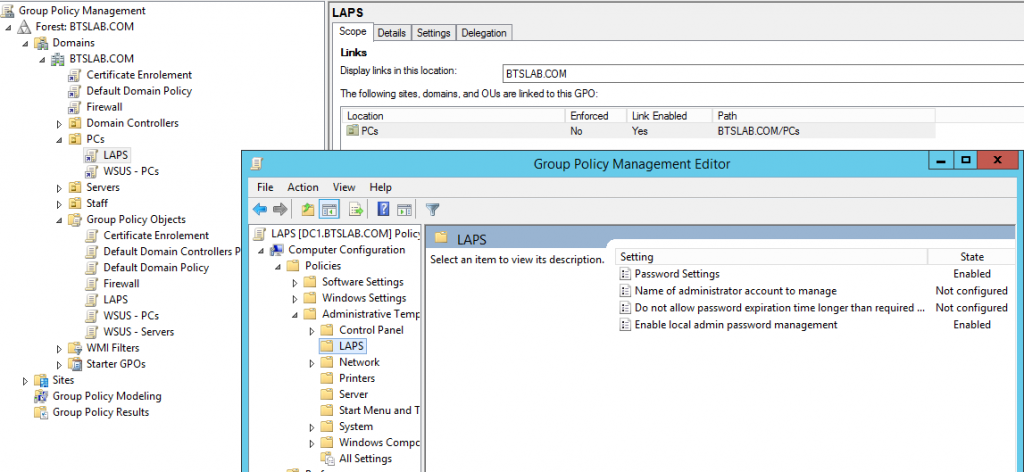
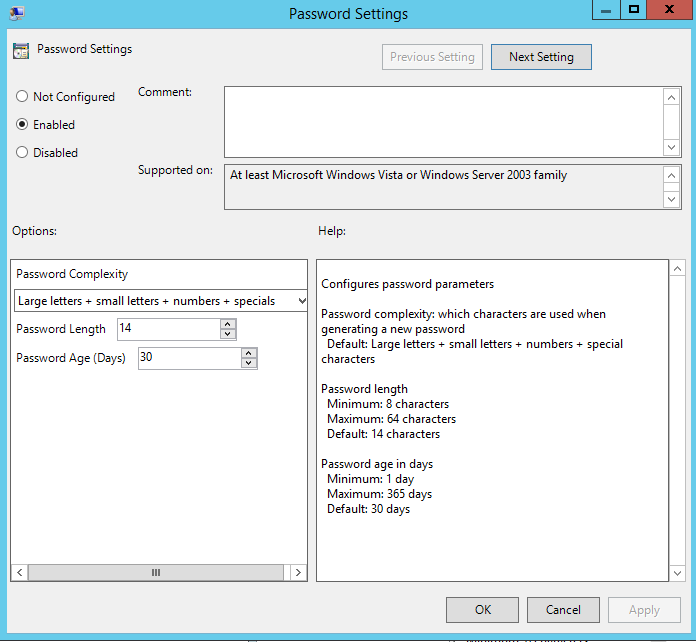
The settings we want to configure are to initial switch on the password management this is called ‘Enable local admin password management’ funnily enough and we want to enable it. Next is the ‘password settings’ this looks like, and has the below configuration options, as you can see we have a fair amount of control over the password to configure it securely. What you see below is the default settings:

Its probably worth noting if you have changed the local administrators account name via policy (and you should!), then you will need to specify the new account name in the policy ‘Name of administrator account to manage’, enable the policy and specify the new name. This policy is only needed if you have renamed the account.

Next up is installing the client side software. I’m going to manually install this however in the enterprise you will probably use SCCM or GPO to deploy to your client machines. I will perhaps demonstrate this in my next post.

Over on our client the install takes all the default values from the same msi that we used for the management computers. I won’t bore you with additional screenshots, just know that it is a next, next, next, finish situation and installed successfully on my client machine W72.

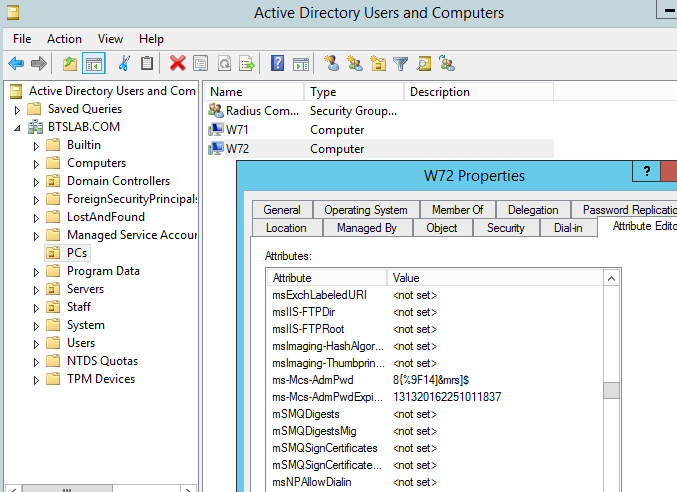
Once the above GPO has had time to take effect on our client machine we can verify the password in AD and through the fat client installed on the management computer. First in Active directory users and computers you can view the password by navigating to the computer object in question (W72 in this case) selecting the attribute editor and scrolling down to the value ‘ms-Mcs-Adm-Pwd’ this value is our new password the one below it is the expiry time (you will need to have selected ‘Advanced Features’ to view the attribute editor on the computer object) and be viewing with the appropriate rights (ie be part of in our case the LAPS Admins group):

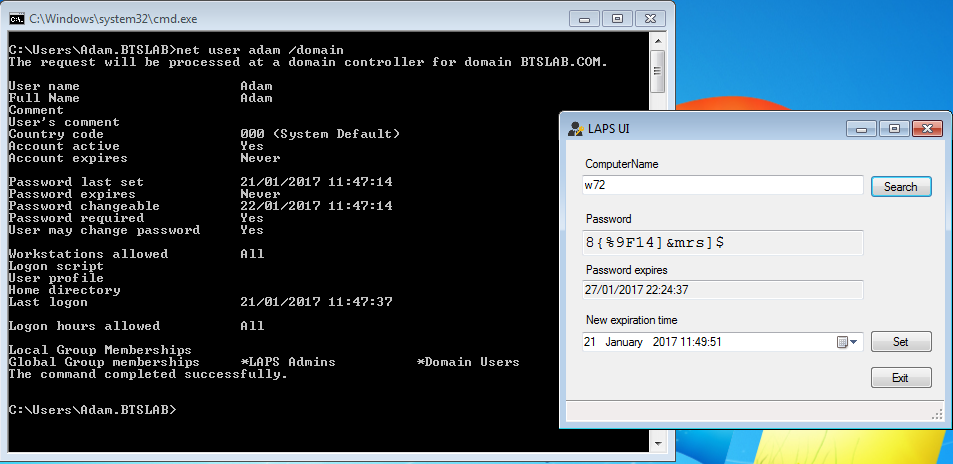
On the management machine with the account ‘Adam’ which is a member of the ‘LAPS Admins’ group through the fat client UI (which does require DotNet4).

Just to demonstrate if we log in with ‘Bob’s account on the same management computer and try to use the same LAPS UI tool the following expected results are shown, not the bob is not a member of the ‘LAPS Admins’ group and so the password is blank, ace!

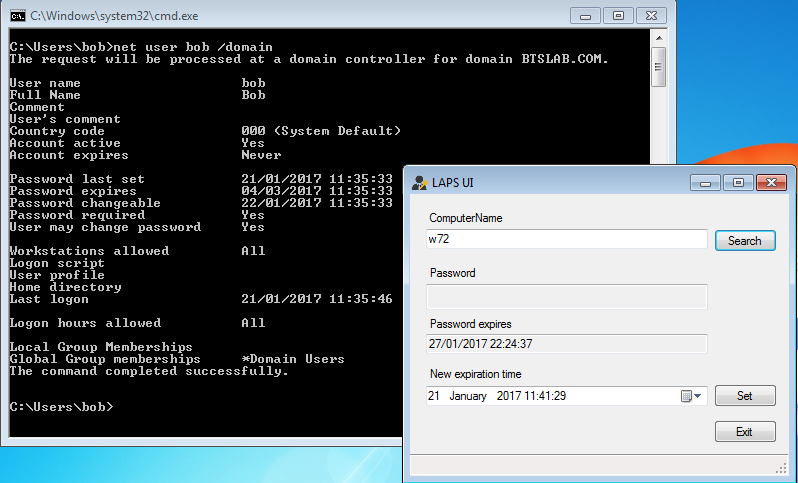
And for the die hard CLI users you can of course use powershell to retrieve the password with the appropriate account of course:

You can now try out your new unique local administrators password. Now even if the box has been compromised an attacker will struggle to crack the likes of the above password and secondly won’t be able to reuse the hash to authenticate to another machine. Remember to test out in your lab before in production. I hope this has been informative.

Unquoted Service Paths

Fixing Unquoted Service Paths in Windows.

This is just a short write up on unquoted service paths, what they are, why they are bad and how we can fix them. A vulnerabilty scanner will often find these on an ‘Authenticated’ type of scan. However we can search for them via WMI (Windows Managment Interface) query or by manually looking through the services one by one. So what is an unquoted service path? It is the path/file location of the service-exe for a given service that isn’t wrapped in quotes, like in the picture.

OK, so what? Why are these bad?

The problem with unquoted service paths is that as windows starts up or as the service is started Windows needs to locate the service-exe for that service. (I keep saying ‘service-exe’, well we’ll come on to that in a sec!). It looks for the service-exe in the path specified in the ‘Path to executable:’ field of the service. If the path is quoted and contains white space in the path windows knows to go directly to the location. If the path is unquoted and contains white space, Windows will essentially query the different locations in the path until the service-exe is found.

Where the service path contains white space and is unquoted, an attacker can use this to escalate privileges from a standard user account. For example if the service is running as SYSTEM, an attacker can create a service-exe to say create an account and drop it in the local administrators group. The attacker would also need to have ntfs permissions as the standard user in the location in the path so ‘C:\’ might not be viable however further down the path might be. The attacker then restarts the service and the new service-exe will be executed by the service running as SYSTEM.

The service-exe I keep refereing to is special type of executable file that is used by services, its not any old exe you can’t just drop cmd.exe in the path unfortunatly…

If I can’t do an Authenticated Vulnerability Scan how can I find them..?

We can use two methods, we can either use WMI query or manually open up each service and check each one, then check the ntfs permissions of each location. We can use the follwoing WMI command from Common Exploits; this will filter out the automatic service and also look for unquoted service paths:

wmic service get name,displayname,pathname,startmode |findstr /i "auto" |findstr /i /v "c:\windows\\" |findstr /i /v """

Running the above wmi query will display something like the the following if present:

WMI Query of Unquoted Service Path

As we can see large mainstream manufactures still implment unquoted service paths!

I’ve found one, how do I fix it?

This is relatively straight forward however this should be tested before being rolled out into production (goes without saying). We need to add the quotes to our service path so windows know where to go for the service-exe directly immediatly, rather than searching each directory. We can do this through the registry.

Fire up the registry and navigate to the service as below:

Registry Unquoted Service Path imagepath

Open up the ImagePath string and simple add the quotes as below:

quotes

Restart the service and ensure the service starts properly. We can also open up the service and also re run the WMI query  to ensure our affected service now has quotes. This will ensure any attackers should they manage to compromise the machine as a standard user, stop them being able to escalte privileges in this manner!Unquoted Service Path Corrected

Hopefully this post will help you resolve the uquoted service path issue.

Windows Client/Server Hardening Part 1: Remote Desktop

We can harden the Windows Client/Server Remote Desktop Protocol (RDP) in several ways using either local settings or preferable through Group Policy. As a minimum we should harden RDP in the following ways:

  • Using Network Level Authentication (NLA).
  • Setting Terminal Services Encryption Level to High.
  • Force the use of TLS 1.0 protocol as a transport layer for the service.
  • Setting the local security policy of the either the server or client to use only FIPS-140 compliant cryptography.

This post will we go through how we can accomplish these tasks.

Network Level Authentication (NLA)

Network level authentication allows the client to authenticate earlier in the remote connection process rather than the normal process.  This option is most commonly seen in the Remote Desktop settings in the system properties as below:

RDP - NLA
Remote Desktop Settings – Network Level Authentication

However it is far easier to set this via Group Policy and distribute to all your Servers as below:

RDP- NLA GPO
Remote Desktop Services – Network Level Authentication GPO

This can be applied to both Servers and workstations from Windows Vista and above.

Setting Terminal Services Encryption Level to High

Setting the Encryption level to High encrypts data sent from client to server and server to clients using 128 bit encryption. Like with the above example we can set the Terminal Services Encryption level to High either locally on the server or via Group Policy. In a domain environment the GPO is the way to go. With windows server 2008 this could be set locally through the GUI by navigating from the start menu–>Administrative Tools–>Remote Desktop Services–>Remote Desktop Session Host Configuration, then double clicking on the ‘RDP-TCP’ connection in the middle of the screen. The Encryption level can be found on the General tab as below:

Remote Desktop Services - Encryption Level 'High'
Remote Desktop Services – Encryption Level ‘High’

Unfortunately Microsoft removed the  ‘RD Session Host Configuration’ options as standard with Server 2012 R2. Rather than adding in the whole RDS role to apply this option in the GUI you can apply it via GPO which will in turn apply to both 2008 and 2012 as below:

RDP - Encryption Level High GPO
Remote Desktop Services – Encryption Level High GPO

Force the use of TLS 1.0 protocol as a transport layer for the service

Forcing the use of TLS 1.0 mitigates the risks associated with SSL 3.0 protocol. Like with the previous option this can only be set in the GUI locally on Windows Server 2008. With this being said, and from a management perspective GPO is our preferred option, in order to apply this setting to both Windows Server 2008 and 2012.

This option is set in Windows Server 2008 locally by navigating from the start menu–>Administrative Tools–>Remote Desktop Services–>Remote Desktop Session Host Configuration, then double clicking on the ‘RDP-TCP’ connection in the middle of the screen as below:

RDP - TLS 1.0
Remote Desktop Services – Security Layer TLS 1.0

The GPO is located here:

RDP - TLS 1.0 GPO
Remote Desktop Services – Security Layer TLS 1.0 GPO

Setting the local security policy of the either the server or client to use only FIPS-140 compliant cryptography

This hardening technique can be accomplished by enabling the ‘System Cryptography’ through the Local computer policy editor or through GPO via the domain. It will force the use of FIPS-140 compliant cryptography for either the client or server across the system. This is windows system setting rather than an RDP setting, however by setting this you will be forcing the use of FIPS-140 compliant cryptography for Remote Desktop settings. If this setting is enabled only the FIPS-140 approved cryptographic algorithms are used: 3DES and AES for encryption, RSA or ECC public key for TLS key exchange and SHA256, SHA284 and SHA512 for TLS hashing. In the case of Remote Desktop it will only use 3DES.

Adding through the local computer policy can be achieved by opening a Microsoft Managment Console (MMC) adding a snap in; Group Policy Object Editor. As below:

RDP - FIPS-140
Remote Desktop Services – FIPS-140 ‘Enabled’

Setting via GPO can be achieved as below:

RDP - FIPS-140 GPO
Remote Desktop Services – FIPS-140 GPO

Hardening RDP – GPO Settings

Putting all these settings together in one GPO would look something like this:

Hardening RDP - GPO settings
Hardening RDP – GPO settings

It clearly goes without saying you should first test these methods out for yourself in a safe test environment first before diving into your main production domain or web servers. Adding higher grade encryption to your communications across the domain may have extra computation costs in terms of performance on your network.