Pwnkit, this is a bad one a really bad one as the “Policy Toolkit” “Polkit” package is installed by default on almost every major Linux operating system distribution after 2009.
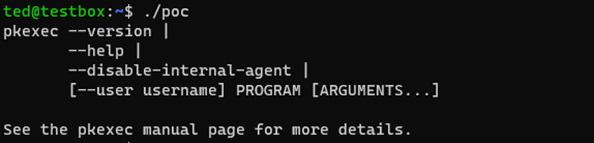
The Polkit package was first released in 2009 therefore the OS needs to be newer than this date, but not updated after January 2022. It essentially allows for an unprivileged user to interact with the pkexec utility to gain full local privilege escalation with relative ease. Polkit can be thought of as similar to sudo, pkexec is the front end SUID-root program, both in gui and cli form. pkexec takes a number of command line arguments like below:
The crux of the vulnerability lies within passing x amount of arguments to produce and out of bounds write, eventually overwriting a system environment variable.
Exploit:
We will use the following exploit code by Andris Raugulis located here to gain LPE. We will simply compile with gcc and run as below:
As you can see this instantly pops root privs. For info this is a recent Ubuntu server.
Fix:
Patches are being rolled out however the recommended temporary fix by Qualys is to remove the SUID bit from the pkexec binary. This can be done with a command such as the following: chmod 0755 /usr/bin/pkexec
If you run the exploit against a patched system it simply return the pkexec help menu:
Running MBSA on remote machine that is in a workgroup or different domain.
I thought I would share my findings on using MBSA (Microsoft Baseline Security Analyser) for targeting remote machines that are not part of the same domain or in a workgroup. This really is a great tool for enumerating OS patch levels.
We have two scenarios to run through; the first, running MBSA on remote machine that is in a different domain from the machine that it is installed on. The second, running MBSA on a machine that is in a workgroup. Ok no problem. Here is what we do.
First Scenario
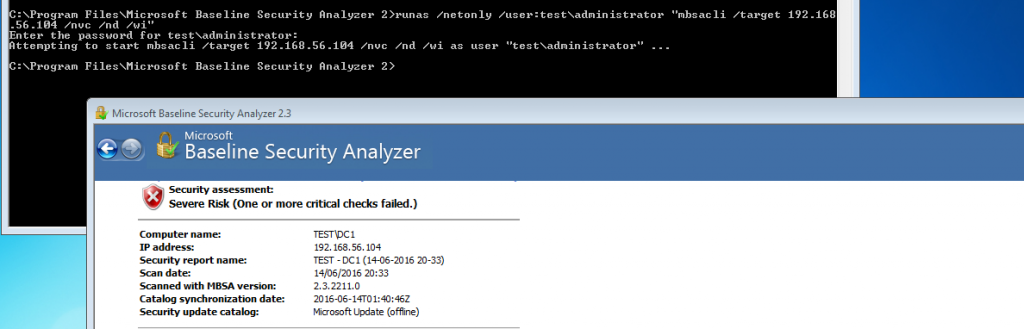
In the first scenario our target machine is a Windows Server 2012 R2 machine that is in a different domain to our MBSA host (Windows 7 Pro 64bit). Fire up a cmd prompt with admin privileges from the machine that you are running MBSA from, and run the following syntax:
A second command prompt will pop up and run, running the syntax as above:
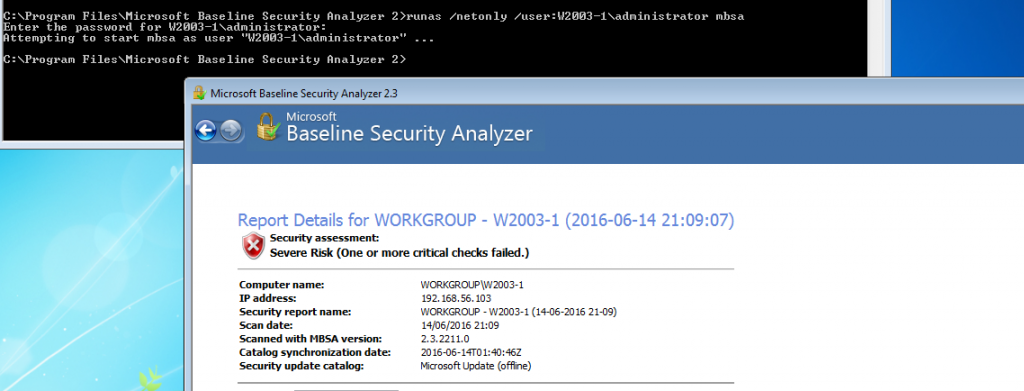
If you wait a short while the MBSA command prompt will disappear when finished, from here you can open up MBSA and view the report:
In this example the target machine was in my virtualbox lab, in a domain called ‘Test’. The machine I ran MBSA from was a Windows 7 Pro machine in a workgroup (no relationship) other than IP connectivity. The cli syntax I used here was used to speed up the check, clearly only use this if you have the latest scan catalogue:
/wi – Show all updates even if not approved by wsus.
/nvc – Do not check for a new version of MBSA.
/nd – Do not download any files from MS update site when scanning.
Additional options:
/target <Target-IP>
/listfile C:\tmp\targets.txt
/catalog C:\tmp\wsusscn2.cab
Add: ‘>C:\tmp\MBSADC1.txt’ to the end of the syntax for a handy output to a text file.
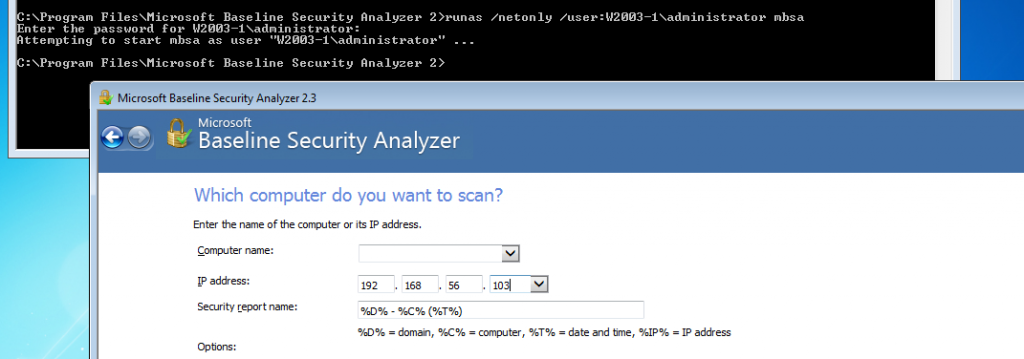
The second scenarios is a Windows Server 2003 machine that is in workgroup. The syntax is actually the same however your specifying the local machine name rather than the domain name. I have mixed this one up a little here by not using the cli, by just specifying MBSA the command simple fires up MBSA GUI as the account specified. The only thing to remember here is to add the IP address into the GUI.
runas /netonly /user:test\administrator mbsa
And again after the scan has finished the results can be view in the GUI.
I haven’t successfully managed to do this from a Windows 10 client yet, various forums would suggest it isn’t supposed to work with 10 however if you know please feel free to drop me an email or comment.
Check your Egress Filtering with a PowerShell port scan script
This is just a quick post so I can refer to myself more than anything regarding conducting a Powershell Port Scan! However this is a useful couple of lines to to conduct a port scan from a windows device with PowerShell. This can be used in a number of situations however is especially ideal to check your egress filtering out to a server on the internet or to a segmented network. In the below few lines we are testing the first 1000 ports this can be bumped up to 65535 if wanted and the server that you are port scanning is listed as X.X.X.X.
This particular script has been pulled from Black Hills Information Security page here. An alternative from Microsoft’s ‘Hey, Scripting Guy! Blog’ can be found here.
The Common Problem
Often organisations lack adequate egress filtering, by this I mean outbound connects that can be established on a number of ports from within the heart of the network. Client machines and typical internal application servers don’t need to access a range of services out on the Internet. Once a nasty exploit has got an attacker onto a network they will look to get a foothold within the network lateral move and phone home to command and control server. Having a range of ports open to clients and servers allows attackers to make an outbound connects from whole host of tools, including PowerShell for that matter.
The Solution
Check you egress filtering and lock down any unwanted open ports out to the internet, your perimeter firewalls should not allow these outbound connections. Obviously certain services are going to need to make outbound connections such as web proxy and email gateways and these rules should be appropriately provisioned. To take this one step further enable your outbound firewall rules on your local hosts, ‘hang on a sec, you must be crazy’ I hear you say, however by doing this you will be help prevent the lateral movement of attackers through your network as well as being able to get off your network back out to the Internet.
Free Active Directory Monitoring with PowerShell, keep an eye on those high privilege level groups!
Keeping an eye on privileged Active Directory groups is Important. We can do this by Monitoring Domain Admins with PowerShell. Groups such as ‘Domain Admins’ (DA) and ‘Enterprise Admins’ (EA) in Active Directory (AD) is vitally important within your IT shop. You need to be aware of any changes happening to high privilege level groups. Especially ones that have the level of access that DA and EA groups have. This of course also extends further than just administering AD privilege groups. In addition to these you may also want to monitor your high privilege level application groups. Such as Lync and SCCM. The worst case scenario is you find a username you not aware of has been dropped in your DA group. As soon as this happens you want to know and investigate immediately. You don’t need any fancy tools to monitor active directory groups. You just need a few lines of PowerShell coupled with the Send-MailMessage feature. Very quickly you have some powerful alerting.
Solution:
I’ve just pulled the below script together in a few minutes which very simple pulls the DA group and emails the contents to the desired location in the script.
$EmailBody = "The Domain Admin group has the following members verify these are correct:
              $currentmembers "

$currentmembers = (Get-ADGroupMember -Identity "Domain Admins").name | out-file -filepath C:\temp\currentmembers.txt

$Email = @{
            'From' = 'Active Directory Administrator <admin@test.lab>'
            'To' = 'adam@test.lab'
            'Subject' = 'Current Domain Admin Members'
            'SmtpServer' = 'my.smtpserver'
            'Body' = $EmailBody
        }
        Send-MailMessage @Email
This is just a simple script to query the contents of a group and mail it. What you would ideally want is a comparison of a before and after state. In addition some intelligence within the script. This would be to either; email you if any changes have been made including the additions. O alternatively do nothing if no changes have been made. Then schedule the script to run every 5 minutes with Task Scheduler. This allows you to have pretty good overview of your high privilege accounts. Such a script thankfully already exists over at TechNet https://gallery.technet.microsoft.com/scriptcenter/Detect-Changes-to-AD-Group-012c3ffa
Alternative tools do exist such as SolarWinds LEM and ChangeAuditor. However using PowerShell is free after all and requires very little effort to implement! As a bonus you’ll boost your PowerShell skills.
Symmetric Encryption Techniques – Block and Stream Ciphers.
Two types of symmetric encryption techniques that are used are Block and Stream Ciphers, in this post I will cover them both in a high level comparison.
Block Ciphers
Block ciphers take a section of plaintext (a block) and turns them into block of ciphertext of 64 or 128 bits. The block size is how much data is encrypted in one go.
The output from a block cipher is usually larger than the input data, due to the ciphertext being a multiple of the orginal block size.
Common modes of operation block ciphers are Cipher Block Chaining (CBC) and Electronic Codebook (ECB). Block ciphers include DES with a 64-bit block size and AES with a 128-bit block size.
Stream Ciphers
Stream ciphers encrypt plaintext one byte or one bit at a time, as opposed to a block of data at a time as with a block cipher. With a stream cipher, the conversion of these smaller plaintext sections of data can vary, depending on when they are viewed during the encryption process. Stream ciphers can be much faster than block ciphers, and usually do not increase the message size, because they can encrypt an any specific number of bits.
Stream ciphers include RC4 (and the RC series) ciphers. DES can also be used in stream cipher mode.
Ways to mitigate VLAN Hopping Attacks on a Cisco Switch.
The ways in which we can prevent basic vlan hopping attacks on a Cisco Switch are more best practice security configurations. Vlan hopping attacks can occur in one of two ways. The first by an attacker spoofing DTP messages directly to a switch, if the switchport has Dynamic Trunking Protocol (DTP) enabled it can then negotiate a vlan and receive tagged packets for that vlan. The second is by introducing a rogue switch and again taking advantage of DTP and negotiating a trunk with the switch and then allowing it to receive all vlans. Not good!
We can do the following to prevent this:
Disable Dynamic Trunking Protocol (DTP) for non-trunked ports with switchport mode access – this should always be done for all ports straight out of the box!
Disable Dynamic Trunking Protocol (DTP) for all trunked ports with switchport non-negotiate.
Manually enable trunk ports with switchport mode trunk.
Set the native vlan to an unused vlan rather than just leaving it on vlan1 with switchport trunk native vlan(your vlan number)
Put all unused ports into an unused vlan and then disable all unused ports – again disabling all unused ports should be done straight out the box.
As an industry we need more information security defenders to play the role of the blueteam in the Enterprise. All too often the IT Team receive a pentest report with a list of red criticals and are immediately overwhelmed with issues to fix. Whilst an organization has regular pentests it has the danger of lulling itself into a feeling of ‘doing the right thing’ however if all they are doing is getting a pentest and not re-mediating the issues then its a waste of time and money. This is a pessimistic view however it is usually the case that more vulnerabilities are released that the IT know what to do with. The IT team tend to either not have enough resource or they don’t have the skills to fix the issues, usually the first being being the case. Penetration testing needs to be more than just a test, it needs to be a more proactive engagement with after test help and support for the enterprise should they need it.
Its easy to criticise the IT department. As Information Security Professionals, we are doped daily with the next new exploit or zero day from the various blogs and podcasts that we listen to. This isn’t a small IT departments main concern or top of their list of to do tasks when they arrive at work, (although it could be argued it should be, with a little more security awareness training). The IT team tend to prioritise keeping those critical business apps or switches up and running (I’ve been that person).
As Information Security Professionals we need to be more involved in fixing and explaining the risks and supporting organisations so that they are better equipped to defend themselves.
The next new shiny security toy in the enterprise may not necessarily be the answer, the existing tools already installed around us could be better used and more creatively used to defend the enterprise. Getting the latest IDS or implementing the next new NextGen Firewall can tend to be a distraction to getting down to what needs to be done i.e. Getting that MS08-067 patched on that business critical server that’s been there for years or tightening up the existing firewall. Hardening existing systems with group policy, tuning WSUS or SCCM to deploy timely updates and utilising windows logging to alert when a domain admin group is modified for example will generally go far further, and are free.
Hopefully sites like this will help contribute to securing enterprises, and assisting system administrators to better defend their existing environments. Enterprises don’t necessarily need to spend huge amounts of money on new technology, the answer could be in being more creative with what you already have.
Many vulnerability scanners will often bring back HTTP TRACE TRACK Methods Allowed against Apache and Microsoft web servers of the older generation. TRACE is usually associated with Apache and TRACK for Microsoft. This has a CVSS score of 4.3 and is a relatively easy fix. Clearly the older generation operating systems should be migrated to a supported platform, both the later distributions of Ubuntu and Microsoft 2012 R2 do not allow these methods to be used. However a simple way to validate this finding is to use telnet to connect to the web server on port 80, once connected you can type something similar to the following for each method. The ‘Host’, ‘TestA’ and ‘TestB’ aren’t needed however if you use some custom text you will be sure to see it echoed back by the web server if trace is enabled.
TRACE / HTTP/1.1
Host: 192.168.0.29
TestA: Is this correct?
TestB: Are we sure?
Tap return twice to send.
Which would look something like the below as you can see the user input was returned, the web server accepting the method:
HTTP Trace enabled on Apache
Remediation:
As I said the HTTP TRACK / TRACE issue is this is relatively straight forward to fix, simple add ‘TraceEnable off’ somewhere in your main Apache config file outside of the vhost configuration.
Once implemented retesting should reveal that the method is not allowed:
I have been recently testing out some SIEM (Secuirty Incident & Event Management) software by SolarWinds there LEM product, (a review for another post perhaps). During the testing I can across the requirement to relay mail notification emails out to a set of test users (this typically being IT, 3rd Line in my scenario) based on certain events, I wanted to ensure the rules were being fired correctly. I haven’t really come across this requirement before in testing so had to give this some thought. I didn’t really want to stand up a whole mail environment with clients etc in my lab simply due to complexity and configuration hassle that I should imagine it would entail, it also takes the focus off what I’m actually trying to achieve. Whilst googling some idea’s for ‘quick and dirty mail deployments’ I came across ‘mailtrap.io’.
Mailtrap.io essentially allows you to relay mail out across the Internet to there mail servers without it actually being forwarded onto the end recipient, a little bit like a fake smtp server. It is specifically designed for test, dev and QA environments for testing mail notifications without actually sending emails to customers or users. You can view the email messages online.
You can sign up for free account which gives you a single mailbox and allows you to receive upto 50 email messages. You receive a username and password and all the other details required for relaying mail, such as smtp address etc. These can be reset at the flick of a button enabling you to reset the creds at the end of your lab session.
Thumbs up for mailtrap.io I will be using this again in the future no doubt check it out at http://www.mailtrap.io
This is Part two of Securing SSH in the Server Hardening Series. In this post we will continue to walk through the remaining hardening options for SSH.
In Part 1 of Securing SSH located here we discussed:
Disabling SSH Protocol 1 and using 2.
Limiting the users who can login.
Disable root login and unsing only a standard user account.
Run SSH on a different port.
In Part 2 of Securing SSH we will now cover the remaining techniques:
Use Public Private keys for Authentication
Filtering SSH with iptables
Setting strong Cryptographic Algorithms
Use Public Private keys for Authentication
As we know passwords can be subject to brute force attacks and given enough time simple passwords can be broken. Using SSH public private key pairs for authentication is a more secure method. Its a more secure method of logging in than using a password due to the computational power and time needed to decipher the public private key pair through brute force. The private key is used on the machine from which you are logging in from and the public key is used on the server or machine which you are establishing an SSH session with. In addition to using the key pair you can use a passphrase to secure the key pair. Should the key pair become compromised you have a an additional fallback and time in which to remove the public key from server it is being used on.
First we need to create the key pair, you can create either an RSA (Rivest-Shamir-Adleman) or DSA (Digital Signature Algorithm) key pair. The default key size in Ubuntu is currently 2048 however you can specify the -b parameter for a high keysize for example ‘-b 4096’. In this example we are creating a keypair for the root login, you should ideally do this for a standard user however this is just to demonstrate the procedure.
In this example we are creating the key pair on the same test ubtunu 14.04 server as the one which we are going to be using the keys to actually access. In reality there are a number of ways and platforms from which to create the key pair, whether that’s on the server or client OS.
ssh-keygen -t rsa -b 4096
After the above command you will be prompted with some further questions, what and where the keys will be stored. Press enter and move on to accept the default files name, you can specify your own file name, the files will be created in the current working directory.
You will next be prompted to enter a passphrase, you have the option to enter one here. Doing so adds a layer of complexity for anyone that has already obtained the key pair and thus further hardens your configuration. If you enter a passphrase you will need to enter it in every time you ssh to the server.
The whole process will look like this:
SSH Key Generation using RSA 4096 key
If we now look in the ssh folder in the home user directory for root (or where ever you chose to save the files) we will see our key pair. The private key is called id_rsa and the public key is id_rsa.pub:
SSH Key files
At this point it would be wise to backup both sets of keys. You will need to copy off the private key for you to use from your local machine that you will be ssh’ing in from, we could do this in many ways either using winscp from a windows operating system alternatively we can view the private key and use copy and paste the contents from an existing session. Remember the folder is hidden, with the period in front of the folder name (.ssh) if your looking for it in winscp ;-).
We will need to move the public key into the ‘authorized_keys’ file on the server you are going to be using the keys for (the same server in our case), and restart SSH. The .pub file should be copied over to the correct profile you will be ssh’ing into.
cd .ssh
cat id_rsa.pub >> authorized_keys
service ssh restart
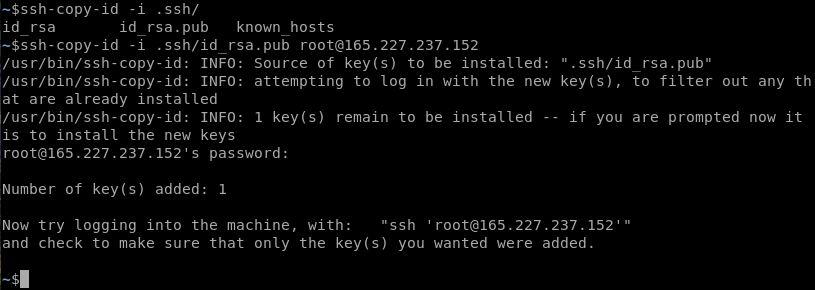
If I had created the key pair on my client machine I could use the ssh-copy-id command in order to get the public key onto the server like below:
At this point you are ready to test the rsa key authentication method. I would strongly recommend you test this at this stage whilst you still have regular username and password ssh authentication enabled, in case you have made a mistake and can’t get back in. If you going to be testing from putty or winscp you will need to use puttygen to convert your private key file into a format that putty can read which is a ppk file. This is a straight forward task.
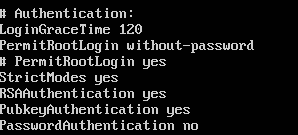
Once tested and you are ready to start using your key pair you will want to remove the ability for ‘root’ (and other user in this example) to login with a username and password. Only do this after you have successfully used your key pair and are comfortable with the process. In the ‘sshd_config’ amend the ‘PermitRootLogin’ to read ‘PermitRootLogin without-password’ and add a line that reads ‘PasswordAuthentication no’ like below.
Restart ssh service one final time. This will deny access via username and password.
Filtering SSH with iptables
I demonstrated the use of iptables in one of my previous posts here, so won’t be going into this again.
Setting strong cryptographic algorithms
In this particular section of the post we are going to look at how we can customize the cryptographic algorithms that SSH can use and further optimize these so we are only using the most secure ones available. To dig a little bit deeper here there are two specific issues we are going address. The first being the type of encryption mode that is being used, and the second being the use of weak MAC algorithms.
At the time of writing (as this will change) your average vulnerability scanner will detect ssh on port 22 and will try to negotiate a session with the service. In doing so it will detect the cryptographic properties that the server would like to use, in your typical out of the box setup CBC (Cipher Block Chaining) encryption mode and MD5 or 96-bit MAC (Message Authentication Code) algorithms will be configured, both of which are considered weak. The use of CBC encryption mode for SSH is currently scored as CVSS Base Score 2.6 equating generally speaking as a Low risk. We can correct this by disabling CBC encryption mode, and enabling a different type of mode such as CTR or GCM. The use of weak MAC is also scored with a CVSS Base Score of 2.6 equating again generally speaking as a Low risk. This can be correct by removing the use of MD5 and 96 bit MACs.
Amend or appending the following lines to the /etc/ssh/sshd_conf file will resolve this issue, there are other variations that you could use however this will rectify the issue:


 As an industry we need more information security defenders to play the role of the blueteam in the Enterprise. All too often the IT Team receive a pentest report with a list of red criticals and are immediately overwhelmed with issues to fix. Whilst an organization has regular pentests it has the danger of lulling itself into a feeling of ‘doing the right thing’ however if all they are doing is getting a pentest and not re-mediating the issues then its a waste of time and money. This is a pessimistic view however it is usually the case that more vulnerabilities are released that the IT know what to do with. The IT team tend to either not have enough resource or they don’t have the skills to fix the issues, usually the first being being the case. Penetration testing needs to be more than just a test, it needs to be a more proactive engagement with after test help and support for the enterprise should they need it.
 Many vulnerability scanners will often bring back HTTP TRACE TRACK Methods Allowed against Apache and Microsoft web servers of the older generation. TRACE is usually associated with Apache and TRACK for Microsoft. This has a CVSS score of 4.3 and is a relatively easy fix. Clearly the older generation operating systems should be migrated to a supported platform, both the later distributions of Ubuntu and Microsoft 2012 R2 do not allow these methods to be used. However a simple way to validate this finding is to use telnet to connect to the web server on port 80, once connected you can type something similar to the following for each method. The ‘Host’, ‘TestA’ and ‘TestB’ aren’t needed however if you use some custom text you will be sure to see it echoed back by the web server if trace is enabled.

 Email Relaying with mailtrap.io