SSH ProxyCommand & ProxyJump

SSH ProxyCommand and ProxyJump to the rescue for jumping through multiple SSH hosts. I was asked by a fellow team member how we access RDP through two Linux hosts recently. I had to think for a moment, and remembered good old ProxyCommand and ProxyJump. So I thought I would post this up as a note to self and anybody else who might find this useful.

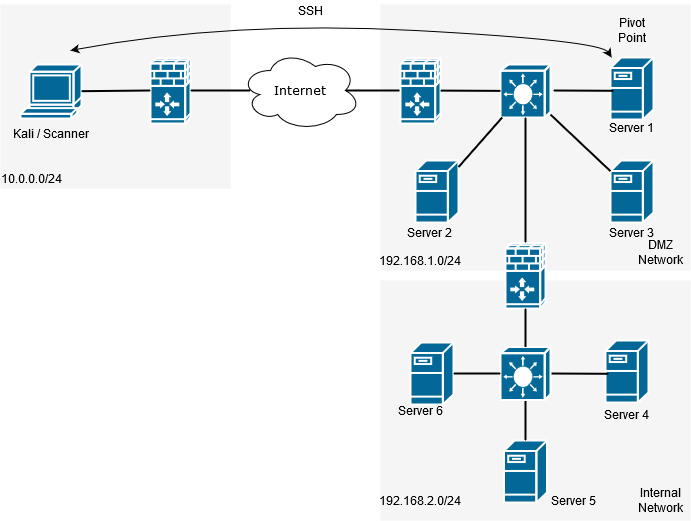
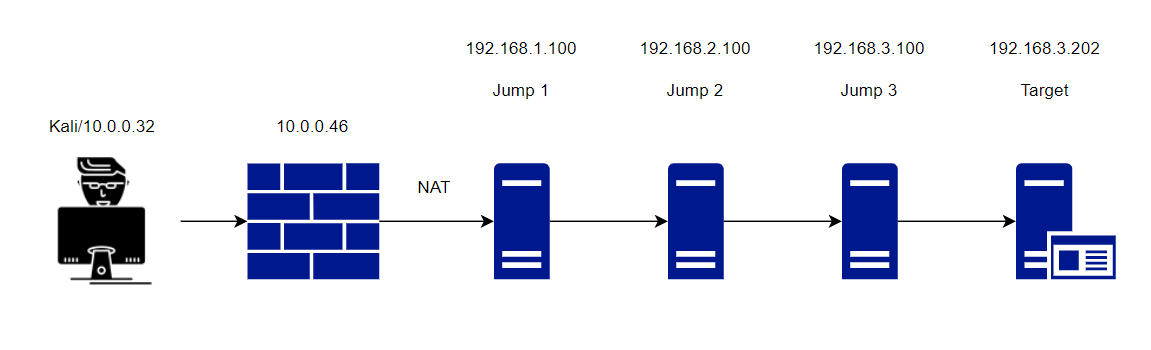
In this scenario imagine we are on the outside of a NAT firewall (this could be across the internet of internal network), we need access to a windows host several networks deep with only Linux/ssh hosts to jump across. Similar to the below:

How do we achieve it? Well, we can actually do this several ways with different commands. One way is to SSH to each host in turn and do a local port forward. That seems a bit long winded. Another approach would be to formulate a set of SSH commands in the /etc/ssh_config file, again a bit long winded. Alternatively, a one liner more suited in this situation would see multiple SSH commands nested together with local port forwarding. There are actually also (not surprisingly) several ways we can achieve a one liner using the likes of ProxyCommand, ProxyCommand with nc and newer versions of openssh ProxyJump.

With ProxyCommand this is what our command would look like:

ssh -o "ProxyCommand=ssh -W %h:%p -o 'ProxyCommand=ssh -W %%h:%%p -L 3389:127.0.0.1:3389 root@10.0.0.46' -L 3389:127.0.0.1:3389 root@192.168.2.100" -L 3389:192.168.3.202:3389 root@192.168.3.100 -vv

This will prompt you at each host for the password, unless you use SSH key pair with no password.

There are a couple of key elements in this one liner that we will go through:

-o : This is used to specify the option you want to use, in this case proxycommand.

-W : This is important, as this redirects the std input/output back to your host securely. Two additional options after the -W are %h which is our kali host and %p is our ssh port. This is specified in each proxycommand, note in the second command the %% this is essential to escape the characters. Note -W is not to be confused with lower case -w which is for a completely different task.

-L : This is our regular local port forward, in this case at each jump host we forwarding back 3389.

Another more neat and simpler way to do this is to use the ProxyJump command which is shortened to -J.

ssh -J root@10.0.0.46,root@192.168.2.100 -L 3389:192.168.3.202:3389 root@192.168.3.100

With ProxyJump we are setting our jump hosts in line one after the other comma separated and just setting the local port forward on our final host. This tunnels the port right through from your local box through to the destination server.

All that is left to do now is to use rdesktop or xfreerdp to 127.0.0.1 on 3389 using either proxycommand or proxyjump.

Pretty cool huh.

Networking Pivoting via SSH – Scanning with Nessus Professional behind a Firewall or NAT.

In this post I’m going to be covering the process to scan a network behind a Firewall or NAT using Networking Pivoting via SSH without being limited to proxychains, specific ports and protocols. Essentially this will use SSH tunneling, virtual tap adapters, some routing and masquarding in IPtables. The beauty of this method is the prerequisites are very low, for the most part no additional packages or standalone tools are required, we can use what is shipped with most Linux builds.

There are many use cases for this, scanning an internal network without being on prem, cloud environments, various pentesting scenarios, which can often be the stumbling point once a shell has been landed. Traditionally this type of task would have been done with the use of proxy chains, through some form of shell access via a netcat listener, Metasploit or SSH dynamic port forward, which I have previous walked through here. However this is an extremely slow method and rely’s on being able to tunnel through a single port with proxy chains, I have never had any luck scanning with more complex tools like Nessus in this way. Full SYN scans (-sT) with nmap great, Nessus not so much.

Lets take the following scenario and set the pivot up:

Networking Pivoting via SSH

We can use tunctl or ip tuntap, the difference being that ip tuntap is part of the iptools suite and therefore general supported on most Linux operating systems. Tunctl can usually be downloaded from your repo of choice ie with Ubuntu its part of the apt repository. In this example we will be working with Kali as the scanning system and a Ubuntu server as the pivot point, which has SSH accessible. (It is worth mentioning at this point it doesn’t matter which end the SSH connection is initiated from).

First we need to create a virtual tunnel and therefore need to create two virtual interfaces at both ends of the tunnel. For this we are going to use a tap interface. For reference a tap interface operates at layer 2 and a tun interface operates at layer 3.

Using tunctl: First we will need to install tunctl with apt install uml-utilities

# apt install uml-utilities

Create the virtual tap interface with the following command:

# tunctl -t tap0

Using ip tuntap: First verify your ip tools version installed supports tuntap, type ‘ip’ you will see if the command is available:

# ip

Create the virtual tap interface with the following command:

# ip tuntap add dev tap0 mod tap

Once this is setup assign it an ip address and raise the interface, assign a different address for each end of the tunnel:

So on the scanner:

# ip a a 10.100.100.100/24 dev tap0 && ip link set tap0 up

On the pivot server:

# ip a a 10.100.100.101/24 dev tap0 && ip link set tap0 up

On each end of the tunnel we will also need to make sure our SSH config will allow us to tunnel. Lets modify our /etc/ssh/sshd_config file by adding ‘ PermitTunnel=yes ‘ to the end and restart the service. More about this option can be found in SSH man page here.

Now for the magic, lets bring the tunnel up by establishing an SSH session, this will need to be done with a privileged account:

ssh -o Tunnel=ethernet -w 0:0 root@11.1.1.11

Lets cover off these options:

  • -o = allows us to specify options
  • Tunnel=ethernet = is our option for the tunnel
  • -w 0:0 = specifies the next available interface for the tunnel, and corresponds to each side of the tunnel.

Next lets take a moment to verify our tunnel is up with a couple of quick checks:

First verify the link is up with ethtool:

# ethtool tap0

You will notice the link is up, try this without the connection you will find the link is down.

Second verify you can ping the other end of the tunnel:

# ping 10.100.100.101

Again disconnect your SSH connection and watch icmp response drop.

Next in order to get our traffic to our destination servers/subnet we are going to need some routes adding to Kali to tell the system where to send the traffic, ie the other end of the tunnel, so, something similar to this where 192.168.1.0/24 being the network you are targeting:

# ip route add 192.168.1.0/24 via 10.100.100.101

# ip route add 192.168.2.0/24 via 10.100.100.101

Finally we need to setup some iptables rules and turn our pivot point into a router by enabling IPv4 forwarding:

# echo 1 > /proc/sys/net/ipv4/ip_forward

# iptables -t nat -A POSTROUTING -o eth0 -j MASQUERADE

# iptables -t nat -A POSTROUTING -o tap0 -j MASQUERADE

# iptables -A INPUT -i eth0 -m state –state RELATED,ESTABLISHED -j ACCEPT

# iptables -A INPUT -i tap0 -m state –state RELATED,ESTABLISHED -j ACCEPT

# iptables -A FORWARD -j ACCEPT

At this point the pivot should be up and running, test this by doing some basic checks with a known host on your target network.

Happy pivoting testers!

Pivoting through SSH with dynamic port forwarding.

snmp-check UDP over SSH

Pivoting through SSH with dynamic port forwarding. Just a quick post about how we can pivot to an internal/dmz network through a host via SSH. This is a classic example of how we might want to pivot through one host to get to an internal or dmz network using SSH as a tunnel. We can essentially tunnel our traffic of this SSH tunnel via the compromised host to an inside network.

The scenario… A picture paints a thousand words… Essential our ‘Hkali’ machine is on the outside. Our Ubuntu Server is in the internal/dmz, this is going to be our pivot point.

So in this scenario the firewall is only allowing inbound access to our Ubuntu server, on port 22  from our attack box running Kali2.0 ‘HKali’. So from Hkali all we can see is port 22 open on 192.168.100.10. We suspect from our initial enumeration that other servers might be in this network. However, we want to check out the rest of the subnet ie ‘WS2K32’ and ‘meta’ to see whats actually there. Imagine we have compromised the ubuntu server already and have gained login details.

Starting at our attacking machine we will SSH into ‘Ubuntu’. In order to be able to forward traffic for any TCP port on through our SSH tunnel we will want to take advantage of Dynamic port forwarding and specify the ‘-D <port>’ command. This uses ‘Dynamic’ port forwarding feature of SSH. This will allow us to send other tools with Kali to localhost:1234 and thus onward onto any route able networks the ‘Ubuntu’ server can see.

Our command would look similar to the below:

ssh root@192.168.100.10 -D 1234

Before we go any further there are some useful additional options we can pass on the ubuntu server in the SSH command, these being below. However the minimum we need to specify is just the -D for dynamic forwarding:

-f: Sends the process to the background. If you do this you will have to kill the process ID rather than just closing the terminal window as it will already be closed. This is easy enough use ‘ps aux | grep ssh’ to get the process ID then ‘kill <ID number>’.
-C: Compresses the data before sending it through the tunnel, mixed success with this, so experiment.
-q: Uses quiet mode.
-N: Tells SSH that no command will be sent through once the tunnel is up.

If we take a look at our local network connections we can in fact see our ssh connections and also our localhost listening on port 1234.

netstat -antp ssh dynamic ports

We can now use a socks proxy or equivalent to proxify our traffic through the SSH tunnel and onward to the inside network. For this we will use proxychains. Lets look at how we could do this using a socks4 proxy. First a look at our proxychains configuration. Lets open up /etc/proxychains.conf and ensure the the following line is set in the last line. (note the port should be whatever you used in the SSH command after the ‘-D’.

dynamic port forwarding SSH proxychains

Now we can proxify something like nmap through to the internal network. Bear in mind we can only proxify full TCP connect commands. So UDP traffic/tools such as snmp-check won’t work – however, we can proxify udp in an alternative way, I describe this here. Some tools won’t play nice with proxychains, so play around in your lab and experiment.

Enjoy!


Pivoting with netsh in Windows – post exploitation goodness!

Move across a network by pivoting with netsh in windows!

Just a quick post to demonstrating pivoting with netsh in Windows. More specifically port forwarding with netsh in Windows (Windows 7 and above). This really is great as your not having to upload any tools to the target system. It is limited in its functionality however, is a great option for say a single port such as 445 or 3389.

netsh interface portproxy add v4tov4 listenport=<LPORT> listenaddress=0.0.0.0 connectport=<RPORT> connectaddress=<RHOST>

Now if you don’t have interactive logon rights but you have a PSEXEC, PTH or even a meterpreter session you can add a port forward on you target system and pivot to your next target with SMB/445. This is especially great when you think of tools like PSEXEC module in Metasploit or the main other remote CMD tools available. Now you could use the autoroute or route add function in Metasploit but its nice to have a backup plan if you didn’t have Metasploit!

You can use the below to display your port forwarding rules:

netsh interface portproxy show all

Just remember to clear down your port forwarding rules when your finished with:

netsh interface portproxy reset

This all comes together like the below: (you can see here i have just used random ports just to give you an example how it looks).

Pivoting with netsh in Windows

Enjoy!