To kick off ‘Project Bash’ located here I’m going to be talking about Awk. Awk is a text processing tool that can be used to manipulate text in a line in bash. There are many uses of awk so I have called this one Part 1. In Part 1 we are going to use awk to select a word in a line of text, this can be very useful if we want a specific value in a line of text like the 5th word and want to iterate that through each line in a file. Take the following example:
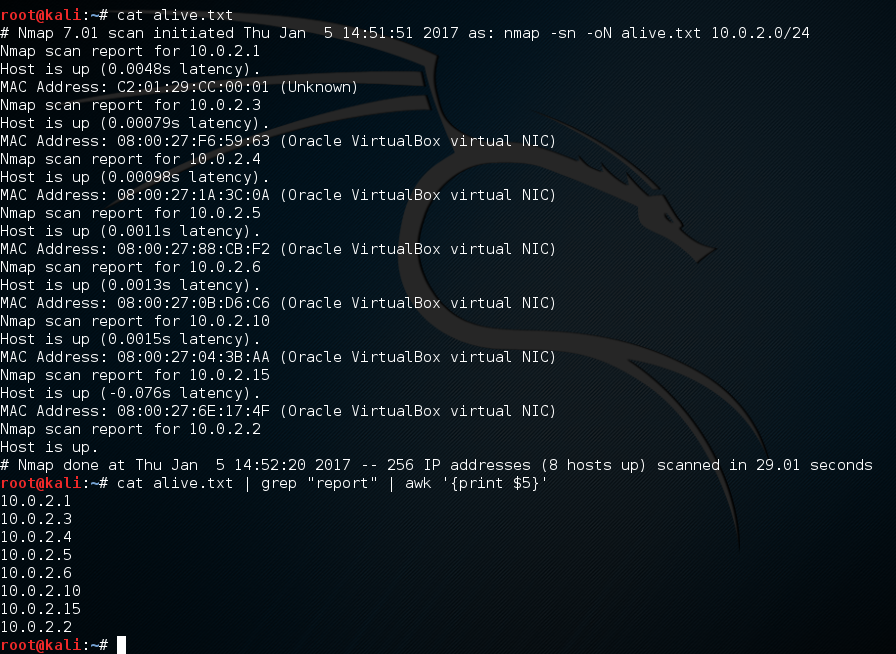
So we have just used Nmap to ping sweep a subnet and want to create a target IP list from the results, we send the output to a file called alive.txt. check out the below:
If we break the command down:
cat alive.txt | grep "report" | awk '{print $5}'
The first command ‘Cat alive.txt’ prints out the contents of the file alive.txt to std output (ie into bash). We then pipe the out to a second command. We then use the command ‘grep “report”‘ to find all lines with the word ‘report’ in:
Nmap scan report for 10.0.2.15
Then finally using ‘awk ‘{print $5}’ to print the 5th word in the line using the variable $5.
Changing the variable in the awk command to ‘$2’ prints the 2nd word in the line:
As you will probably agree this is powerful tool, especially when you need to clean up some out. There are multiple ways we can do the above this is just one of them. Ace!
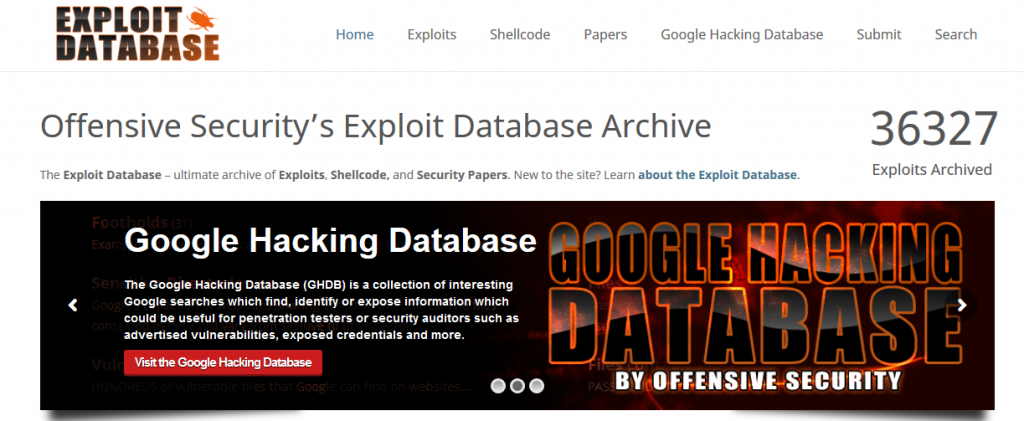
The Exploit-db.com needs no introduction. Most penetration testers will be well versed in the use of Exploit-db and its uses. However for new-comers, this is an excellent and ‘the go to’ resource when looking for exploits and exploit code for use in test labs on vulnerable systems. It goes without saying though when looking through code that is published on the internet the following precautions should be taken;
Review the code. Understand what the code is doing.
Modify the code if needed to suit your situation, especially any shellcode snippets.
Understand what lanuguage the code is written in.
Don’t run code from the internet without knowing what the code is going to do. You don’t want to create a reverse shell back to a C&C server do you.
Always test code in a lab, isolated from the internet and production systems.
Understand that some code such as C++ and C for example will most likely need compiling and need dependancies.
Exploit-db.com
Searching Exploit-db.com
There are several ways to search the Exploit-db such as:
Via the exploit-db site: https://www.exploit-db.com/ however when searching for exploits you will have to use their captcher form in order to proceed with a search.
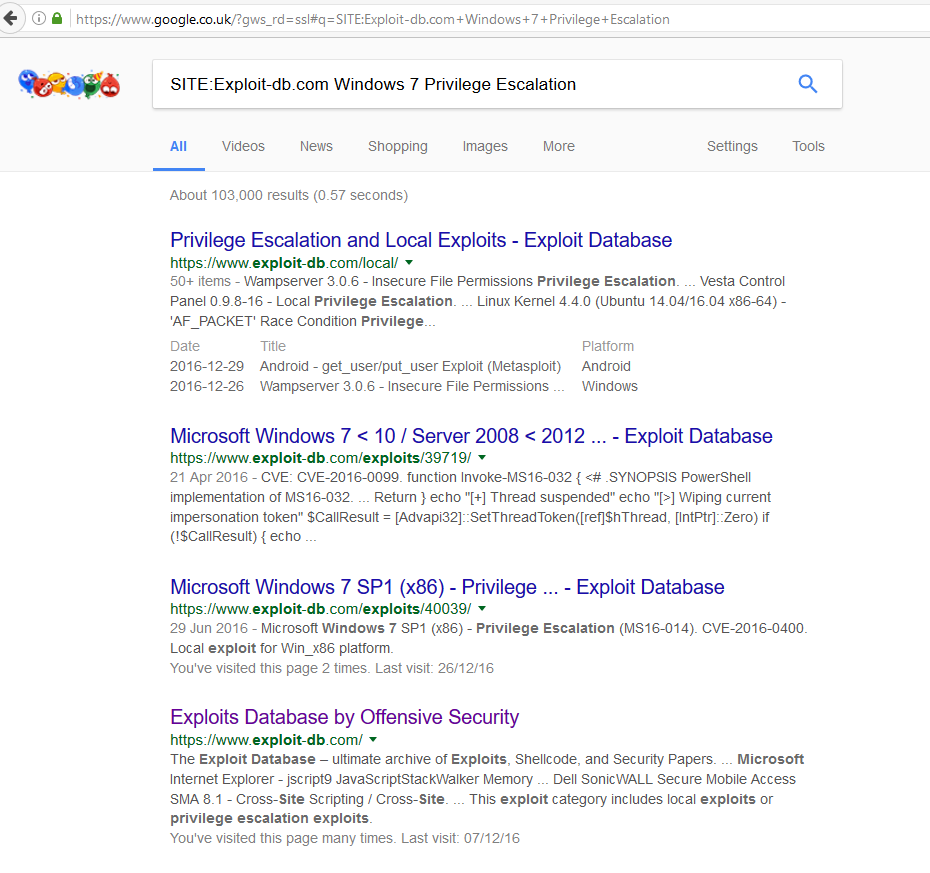
Via Google search engine using the syntax: ‘SITE:Exploit-db.com Windows Privilege Escalation’
Google search of the Exploit-DB
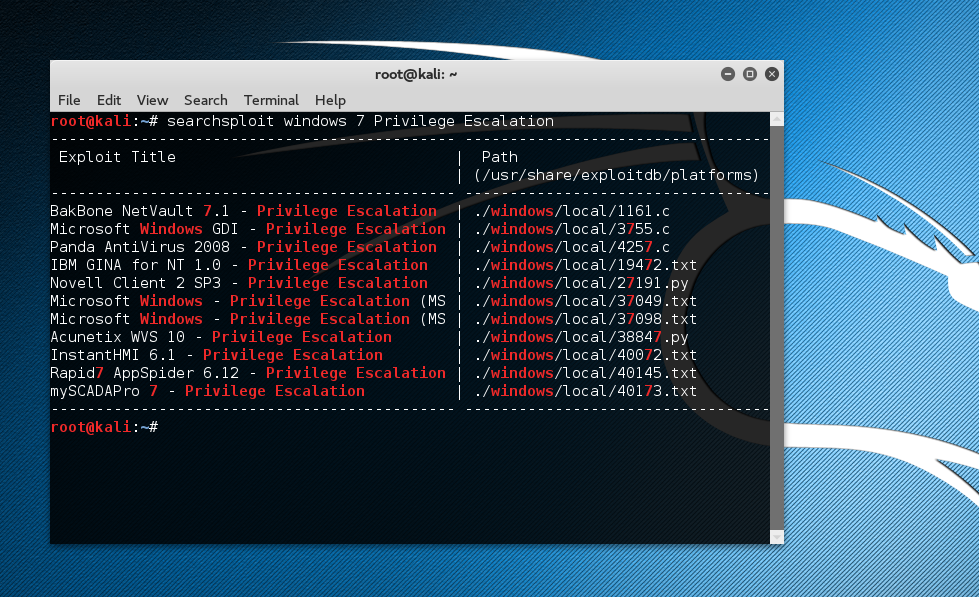
Using searchsploit built into Kali Linux like below, this has the added benefit that the databse is offline:
root@kali:~# searchsploit windows 7 Privilege Escalation
How do we remove specific text from each line in a text file in Linux? In this post we cover using Sed to remove text from a line in Linux.
We previously covered in this post adding text to a line in Linux. In this post we will be specifically talking about the opposite. Using Sed to remove text from a line in linux is fairly straight forward. To remove specific characters or portion of text from a line in Linux we can use command line bash tool sed. The tool sed is used to perform basic text transformations, more info on sed can be found here. In the below example we want to specifically remove ‘BARRY\’ from a line everything within the square brackets [text to remove] is removed, so we use:
sed 's/[BARRY\]//g'
example:
cat users | grep BARRY | cut -d" " -f 2 | sed 's/[BARRY\]//g'
Just a quick post to show a way to check for insecure service permissions in Windows using the following built in command line tools. This uses a combination of wmic to query for services and then icacls to check the permissions.
I found the below for loops as shown by travisaltman.com to quickly get the results we require.
for /f "tokens=2 delims='='" %a in ('wmic service list full^|find /i "pathname"^|find /i /v "system32"') do @echo %a >> c:\users\adam\permissions.txt
for /f eol^=^"^ delims^=^" %a in (c:\users\adam\permissions.txt) do cmd.exe /c icacls "%a"
The first line using wmi to query the services excluding ‘system32’ and then the the second line takes the output and runs icacls against each line.
Another way to view these is via Sysinternals with the accesschk tool like below:
Windows Updates… the bit you need to do after installing them!
Bit of an FYI post really for the following updates KB2269637 KB2719662 MS15-124. The below are some Windows 7 hardening steps that are needed after installing Microsoft updates KB2269637 KB2719662 MS15-124. I see these a lot in organizations. Admins have installed all the patches however haven’t followed through with the extra steps that are needed. There are only a few updates that require some extra action. In most cases its a registry key that needs adding or modifying. In mosat cases these can be achieved through Group Policy. The below list isn’t all of them just a couple I have recently come across.
MS KB2269637: Insecure Library Loading Could Allow Remote Code Execution
In this post we will be using Python to generate all hex characters for use with Buffer Overflows when writing exploit code. I came across a requirement whilst writing some exploit code to generate all hex characters available. The reason for this was to find all bad characters in a piece of shell code. This was needed as to not mangle the code when it is loaded into memory on the stack.
There are a few other tools built into Kali that can do this however the following python code will do the trick for us nicely, listing all hex characters :
#!/usr/bin/python
import sys
for x in range(1,256):
        sys.stdout.write ("\\x" + '{:02x}'.format(x))
All we need to do is run the python code and hey presto we have the hex characters ready to send to out application. You can simply copy the above text. Open up your favourite text editor in Linux, I like to use Nano. Copy the text into Nano, save the file out as youfile.py. You will need to then modify the permissions of your new file and run the file with Python, python yourfile.py.
Of course if you don’t want a script to list all the hex characters you can always copy them from here: 🙂
Using sed to add text to the end of each line in Linux.
In this example we are going to use sed to add text to the end of each line in Linux. More specifically in a text file in Linux using a bash one liner! Why would we want to do this? Multiple reasons if your penetration tester. Creating user name lists or adding ports to the end of IP addresses for example. Sed is used to perform basic text transformations you can read more about it here.
So for example if we wanted to add ‘:80’ to the end of each line for a list of IP address we would do the following:
Or if we found we wanted to add ‘adm’ to the end of each line in a list of user names we would also use sed.
~$cat admins.txt
adam
bob
bill
james
jane
~$sed 's/$/adm/' admins.txt > new_admins.txt
~$cat new_admins.txt
adamadm
bobadm
billadm
jamesadm
janeadm
~$
Having these small bash commands to hand is super useful. As a penetration tester I am always find that I need to script something in Bash or PowerShell or needing to produce one liners. Having these commands to ready and waiting saves time looking them up. Hopefully you will also find them useful. Don’t forget the man pages for bash commands. Practice, practice and more practice.
Just a quick post regarding creating username lists.
Often during an engagement if you have discovered a service that is brute-force able such as smb then it would be advantageous to create a semi-valid username list. We can do this fairly easily with the harvester. Once we have this list we probably want to manipulate the forname and surname to create a valid username to suit our target. I came across this python script which quickly gives us the output we need. Full props to Harold Rodriguezsuperkojiman for his code: https://gist.github.com/superkojiman/11076951. I have found that just removing the various outputs that you don’t want works best if you know the target username combination, and if you don’t run with all options. I’ve found the password/username spraying technique with a single password works best and is the smart option to avoid account lockouts.
#!/usr/bin/env python
import sys

if __name__ == "__main__":
	if len(sys.argv) != 2:
		print "usage: %s names.txt" % (sys.argv[0])
		sys.exit(0)

	for line in open(sys.argv[1]):
		name = ''.join([c for c in line if  c == " " or  c.isalpha()])

		tokens = name.lower().split()
		fname = tokens[0]
		lname = tokens[-1]

		print fname + lname		# johndoe
		print lname + fname		# doejohn
		print fname + "." + lname	# john.doe
		print lname + "." + fname	# doe.john
		print lname + fname[0]		# doej
		print fname[0] + lname		# jdoe
		print lname[0] + fname		# djoe
		print fname[0] + "." + lname	# j.doe
		print lname[0] + "." + fname	# d.john
		print fname			# john
                print lname                     # joe
I came across a need to expand the hdd on Linux virtual machine, as I had run out of space. I thought I would share my experience by walking through the steps I took in resizing a VirtualBox Linux disk for the Debian based OS that I had. The process involves expanding the virtual image file then using GParted to expand the partition. This is actually relatively painless. My particular disk image was in VMDK that I needed to increase by an additional 10Gb. I actually tested this out for a non trivial virtual machine first, this is how I got on:
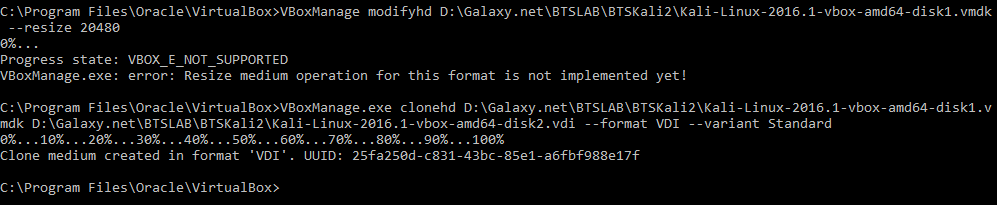
First like me if your using a VMDK you will need to convert the disk image to either a VDI or VHD file. This can be done at the command line (with Admin privs) like below. If you try to expand the a VMDK with VirtualBox you get a nice error as below:
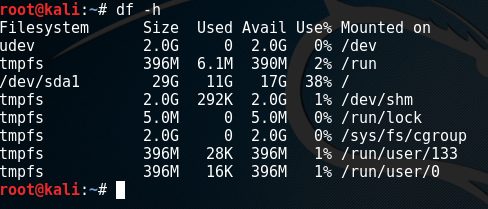
The next stage is optional: Take the new VDI file and create a new virtual machine using the new HDD file. I personally would then boot the machine just to check it boots and everything is in order however this is optional, while I was there I took a quick snip of the HDD space. /dev/sda1 is 29Gb we will increase to 40Gb.
Resize the VDI file at the command line (with Admin privs) like below:
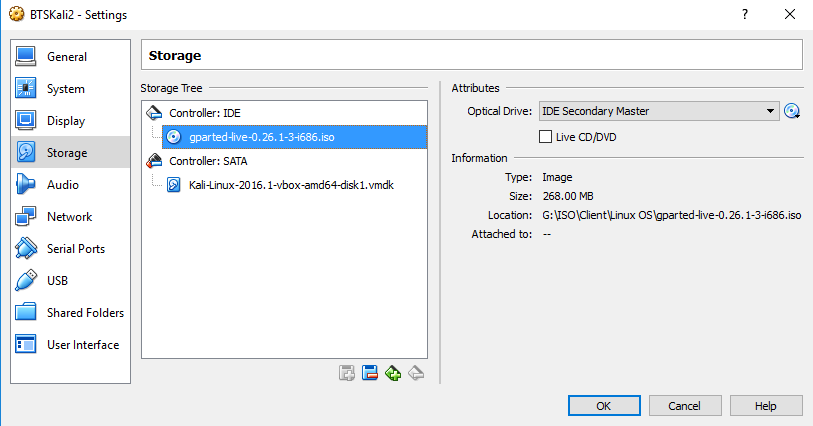
At this point the vm will still boot just fine, however the hdd partition won’t have increased. We will need to extend the partition using a program like Gparted. So we mount the GParted ISO into the guest CD drive. You will also need to enable EFI from the system page in order to boot into the latest GParted GUI, this will need to be unchecked after we have finished to boot back into our Debian os.
Start the vm, allow GParted to boot. Select the first option and allow GParted to continue to load, accept the default settings pressing ‘enter’ three times.
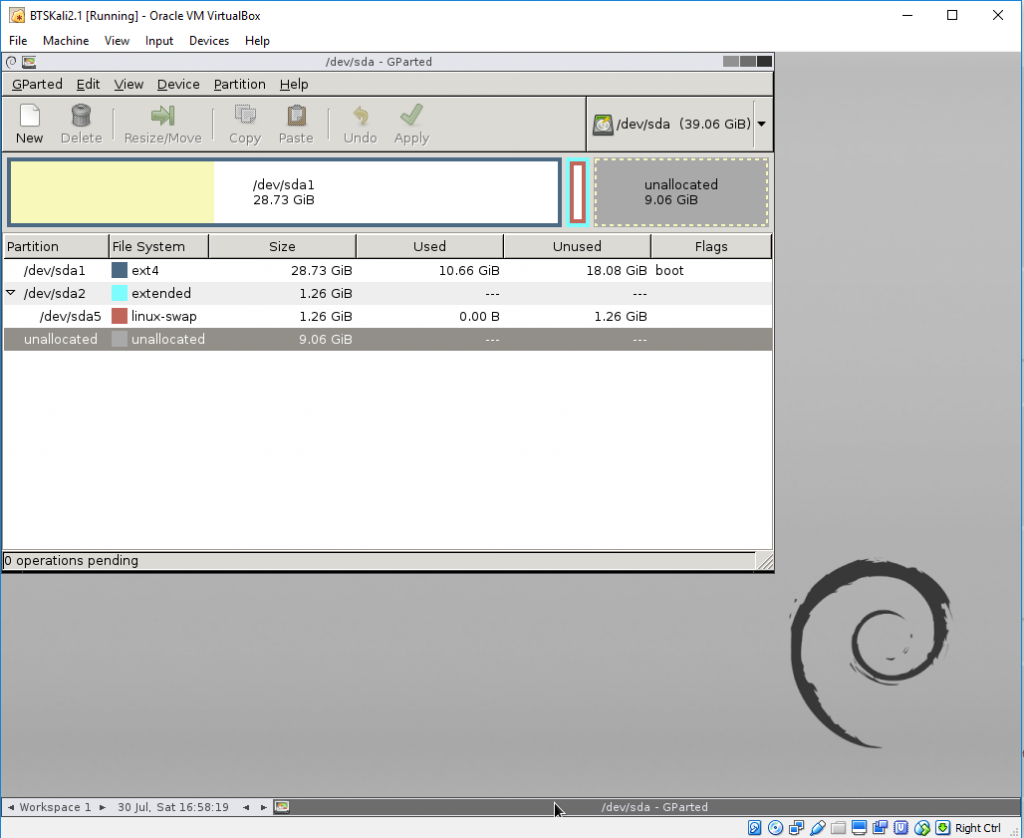
Once booted into GParted you will be presented with the following screen:
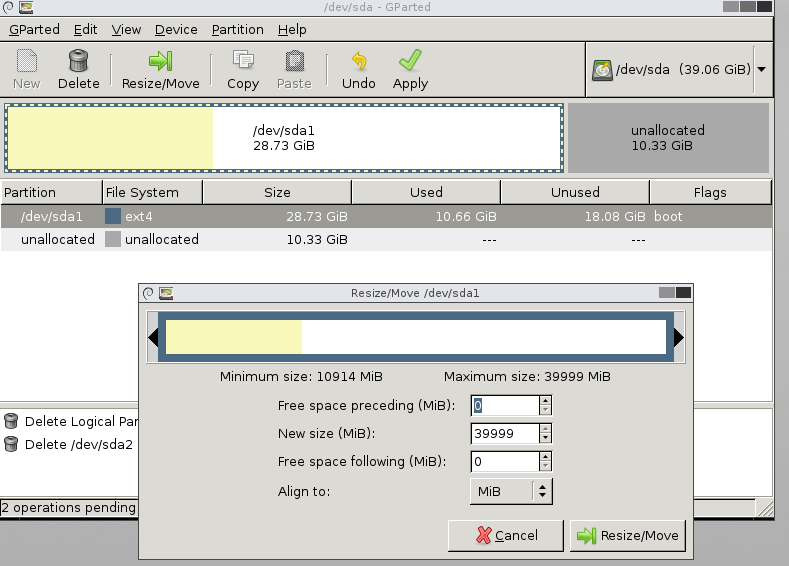
We need to remove ‘/dev/sda2’ (the swap file and recreate it later) in order to extend the partition into the unallocated space. Once this is complete we can then select ‘/dev/sda1’ select ‘Resize/Move’ from the menu, drag the slider bar all the way to the right hand side like below and select ‘Resize/Move’.
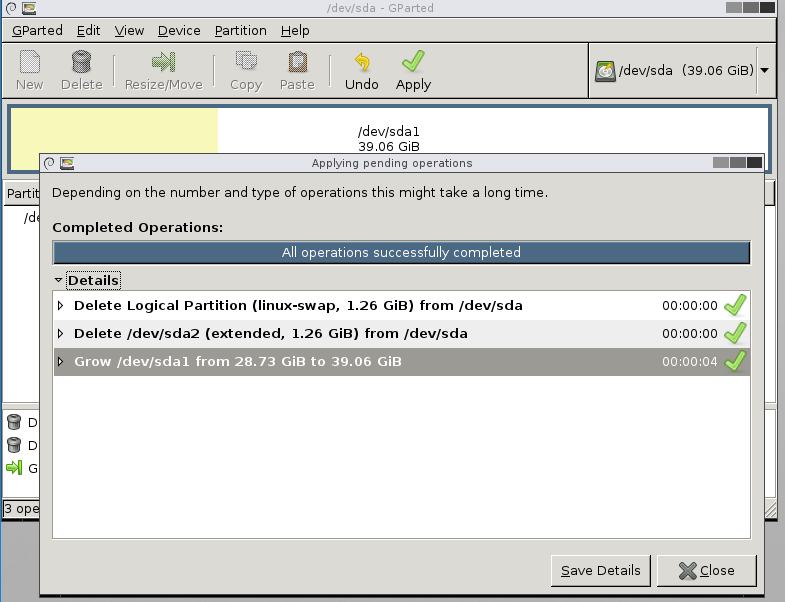
Select ‘Apply’ from the menu, and after a short pause we can see all operations were successful. Once this is complete close the ‘Apply pending operations’ and shutdown.
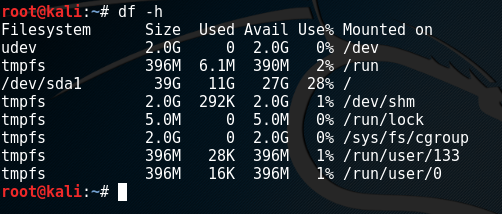
Remember to disable the EFI option in the VirtualBox machine settings for our Debian based system. Boot the machine up and recheck the size; voila, we can see our /dev/sda1 is now 39Gb!
In this post I’m going to be talking about LLMNR and NBT-NS. That’s Link Local Multicast Name Resolution (LLMNR) and Netbios Name Service (NBT-NS). They are backup name resolution processes that take place by default in windows networking to help your PC resolve names it requests. However are they really helping you or actually causing you more harm! I’l talk about why its bad, and why we should look to disable it.
Ok so what is LLMNR and NBT-NS, whats it all about?
Link Local Multicast Name Resolution (LLMNR) and Netbios Name Service (NBT-NS) are processes that take place by default in windows networking to help your PC resolve names it requests. When you PC needs to resolve the name or a server for example to an IP address it firstly uses the DNS server it has been assigned. If the DNS Server doesn’t have the record you requested, your PC will use LLMNR and then NBT-NS. With LLMNR your PC will broadcast across the local subnet and ask other machines if they have a record for the name you are trying to resolve. If no-one answers, your PC will then try NBT-NS in the same manner.
Lets see it in action, in the below wireshark we can see 10.0.2.2 (Windows 7 domain joined machine) querying 10.0.2.10 ( Windows Active Directory DNS Server) for the record of DC2. DC2 doesn’t exist, and as we can see the DNS server responds ‘No such name..’. The PC then proceeds to use LLMNR and broadcasts across the subnet. No response is given. The PC then tries NBT-NS and again broadcasts across the subnet, no response is given. No response is given as no-one on the subnet has that record, I just made it up to demonstrate LLMNR and NBT-NS.
Ok so why is this bad, surely its a good thing right..?
Well yes and no, more no these days. Ordinary and back some 10 years ago LLMNR and NBT-NS were used in helping resolve names. If the DNS Server was unavailable local hosts on the same subnet would help resolve names. However lets face it if your PC can’t use DNS its pretty much not going to be doing alot in terms of network connectivity and services. LLMNR and NBT-NS are just not needed anymore (usually). Attackers can take advantage of the LLMNR and NBT-NS broadcasts by replying to them with poisoned responses. The poisoned response can essentially trick the PC into thinking that it knows where the resource is. The PC then attampts to setup an SMB challenge response, in doing so sends its credentials along to the attackers machine. An attacker is able to capture the username and LM, NTLMv1 or NTLMv2 hash of the user making the request. This can then be subject to an offline brute force attack using several different programs such as John the Ripper or OCLhashcat. Or be reused in a PassTheHash or SMB relay attack.
Lets see it in action from wireshark.
We can see our usual DNS request, then an LLMNR broadcast goes out, as the DNS server has no record. Our attacker on 10.0.2.3 (a kali linux machine using Responder) sends a response back to our PC ‘Standard query response, DC3 is at 10.0.2.3’ this is actually the attackers machine fooling the PC. NBT-NS request hasn’t gone out at this stage as a response is received to the LLMNR. The PC is fooled into thinking the resource is at 10.0.2.3 and starts to negotiate an SMB session, passing along its credentials to the attackers machine.
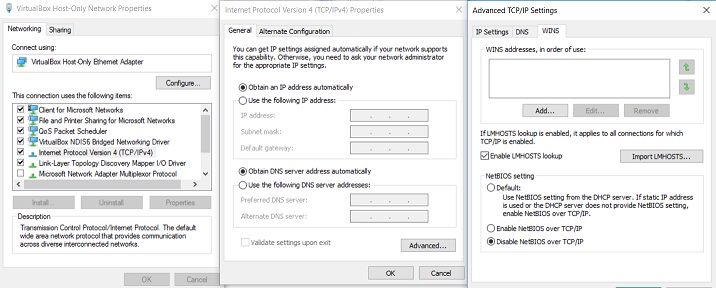
What can we do to fix it?
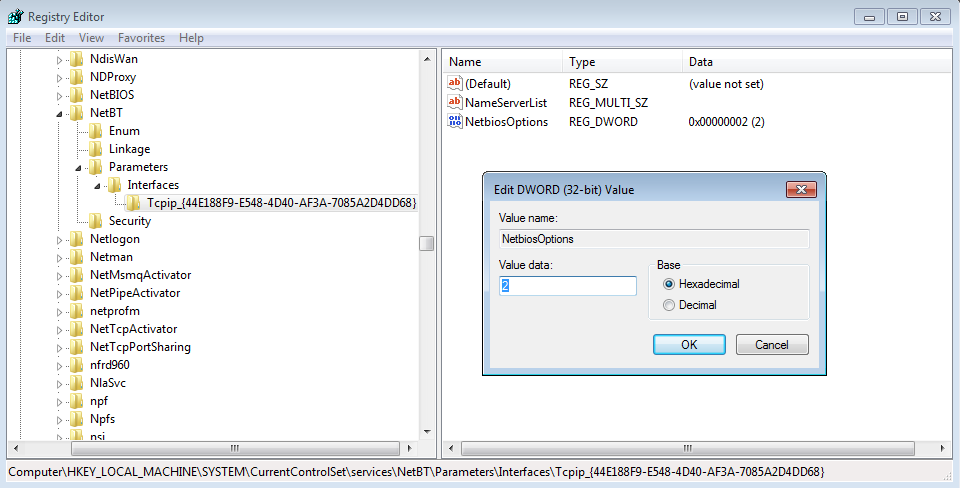
LLMNR and NBT-NS are old methods for name resolution. You may have legacy applications in your environment that may potentially still use LLMNR and NBT-NS for broadcast name resolution. Due to this thorough testing should be carried out first. If this is the case get onto the vendor for some answers as to why! Otherwise we can disable both via GPO and DHCP options. For LLMNR there is native GPO setting. For NBT-NS there is no native setting however it can be set in the registry. The registry key references an interface name which has its own unique GUID so can’t be changed in GPO via a registry key change (as the key will be different every time), however we can use powershell and do a ‘catch all’ on that key and thus script and then run via GPO. I’ll demonstrate below.
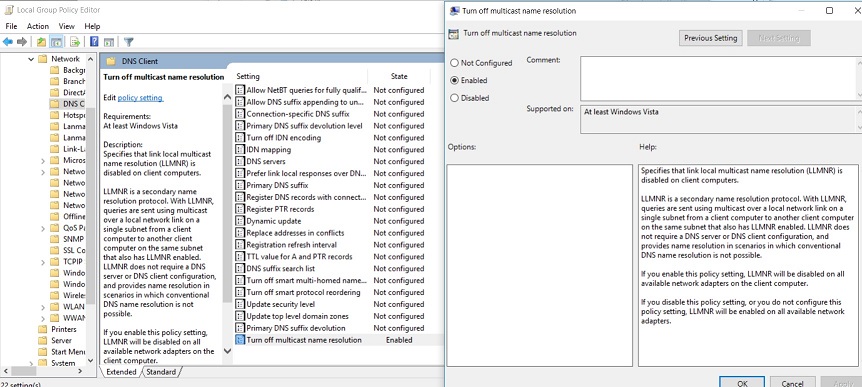
You can disable LLMNR via Group Policy in your domain or locally, go to:
The process for disabling both are in the below video:
It obviously goes without saying the appropriate testing, change control and usual roll out procedures should apply especially with a change like this.


 We previously covered
  In this post we will be using Python to generate all hex characters for use with Buffer Overflows when writing exploit code. I came across a requirement whilst writing some exploit code to generate all hex characters available. The reason for this was to find all bad characters in a piece of shell code. This was needed as to not mangle the code when it is loaded into memory on the stack.