Windows Event Forwarding is a powerful tool and is also free unlike most SIEM options. Being able to log certain events back to a logging server is important, getting the right events logged is also equally important, and not being swamped with the wrong events. You really do need to know if someone is messing with your Domain Admins group or an LSSAS proccess on a member server.
In this post we will walk through setting up WEF (Windows Event Forwarding) in a lab environment to demonstrate how we can have better visibility over important security events in the domain. All without having expensive SIEM products, ie using what we already have.
For a bit of background, WEF has been part of Microsoft Operating systems for a while, being supported in Windows 7 right up to 2012 R2. Events can be either source initiated, ie sent from a client, DC or member server to a collector. Alternatively be collected by the event collector server itself. The idea here being that when an important event gets written to the Windows event log (Client or Member Server) it also gets forwarded to a certal logging server and thus the IT admins or security team get alerted to the event in some manner such as email. I posted a while back about doing this for Cisco kit with a Ubuntu 14.04 server utilising rsyslog for event collection posted here.
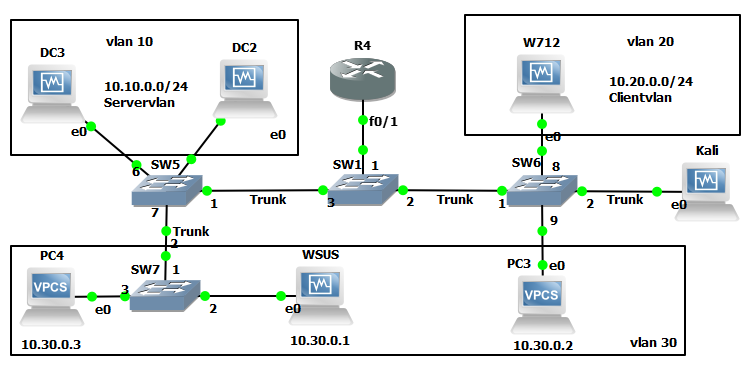
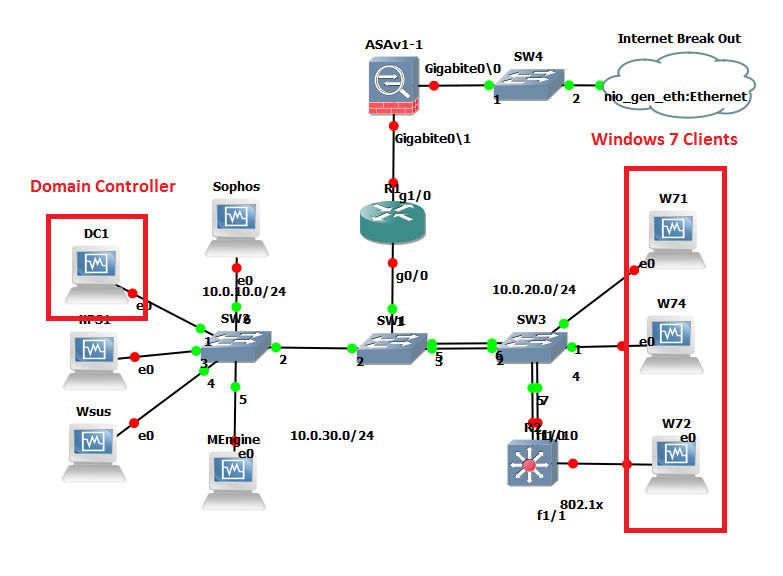
So our lab will utilise GNS3 as it gives us a good visual representation as to what we are working with:
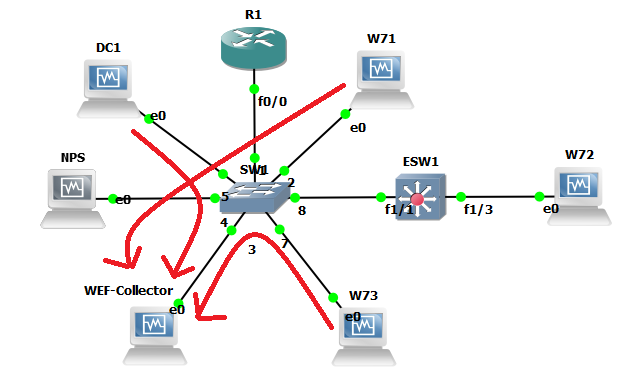
As you can see, a pretty simple lab setup a Domain Controller (DC1) a couple of member servers (NPS and WEF-Collector) and client machines (W71, W72 and W73). We won’t worry too much about ESW1 or R1 at the moment these were just left over from an 802.1x lab I had been working on, the topology is just a flat 10.0.x.x network. The events will be written to our WEF-Collector Windows Server 2012 R2 machine.
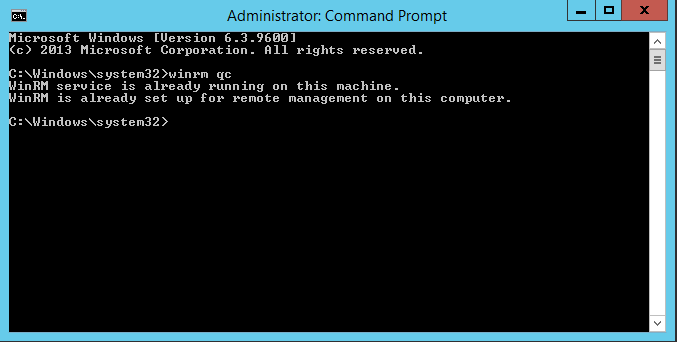
First we will setup our Event collector server WEF-Collector. We will want to ensure WinRM the Windows Remote Managment service is started and Event forwarding is setup. Open an administrative prompt and type ‘winrm qc’ (you may find it is already configured as below):
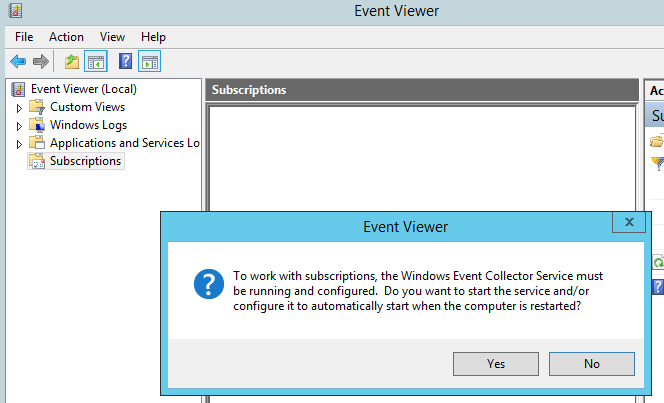
Now to enable event forwarding on WEF-Collector our event collector. Go to the event viewer, select ‘subscriptions’ you will get a pop up – select ‘yes’ as we do want to enable event forwarding to start automatically if the server is restarted.
Now lets look how we can forward events to the collector ‘WEF-Collector’.
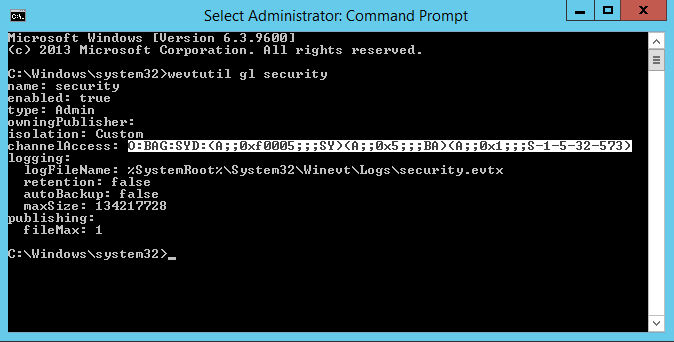
First we need to give the local Network Service principal rights to read the security log, we run the following ‘wevtutil gl security’ on machine in the lab to grab the channel access string (this will be used in our GPO):
O:BAG:SYD:(A;;0xf0005;;;SY)(A;;0x5;;;BA)(A;;0x1;;;S-1-5-32-573)
Thanks to Jessica Payne with this article for discribing this section.
We will then append the string with (A;;0x1;;;NS) so it reads:
O:BAG:SYD:(A;;0xf0005;;;SY)(A;;0x5;;;BA)(A;;0x1;;;S-1-5-32-573)(A;;0x1;;;NS)
This line is essentially where the permissions on the log are stored.
Now we will create a GPO so we can apply the settings to our clients and servers that we want to push events from, this will tell the clients and severs where to check for subscriptions and where to send events to ie ‘WEF-Collector’. We will initially want ot set two policies:
Computer Configuration>Policies>Administrative Templates>Windows Components>Event Forwarding>Configure target subscription manager:
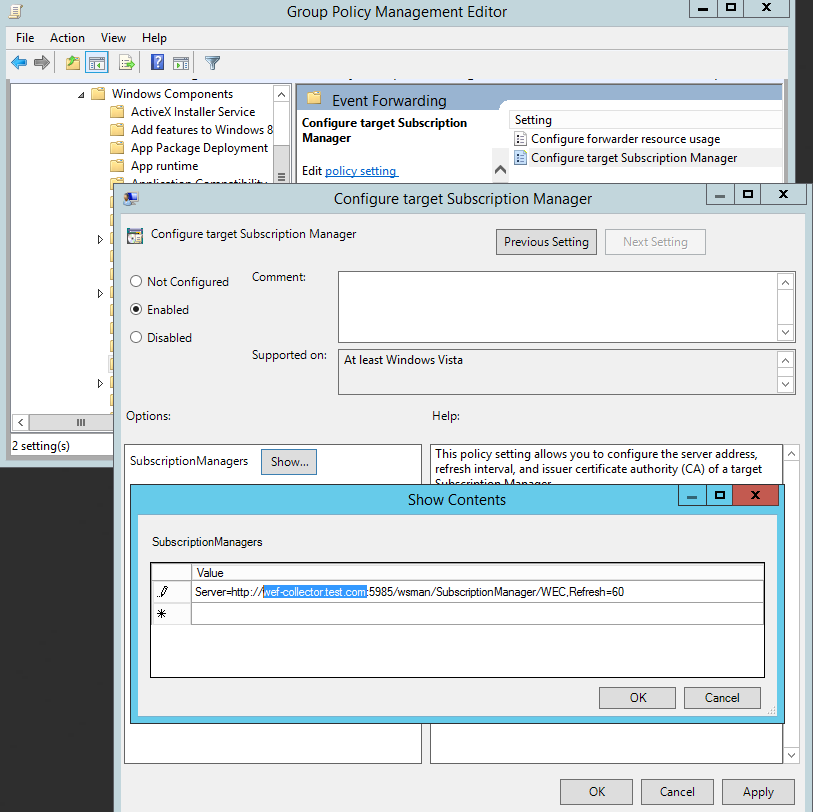
Note: Instructions are in the text of the GPO iteslf however in summary we want the FQDN, URL path, port and refresh time. Clearly checking every 10 seconds is overkill however for the lab its ideal.
Computer Configuration>Policies>Administrative Templates>Windows Components>Event Log Service>Security> Configure log access:
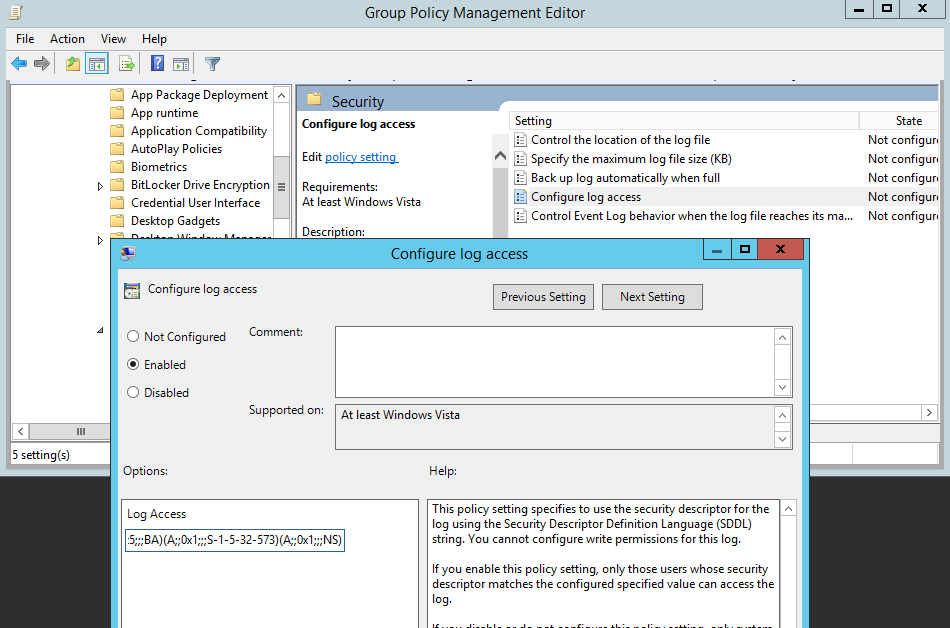
This is where our channel access string comes into play.
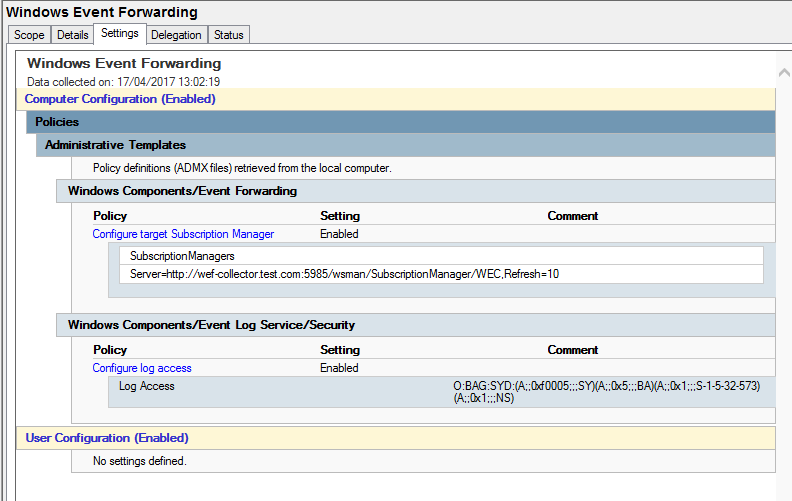
Our GPO should look like this:
Now link the GPO to our AD structure to enable it.
Now our clients and servers are configured, lets configure some example subscriptions:
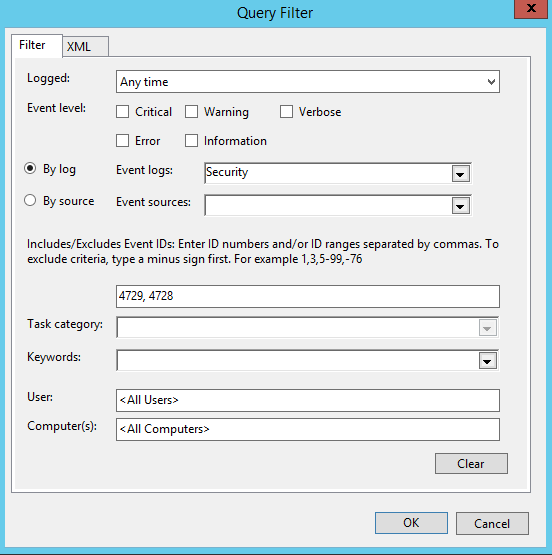
Logging Domain Admin changes sounds like a good idea, this is event ID 4728 and 4729. Start in the Event View, under Subscriptions select create subscription and fill in details like so:
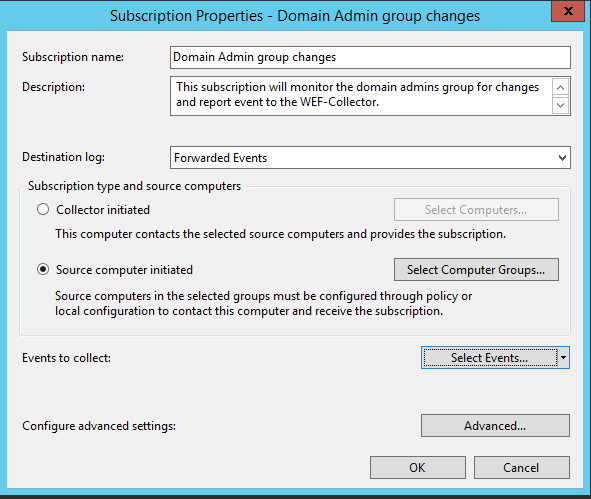
Next select ‘Source computer initiated’, and in this case we are going to add DC1. Next we are going to go into the Select Events option and configure like so:
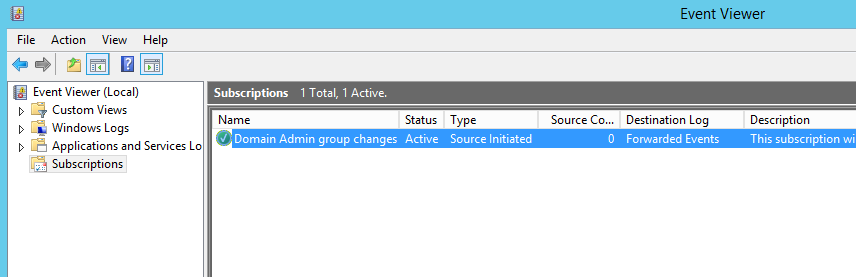
At the moment we can see that DC1 hasn’t yet checked in as the ‘Source Computers’ column is still ‘0’.
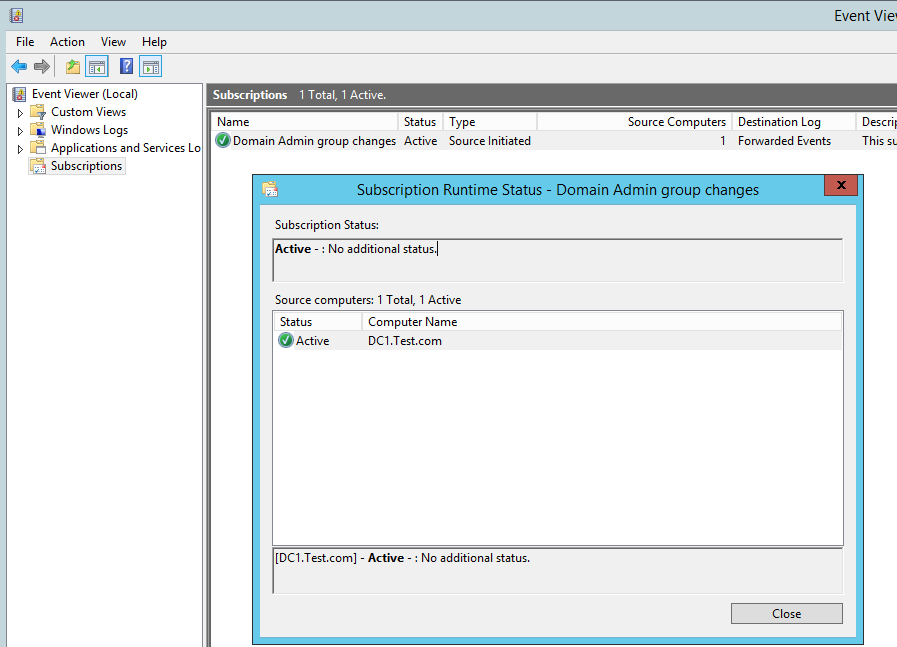
Once DC1 has checked in to see if there are any subscriptiosn for it we can see that the ‘Source Computers’ column is now 1, we can check the status by clicking on ‘Runtime status’. Here we can see DC1 is ready and waiting to send events:
If we now generate some events on our DC by removing and adding the user ‘Bob’ to the ‘Domain Admins’ group we can see the following two events have been logged in the ‘Forward Events’ section under the ‘Windows Logs’:
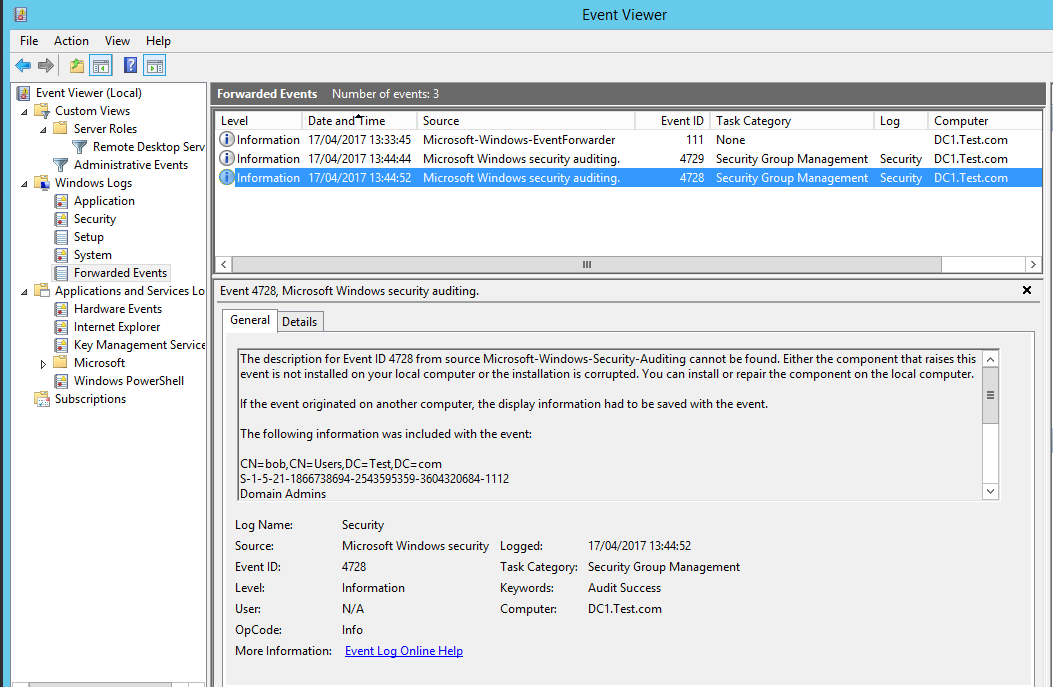
Clearly this is only based on two event ID’s however hopefully demonstrates what can be done takeing this example and expanding it, creating multiple subscriptions based on certain filters and IDs.
I hope this helps demonstrate WEF and how we can get much better visualisation into whats happening on the network for security events.

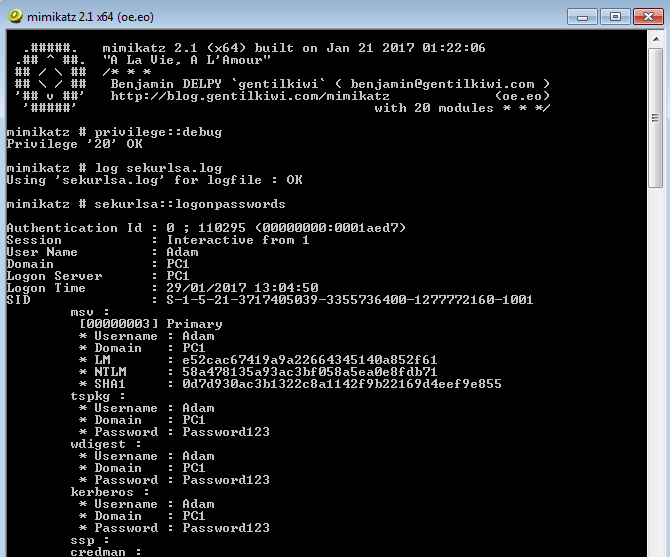
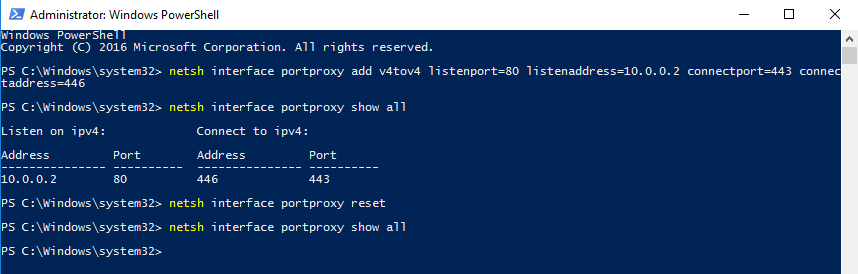
 Searching for password files in PowerShell, can be particularly useful especially for post exploitation recon phase of an engagement. PowerShell is great tool for a penetration tester. Its post exploitation capabilities has grown exceptionally over the last few years. During the course of a penetration test once you have compromised a windows host there is a good chance that you will want to enumerate the host system further and gather as much information as possible. If you have access to a low privilege user you are likely going to want to escalation your privileges to higher account. This being known as post-exploitation. This will almost always likely include searching the local system for passwords. We will want to search for xlsx, docx are classics. Sure we can use the windows built-in gui however we can also use PowerShell. We can use the following syntax in PowerShell to search for files with the text ‘password’ in the filename, just like below. We use the wildcard ‘*’ either end of the ‘passwords’ so we can search for variations in the file name. Ace!