Superseded Windows Updates

Is this update superseded or not?

I recently came across a need to check for Superseded Windows Updates. Basically checking on whether a Windows update had been superseded or not. WSUS does give this information in the console view, it indicates whether an update has been superseded or not. However, in my opinion and experience people tend to find it not that great and bit confusing to read. A better and more solid view is to look up the official Microsoft Security Bulletin Data, which shows you what has been superseded and what has not.

If you search for ‘Microsoft Security Bulletin Data’ in google as below you find what we are after or the direct link is here. This is a link to the full Microsoft Security Bulletin Data.

Following the link will lead you to the download, this is in XLSX format. This is a list of all Security Bulletins that have been released. As you can see from the below you are able to navigate around the data with ease in Excel:

There really is a lot of useful information in here, such as whether a reboot is required, the severity rating and also the ‘supersedes’ column.

So when you need to check up on an update you can always refer to this useful data.

Creating a Windows 7 Logon Banner Legal Notice message at Logon via GPO

Windows 7 Logon Banner

This is just a super quick post to reference an earlier video which I created which demonstrates how to add an interactive Windows 7 logon banner legal notice to work/domain joined client machines. This can be achieved via group policy object. A user would need to click ‘OK’ to accept the message before logging onto the machine.

This is a CIS (Center for Internet Security) benchmark for Windows 7 machines the rationale is that it is important to notify and warn unauthorized users attempting to gain access to carry out an attack on the computer by notifying them of the consequences of what they are about to do and any legal ramifications.

Microsoft LAPS (Local Administrator Password Solution) Deployment

Password re-use… ah such a bad idea.

During a penetration test one of the most common vulnerabilities I see is the local administrators account having the same password used across all client machines in the estate, usually one for servers and one for clients. So a classic scenario I see a lot goes something like this; a vulnerability is identified in an environment lets say a nasty remote code execution, it gets exploited giving SYSTEM level privileges, you then dump creds from the box and boom you have the local administrators password, even if you don’t get the clear text password you might get the hash. You use the creds/hash with something like hydra or medusa to try a few more workstations in the environment, and hey presto your screen lights up with successful smb authentications. You now have the ability to move laterally across the network logging into workstation after workstation either dumping more creds with mimikatz or stealing tokens with incognito until you reach a domain admin account.

There are in fact a few ways in which we can contain or should I say slow down lateral movement by an attacker, one being to use a different local administrators password on every device, I’m going to walk through how we can achieve this using Microsoft LAPS (Local Administrator Password Solution). This essentially allows you set a unique local administrators password on every workstation in the domain. Thus stopping password reuse and pass the hash type attacks. Granted this is only half the problem solved however does shutdown this avenue of attack.

OK, how do we set this up?

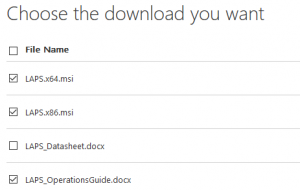
A quick search on google for LAPS and you will find the free download from Microsoft.

Go ahead and download the 32 & 64 bit downloads as well as the ops guide for reference.
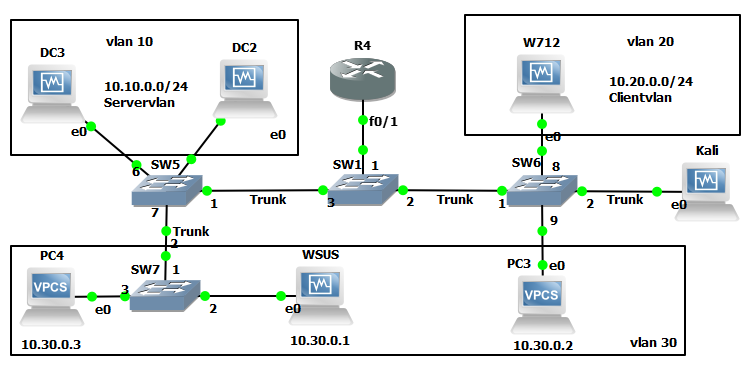
For this demo I’m going to be using the trusty Blue Team Security lab in GNS3, you can see from the below diagram we have our Domain Controller and a few windows 7 clients to play with, great:
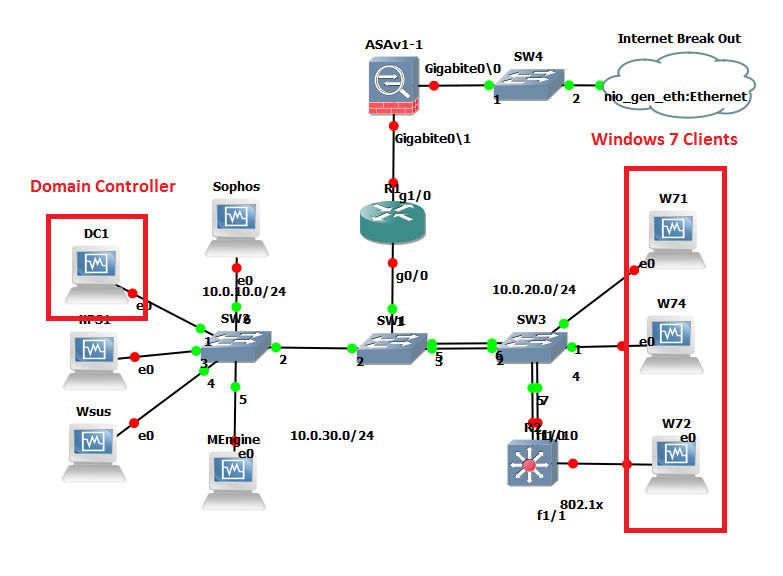
LAPS works by having what Microsoft refers to as clients and management computers within your domain. Passwords are stored in Active Directory as a computer object attribute this does mean that the password is stored in clear text. However transmission is encrypted. Management computers and its user will have the ability to fetch the password of any given client, so its important to delegate this responsibility carefully i.e to a specific security group. The msi we downloaded is the same for both client and management computers, the install has different options selected for each type. The default options being for clients. For the management computers I’m going to use ‘W71’ this is a standard Windows 7 Pro domain joined client.  For the client computers we are going to use W74 and W72, again just standard domain joined Windows 7 Pro builds.

When we talk about management machines we are talking about user admin machines so where your helpdesk or second line staff can access.

There are a couple of pre-requisites; the first is a schema update which adds two new attributes to AD these are to store the password and timestamp for password expiry. The second are some permissions that need to be setup for our clients and the users that can see these attributes.

Let’s first install the management software and tackle the schema update.

On our management computer lets go ahead and double click on the msi in my case 64 bit so ‘LAPS.x64’

Click Next.
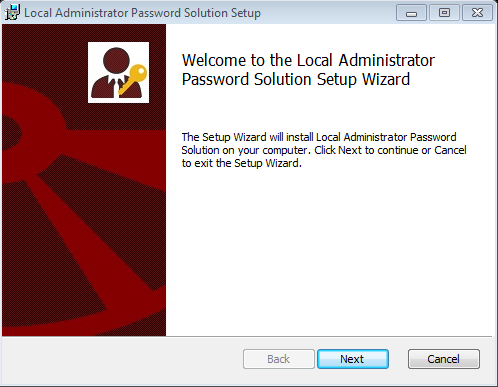
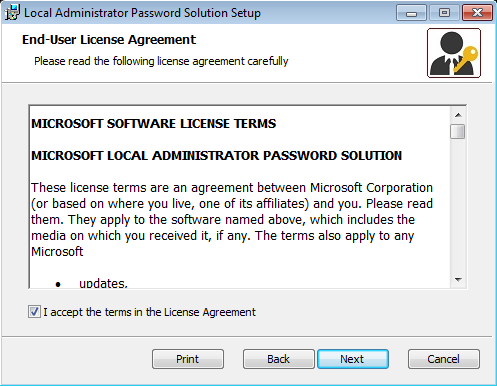
Accept the End-User License Agreement and click next.
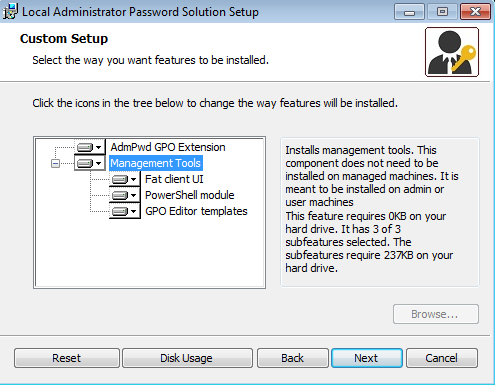
Select the ‘Managment Tools’ and select to install to all the computer and click next.
That it management install complete.

Onto our scheme update, open up an elevated PowerShell prompt with an appropriate scheme admin account, import the module and then update the schema like below:

Import-module AdmPwd.PS

Update-AdmPwdADSchema

Onto our permissions. Basically, the client machines need to be able to update the password and timestamp expiry attributes. Using the module that we have previously imported, or in the same window as before run:

Set-AdmPwdComputerSelfPermission -OrgUnit <name of the OU to delegate permissions>

In the Blue Team Security lab this would be on the ‘PCs’ OU:
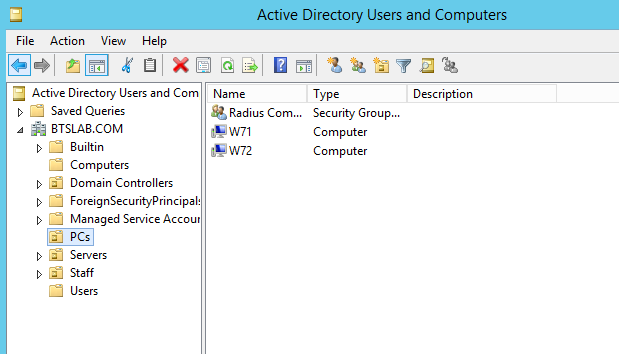
So the command would be:

Set-AdmPwdComputerSelfPermission -OrgUnit PCs

Next we will create a User Group that we can assign read permissions for the new attributes. This will essentially allow the new group and its users the ability to read the password field of the computer objects. In this case I have created a group called ‘LAPS Admins.’ The comand is:

Set-AdmPwdReadPasswordPermission -OrgUnit <name of the OU to delegate permissions> -AllowedPrincipals <users or groups>

In the Blue Team Security Lab our command would be:

Set-AdmPwdReadPasswordPermission -OrgUnit PCs -AllowedPrincipals ‘LAPS Admins’

The same again for the expiry field:

Set-AdmPwdResetPasswordPermission -OrgUnit PCs -AllowedPrincipals ‘LAPS Admins’

Managing clients; telling them we want to control their local administrator password is done through group policy. The policy we want to configure is a computer policy under administrative templates called LAPS, this will have been imported when the management computer software was installed. Using our management machine, in our group policy management console we want to create a new GPO under the container where our client machines are, just like below:
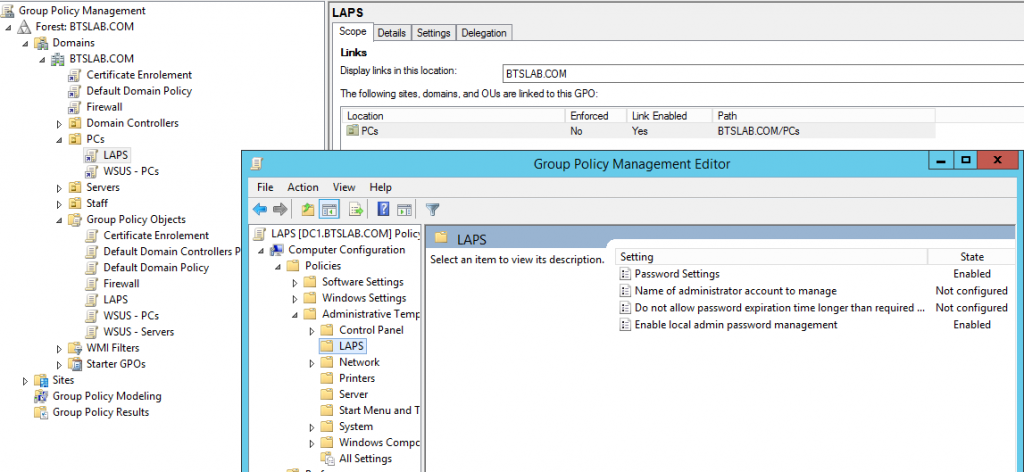
The settings we want to configure are to initial switch on the password management this is called ‘Enable local admin password management’ funnily enough and we want to enable it. Next is the ‘password settings’ this looks like, and has the below configuration options, as you can see we have a fair amount of control over the password to configure it securely. What you see below is the default settings:
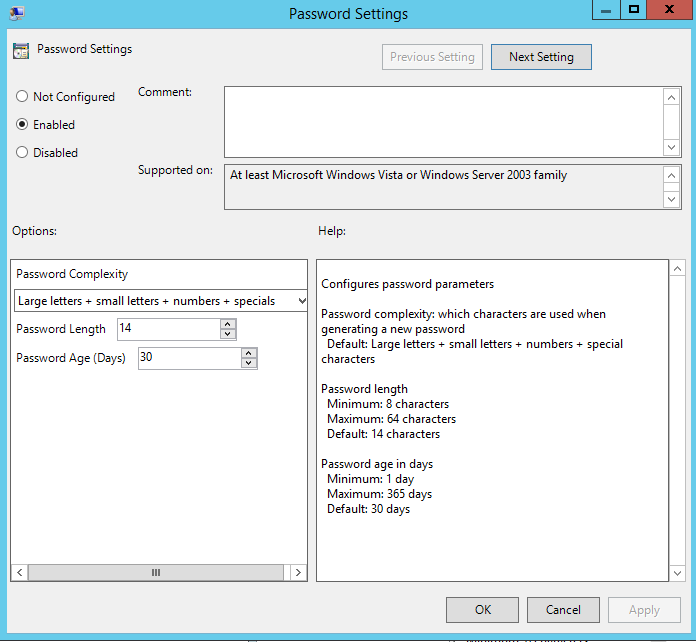
Its probably worth noting if you have changed the local administrators account name via policy (and you should!), then you will need to specify the new account name in the policy ‘Name of administrator account to manage’, enable the policy and specify the new name. This policy is only needed if you have renamed the account.

Next up is installing the client side software. I’m going to manually install this however in the enterprise you will probably use SCCM or GPO to deploy to your client machines. I will perhaps demonstrate this in my next post.

Over on our client the install takes all the default values from the same msi that we used for the management computers. I won’t bore you with additional screenshots, just know that it is a next, next, next, finish situation and installed successfully on my client machine W72.

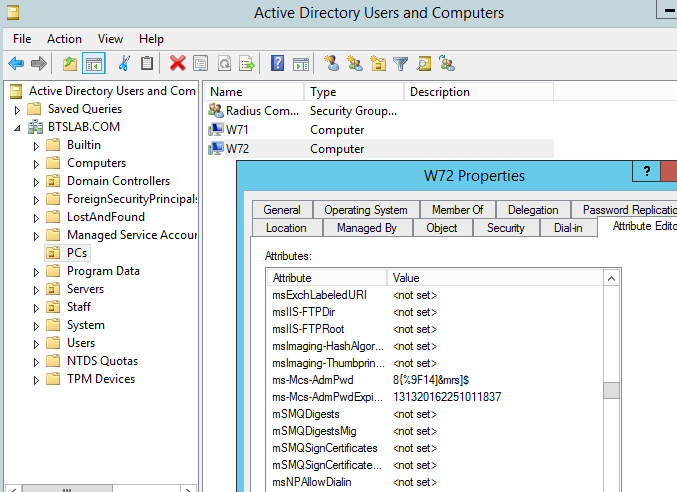
Once the above GPO has had time to take effect on our client machine we can verify the password in AD and through the fat client installed on the management computer. First in Active directory users and computers you can view the password by navigating to the computer object in question (W72 in this case) selecting the attribute editor and scrolling down to the value ‘ms-Mcs-Adm-Pwd’ this value is our new password the one below it is the expiry time (you will need to have selected ‘Advanced Features’ to view the attribute editor on the computer object) and be viewing with the appropriate rights (ie be part of in our case the LAPS Admins group):
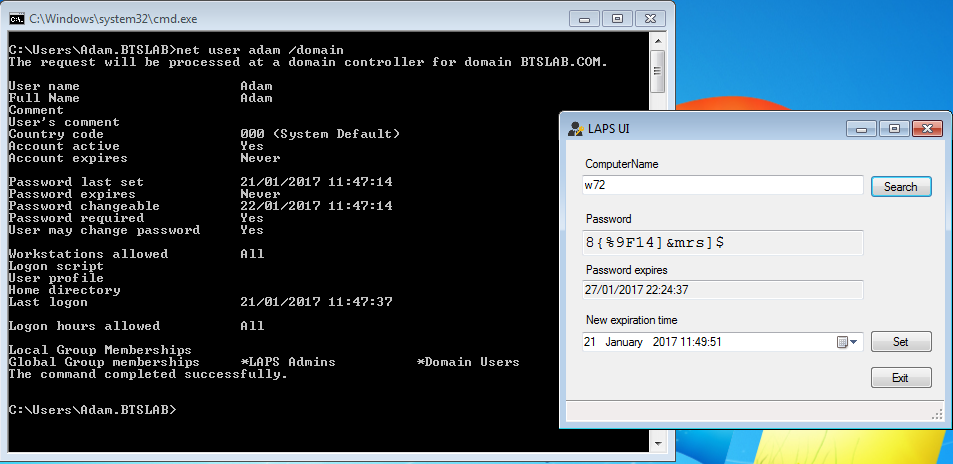
On the management machine with the account ‘Adam’ which is a member of the ‘LAPS Admins’ group through the fat client UI (which does require DotNet4).
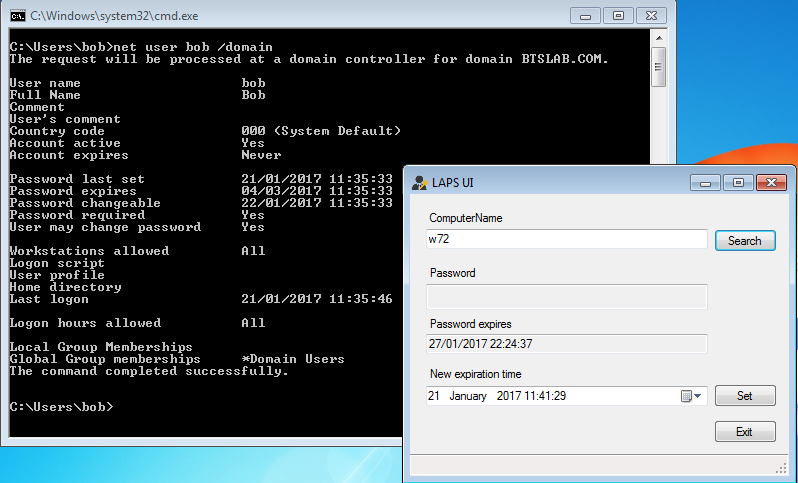
Just to demonstrate if we log in with ‘Bob’s account on the same management computer and try to use the same LAPS UI tool the following expected results are shown, not the bob is not a member of the ‘LAPS Admins’ group and so the password is blank, ace!
And for the die hard CLI users you can of course use powershell to retrieve the password with the appropriate account of course:

You can now try out your new unique local administrators password. Now even if the box has been compromised an attacker will struggle to crack the likes of the above password and secondly won’t be able to reuse the hash to authenticate to another machine. Remember to test out in your lab before in production. I hope this has been informative.
Awk – Part 1 – Printing the 5th word in a line of text to std output

AWK

To kick off ‘Project Bash’ located here I’m going to be talking about Awk. Awk is a text processing tool that can be used to manipulate text in a line in bash. There are many uses of awk so I have called this one Part 1. In Part 1 we are going to use awk to select a word in a line of text, this can be very useful if we want a specific value in a line of text like the 5th word and want to iterate that through each line in a file. Take the following example:
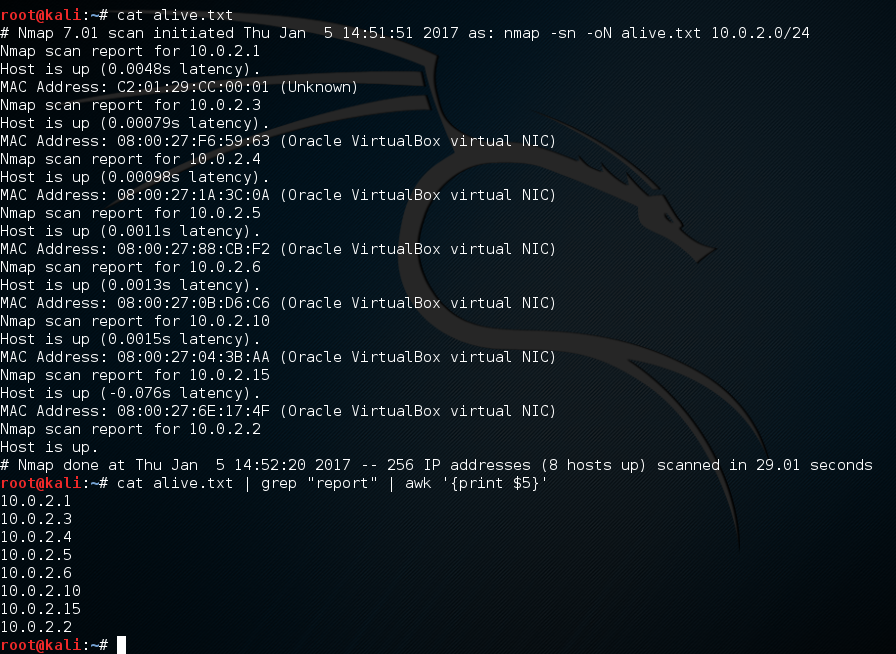
So we have just used Nmap to ping sweep a subnet and want to create a target IP list from the results, we send the output to a file called alive.txt. check out the below:
Awk Part 1

If we break the command down:

cat alive.txt | grep "report" | awk '{print $5}'

The first command ‘Cat alive.txt’ prints out the contents of the file alive.txt to std output (ie into bash). We then pipe the out to a second command. We then use the command ‘grep “report”‘ to find all lines with the word ‘report’ in:

Nmap scan report for 10.0.2.15

Then finally using ‘awk ‘{print $5}’ to print the 5th word in the line using the variable $5.

Changing the variable in the awk command to ‘$2’ prints the 2nd word in the line:

As you will probably agree this is powerful tool, especially when you need to clean up some out. There are multiple ways we can do the above this is just one of them. Ace!

Searching for Exploits with Exploit-DB.com – Online and Offline.

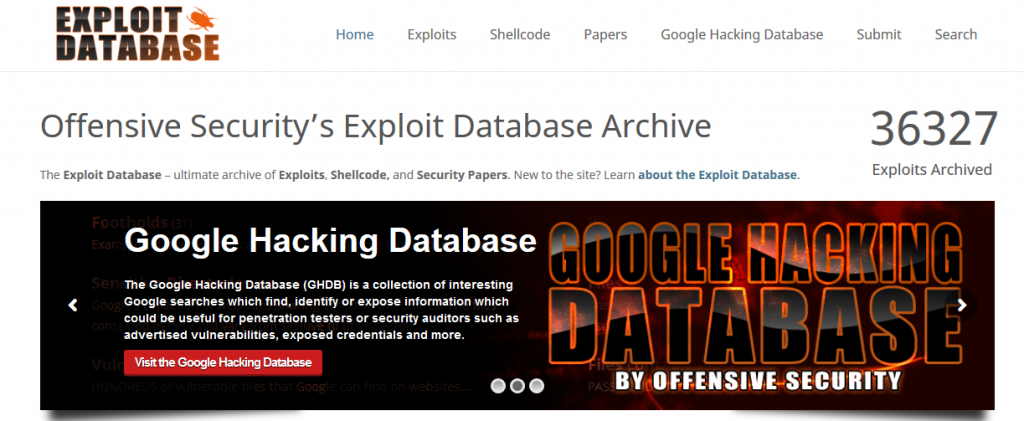
The Exploit-db.com needs no introduction. Most penetration testers will be well versed in the use of Exploit-db and its uses. However for new-comers, this is an excellent and ‘the go to’ resource when looking for exploits and exploit code for use in test labs on vulnerable systems.  It goes without saying though when looking through code that is published on the internet the following precautions should be taken;

  • Review the code. Understand what the code is doing.
  • Modify the code if needed to suit your situation, especially any shellcode snippets.
  • Understand what lanuguage the code is written in.
  • Don’t run code from the internet without knowing what the code is going to do. You don’t want to create a reverse shell back to a C&C server do you.
  • Always test code in a lab, isolated from the internet and production systems.
  • Understand that some code such as C++ and C for example will most likely need compiling and need dependancies.
Exploit-db.com
Exploit-db.com

Searching Exploit-db.com

There are several ways to search the Exploit-db such as:

  1. Via the exploit-db site: https://www.exploit-db.com/ however when searching for exploits you will have to use their captcher form in order to proceed with a search.
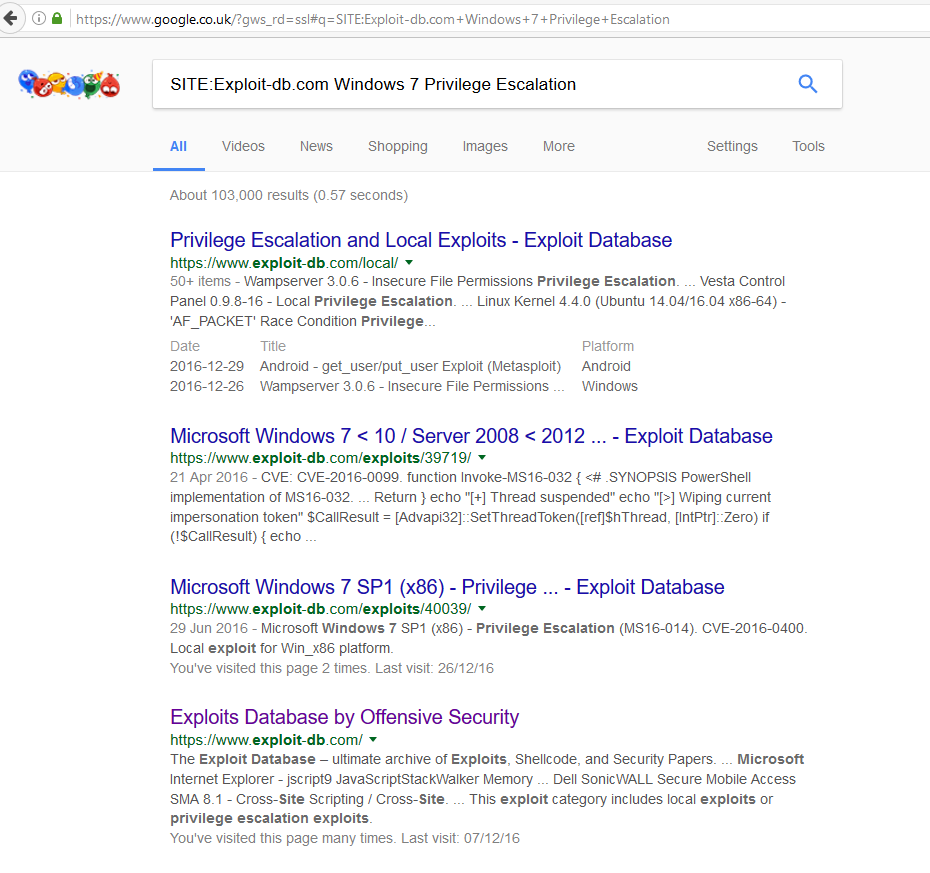
  2. Via Google search engine using the syntax: ‘SITE:Exploit-db.com Windows Privilege Escalation’

    Google search of the Exploit-DB
    Google search of the Exploit-DB
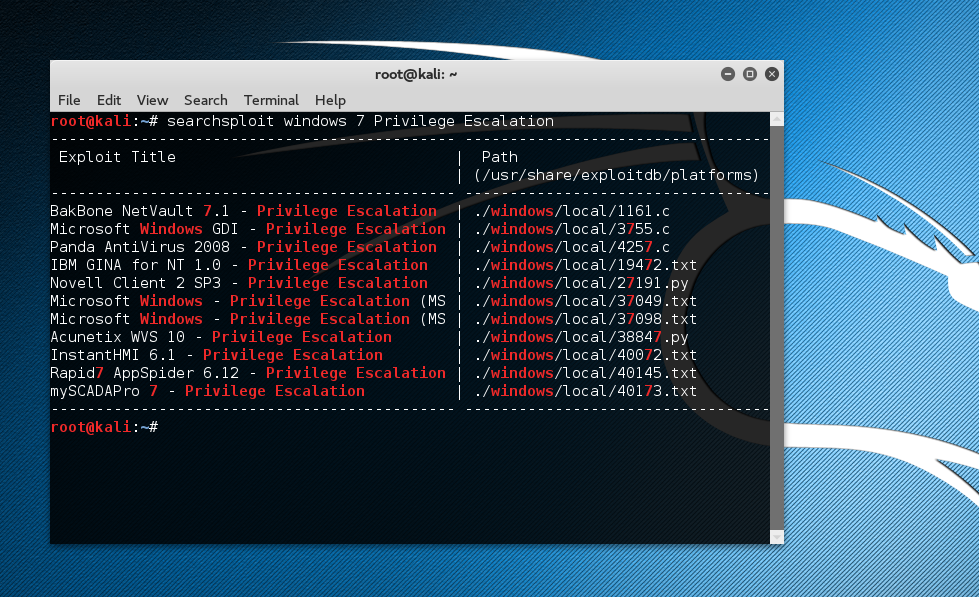
  3. Using searchsploit built into Kali Linux like below, this has the added benefit that the databse is offline:
    root@kali:~# searchsploit windows 7 Privilege Escalation
searchsploit in Kali

The offline copy can be updated with:

root@kali:~# searchsploit -u

Hope you find this useful.

Sed – Part 2 – Using Sed To remove text from a line in linux

How do we remove specific text from each line in a text file in Linux? In this post we cover using Sed to remove text from a line in Linux.

Sed to remove text from a line in linuxWe previously covered in this post adding text to a line in Linux. In this post we will be specifically talking about the opposite. Using Sed to remove text from a line in linux is fairly straight forward. To remove specific characters or portion of text from a line in Linux we can use command line bash tool sed. The tool sed is used to perform basic text transformations, more info on sed can be found here. In the below example we want to specifically remove ‘BARRY\’ from a line everything within the square brackets [text to remove] is removed, so we use:

sed 's/[BARRY\]//g'

example:

cat users | grep BARRY | cut -d" " -f 2 | sed 's/[BARRY\]//g'

Hopefully you will find this useful!

Windows Firewall profile – Network Location Awareness (NLA)

How to reset the windows firewall profile.Windows Firewall profile - Network Location Awareness (NLA)

In Windows operating systems Microsoft uses Network Location Awareness (NLA) for its Windows Firewall profile. This is not to be confused with RDP NLA (Network Level Authentication). This is used to determine if a network connection is on a public LAN, private LAN, or domain network. Essentially NLA collects information for each network adapter. The windows firewall then makes a decision as to which profile to assign based on this information. It first checks If the Connection Specific DNS Name matches a specific key. If it does it will apply the ‘Domain’ profile. If it doesn’t match this, it will move on and look at other characteristics such as gateway etc.

You can change the profile for each network connection by doing the following:

  1. Disable the network adapter.
  2. Open the registry at HKLM\Software\Microsoft\WindowsNT\CurrentVersion\NetworkList\Profiles – look for the ‘ProfileName’ and ‘Description’
  3. Delete the profile key.
  4. Re-enable the network adapter.

More in depth informaiton on the Windows Firewall Profile and NLA can be found in the following Microsoft Blog on NLA . However I hope this quick tip helps!

Checking for Insecure Service Permissions in Windows

How to check for them.

Just a quick post to show a way to check for insecure service permissions  in Windows using the following built in command line tools. This uses a combination of wmic to query for services and then icacls to check the permissions.

I found the below for loops as shown by travisaltman.com to quickly get the results we require.

for /f "tokens=2 delims='='" %a in ('wmic service list full^|find /i "pathname"^|find /i /v "system32"') do @echo %a >> c:\users\adam\permissions.txt
for /f eol^=^"^ delims^=^" %a in (c:\users\adam\permissions.txt) do cmd.exe /c icacls "%a"

The first line using wmi to query the services excluding ‘system32’ and then the the second line takes the output and runs icacls against each line.

Another way to view these is via Sysinternals with the accesschk tool like below:

accesschk.exe -uwcqv *

accesschk.exe -uwcqv “Authenticated Users” *
accesschk.exe -uwcqv “Everyone” *

Windows 7 Hardening Steps – the things you need to do after installing updates KB2269637 KB2719662 MS15-124.

Windows Updates… the bit you need to do after installing them!

Bit of an FYI post really for the following updates KB2269637 KB2719662 MS15-124. The below are some Windows 7 hardening steps that are needed after installing Microsoft updates KB2269637 KB2719662 MS15-124. I see these a lot in organizations. Admins have installed all the patches however haven’t followed through with the extra steps that are needed. There are only a few updates that require some extra action. In most cases its a registry key that needs adding or modifying. In mosat cases these can be achieved through Group Policy. The below list isn’t all of them just a couple I have recently come across.

MS KB2269637: Insecure Library Loading Could Allow Remote Code Execution

REG ADD "HKLM\SYSTEM\CurrentControlSet\Control\Session Manager" /f /v CWDIllegalInDllSearch  /t REG_DWORD /d 0x1

MS KB2719662: Vulnerabilities in Gadgets Could Allow Remote Code Execution

REG ADD "HKLM\SOFTWARE\Microsoft\Windows\CurrentVersion\Policies\Windows\Sidebar" /f /v TurnOffSidebar /t REG_DWORD /d 0x1

MS15-124: Cumulative Security Update for Internet Explorer (3116180)

REG ADD "HKLM\SOFTWARE\Microsoft\Internet Explorer\MAIN\FeatureControl\FEATURE_ALLOW_USER32_EXCEPTION_HANDLER_HARDENING" /f /v iexplore.exe /t REG_DWORD /d 0x1
REG ADD "HKLM\SOFTWARE\Wow6432Node\Microsoft\Internet Explorer\MAIN\FeatureControl\FEATURE_ALLOW_USER32_EXCEPTION_HANDLER_HARDENING" /f /v iexplore.exe /t REG_DWORD /d 0x1

Test and test again to ensure compatibility and that these work in your own environment, they worked for me though on Windows 7 Pro machine.

Using Python to generate all hex characters for use with writing exploit code for Buffer Overflows.

hex hex hex!

Using Python to generate all hex charactersIn this post we will be using Python to generate all hex characters for use with Buffer Overflows when writing exploit code. I came across a requirement whilst writing some exploit code to generate all hex characters available. The reason for this was to find all bad characters in a piece of shell code. This was needed as to not mangle the code when it is loaded into memory on the stack.

There are a few other tools built into Kali that can do this however the  following python code will do the trick for us nicely, listing all hex characters :

#!/usr/bin/python
import sys
for x in range(1,256):
        sys.stdout.write ("\\x" + '{:02x}'.format(x))

All we need to do is run the python code and hey presto we have the hex characters ready to send to out application.  You can simply copy the above text. Open up your favourite text editor in Linux, I like to use Nano. Copy the text into Nano, save the file out as youfile.py. You will need to then modify the permissions of your new file and run the file with Python, python yourfile.py.

Of course if you don’t want a script to list all the hex characters you can always copy them from here: 🙂

badchars = ("\x00\x01\x02\x03\x04\x05\x06\x07\x08\x09\x0a\x0b\x0c\x0d\x0e\x0f\x10\x11\x12\x13\x14\x15\x16\x17\x18\x19\x1a\x1b\x1c\x1d\x1e\x1f"
"\x20\x21\x22\x23\x24\x25\x26\x27\x28\x29\x2a\x2b\x2c\x2d\x2e\x2f\x30\x31\x32\x33\x34\x35\x36\x37\x38\x39\x3a\x3b\x3c\x3d\x3e\x3f\x40"
"\x41\x42\x43\x44\x45\x46\x47\x48\x49\x4a\x4b\x4c\x4d\x4e\x4f\x50\x51\x52\x53\x54\x55\x56\x57\x58\x59\x5a\x5b\x5c\x5d\x5e\x5f"
"\x60\x61\x62\x63\x64\x65\x66\x67\x68\x69\x6a\x6b\x6c\x6d\x6e\x6f\x70\x71\x72\x73\x74\x75\x76\x77\x78\x79\x7a\x7b\x7c\x7d\x7e\x7f"
"\x80\x81\x82\x83\x84\x85\x86\x87\x88\x89\x8a\x8b\x8c\x8d\x8e\x8f\x90\x91\x92\x93\x94\x95\x96\x97\x98\x99\x9a\x9b\x9c\x9d\x9e\x9f"
"\xa0\xa1\xa2\xa3\xa4\xa5\xa6\xa7\xa8\xa9\xaa\xab\xac\xad\xae\xaf\xb0\xb1\xb2\xb3\xb4\xb5\xb6\xb7\xb8\xb9\xba\xbb\xbc\xbd\xbe\xbf"
"\xc0\xc1\xc2\xc3\xc4\xc5\xc6\xc7\xc8\xc9\xca\xcb\xcc\xcd\xce\xcf\xd0\xd1\xd2\xd3\xd4\xd5\xd6\xd7\xd8\xd9\xda\xdb\xdc\xdd\xde\xdf"
"\xe0\xe1\xe2\xe3\xe4\xe5\xe6\xe7\xe8\xe9\xea\xeb\xec\xed\xee\xef\xf0\xf1\xf2\xf3\xf4\xf5\xf6\xf7\xf8\xf9\xfa\xfb\xfc\xfd\xfe\xff")

If you have a better way to be produce it let me know.