I posted recently about implementing Linux password complexity here and wanted to follow it up by posting about account lockout policy. Linux account lockout policy is often overlooked, this post will show you how to implement simple controls to keep you in check. Brute force attacks are trivial to perform, not having a lockout policy (and password policy) could end you up in hot bother. With a lockout time configured this will at least slow down your adversaries and very least annoy the hell out of them. I would always suggest you use a public/private key pair for SSH access and disable password authentication specifically for this service.
Linux account lockout policy is controlled by Pluggable Authentication Modules (PAM) more specifically pam_tally and pam_tally2. These modules can be configured in Debain/Ubuntu in the /etc/pam.d/common-auth, and in RedHat and Centos based distros /etc/pam.d/system-auth. Pam_tally as the name might suggest is a count for logins (ie tallying up logins). The module has various options to configure, it will maintains a count of attempted logins, can reset counts, and deny access based on too many incorrect attempts, set lockout time etc.
Lets look at an example of how we might configure this within Ubuntu 18.04.1.
If we check what PAM modules are installed ‘man -k pam_’ we see that pam_tally and pam_tally2 are already installed.
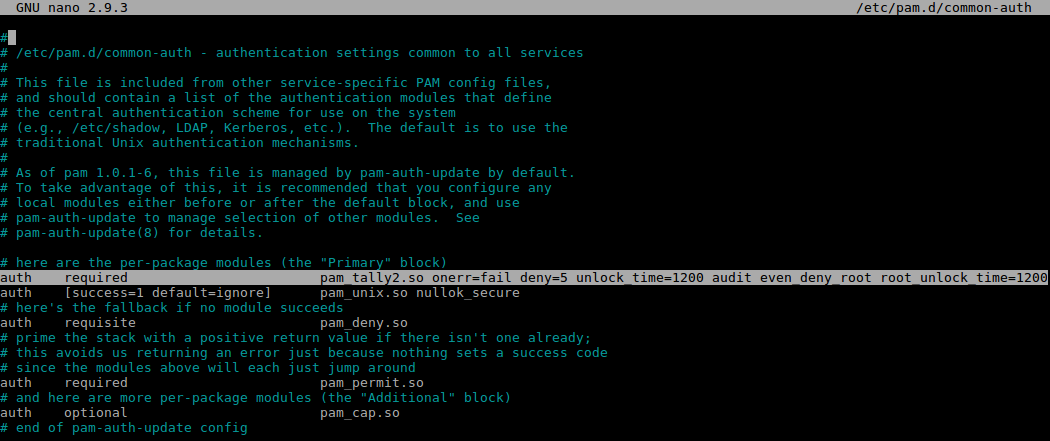
I have added the highlighted line into the /etc/pam.d/common-auth file:
According to the Ubuntu man pages here normally failed attempts to access the root account will not cause the root account to become blocked, to prevent denial of service, this can be overriden with an optional argument which we will discuss later.
Our settings are:
onerror=fail : Upon an error issue a fail. deny=5 : Deny access if the count for this user exceeds 5 attempts. unlock_time=1200 : This will lock the user out for 1200 seconds (20 mins) if the max allowed attempts is exceeded. audit : This will log the user name into the sys log if the user is not found. even_deny_root : Careful with this one, this will lock the root account out. root_unlock_time=1200 : This will lock the root account out for 1200 seconds (20 mins) if the max allowed attempts is exceeded.
These changes are instant, no need to reboot or restart any service.
All that’s left to do now is to test our configuration on our test server. In the /var/log/auth.d file we can see pam_tally2 is racking up the login attempts and is denying access.
Linux Password Policy is often overlooked. This post is to raise awareness how we can up our game in terms of password complexity for Linux systems. Setting up password complexity in Linux specifically Ubuntu Server more specifically 18.04.1 is achieved through Pluggable Authentication Modules (PAM). To authenticate a user, an application such as ssh hands off the authentication mechanism to PAM to determine if the credentials are correct. There are various modules that can be modified within PAM to set-up aspects like password complexity and account lockout and other restrictions. We can check what modules are installed by issuing:
sudo man -k pam_
By default Ubuntu requires a minimum of 6 characters. In Ubuntu this is controlled by the module pam_unix which is used for traditional password authentication, this is configured in debain/ubuntu systems in the file /etc/pam.d/common-password (RedHat/Centos systems its/etc/pam.d/system-auth). Modules work in a rule/stack manner processing one rule then another depending on the control arguments. An amount of configuration can be done in the pam_unix module, however for more granular control there is another module called pam_cracklib. This allows for all the specific control that one might want for a secure complex password.
A basic set of requirements for password complexity might be:
A minimum of one upper case A minimum of one lower case A minimum of least one digit A minimum of one special character A minimum of 15 characters
Password History 15
Lets work through on a test Ubuntu 18.04.1 server how we would implement this. First install pam_cracklib, this is a ‘pluggable authentication module’ which can be used in the password stack. ‘Pam_cracklib’, will check for specific password criteria, based on default values and what you specify. For example by default it will run through a routine to see if the password is part of a dictionary and then go on to check for your specifics that you may have set like password length.
First lets install the module, it is available in the Ubuntu repository:
sudo apt install libpam-cracklib
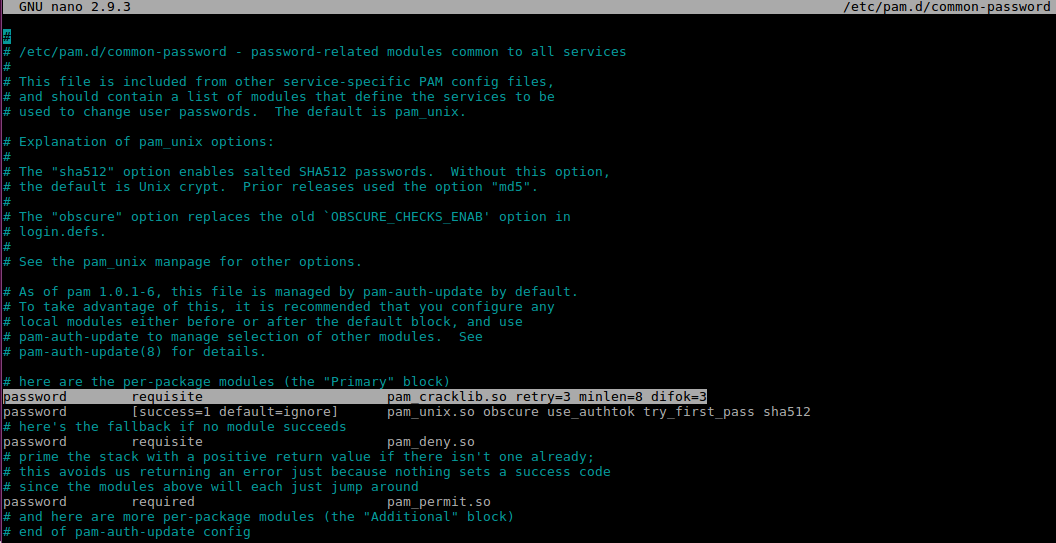
The install process will automatically add a line into the /etc/pam.d/common-password file that is used for the additional password control. I’ve highlight it below:
We can then further modify this line for additional complexity. working on the above criteria we would add:
ucredit=-1 : A minimum of one upper case lcredit=-1 : A minimum of one lower case dcredit=-1 : A minimum of least one digit ocredit=-1 : A minimum of one special character minlen=15 : A minimum of 15 characters.
note the -1 number represents a minimum value to subtract from the minlen value. There is nothing to stop you incresing this, for example ocredit=-3 would require the user to add 3 special characters.
Password history is actually controlled by pam_unix so we will touch on this separately.
Default values that get added are:
retry=3 : Prompt user at most 3 times before returning an error. The default is 1. minlen=8 : A minimum of 15 characters. difok=3 : The amount of character changes in the new password that differentiate it from the old password.
For password history first we need to create a new file for pam_unix to store old passwords (hashed of course). Without this password changes will fail.
Add the ‘remeber=15‘ to the end of the pam_unix line and your done, at least for now. Both lines should look like this:
These changes are instant, no need to reboot or restart any service.
Now all that is left to do is test your new password policy. Whilst this does provide good password complexity I would always suggest you use a public/private key pair for SSH access and disable password authentication specifically for this service.
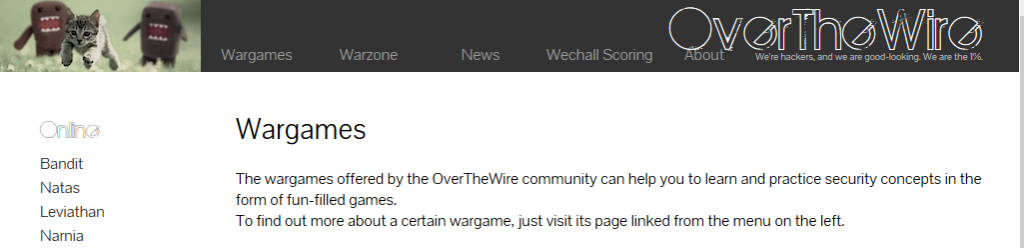
I just thought I would share with you all Over the wire – bandit this is fun hacking practice game that you can play on online through SSH. It very addictive and once you start you will want to progress through the levels. Not stopping till you have finished. I started this and had to finish it. You can find it over at http://overthewire.org/wargames/ I found this through ‘The hackers playbook 2’ book of pentesting tips and tricks found here http://thehackerplaybook.com/dashboard/
Over the wire is a set of text based games, brought to you in a ‘capture the flag’ type style game where you ssh into there servers and crack the puzzle or code. The first series called ‘bandit’ is relatively straight forward with 26 levels. You start the game with a username and password to login to their servers via SSH. You can move up a level each time cracking the puzzle and obtaining the password to the next level. The bandit series is a great intro in its own right to bash as you have to use and combine tools and functions like grep, sort, base64 etc in order to crack the code. Each level finds you figuring out how to view/capture a text string which is the password to the next level. Head over to http://overthewire.org/wargames/ and check it out.
I thought I would run through the process of obtaining a certificate for a web server from Lets Encrypt the open certificate authority by the Internet Security Research Group (ISRG) , for free!
The Lets Encrypt initiative has been setup to simplify the process of obtaining a certificate and make it more accessible for people to use encryption on their websites you can read more about it here: https://letsencrypt.org/. Certificates are free and valid for 90 days and need to be renewed for continuation of the service. (which can be automated). Those who have been through the process of provisioning certificates will understand the involved process to get it working, this is a breath of fresh air in comparison.
Sounds great so what do we need to do? Well the below example runs through the process for an already created standard HTTP apache debian based system.
OK So Lets Encrypt!
First we need to obtain the Lets Encrypt files. We will pull the files across from the Official GitHub repository. We’ll do this through git. This ensures that we have the latest version of the Lets Encrypt files. We will drop it under the /opt folder.
(If you want to update in the future run ‘git pull’ in the same folder.)
Move into the lets encrypt folder:
cd /opt/letsencrypt
We then need to install the Lets Encrypt client through the ‘letsencrypt-auto’ command, when this is run it will essentially pull down all the related dependencies from your OS repositories and update the client through either apt-get or yum for example. From there on you can run either ‘letsencrypt’ or ‘letsencrypt-auto’ command for new certs of renewals.
Next we will obtain our certificate and bundle for our test domain testdomain.co.uk and subdomain www.testdomain.co.uk with the letsencrypt-auto command. This is the recommended method from the Lets Encrypt website.
There are a number of plugins that can be used with letsencrypt run command, and a number of command line parameters you can pass, these are all designed to help ease the process along. We are going to be running the Apache plugin and so will pass it the ‘–apache’ command. This plugin is designed to be used with Apache (funnily enough!) which automates the process of obtaining and installing the certificate with Apache2.4 on Debian based systems. This effectively sorts all the certificate configuration within Apache and then restarts the service.
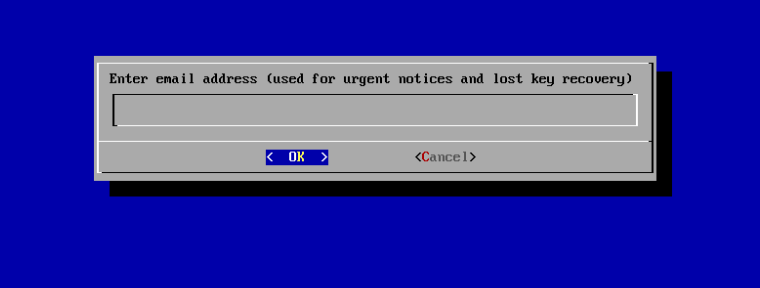
After this is executed you should see the updates scroll through pulling content from your repositories, after a while you will presented with the following screen asking you to confirm your email. This is used as a reminder for renewal:
Lets Encrypt Confirm Email
You can automate this process passing the –email parameter at the command line if you wish. So ‘–email admin@testdomain.co.uk’
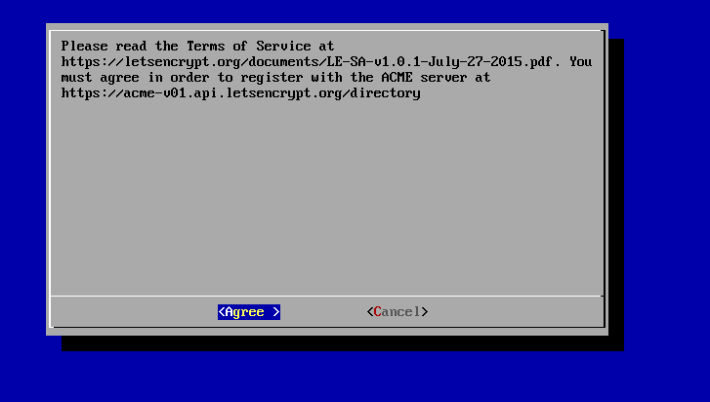
You will next be asked to agree to the terms of service:
Lets Encrypt ToS
Again you can automate this by passing the –agree-tos in the command line.
Next you will be asked where you want to access your site through http and https or just through https.
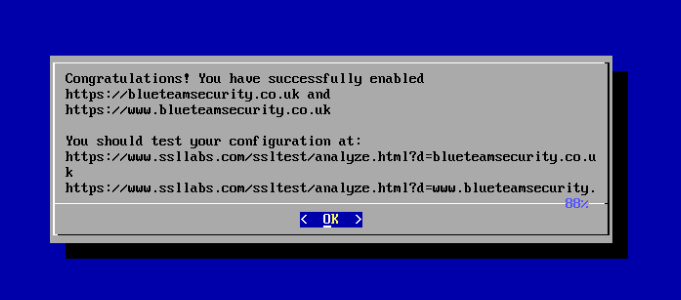
You will then be presented with the ‘Congratulations!’ screen saying you have successfully configured your certificate and enabled https:
Lets Encrypt! Congratulations
Renewal
To renew your certificate run:
letsencrypt-auto renew
This will renew all your certificates with all previously used parameters for certificates that are due to expire within 30 days. passing the -d parameter will renew per domain.
--force-renewal
Allows you to renew before 30 days.
You can also run:
letsencrypt-auto renew --rsa-key-size 4096
This will renew your certificate with a key size of 4096 bit.
You can also rerun the existing command you ran earlier in which case you will be prompted that you have already run the command and to either re-run the install or renew your certificates.
All that is left to do is to automate the renewal with a cron job, one for another post.
Amazing that’s it! This makes obtaining a certificate for a website very accessible to people due to the way the scripts/plugins automate the apache configuration.
This is Part two of Securing SSH in the Server Hardening Series. In this post we will continue to walk through the remaining hardening options for SSH.
In Part 1 of Securing SSH located here we discussed:
Disabling SSH Protocol 1 and using 2.
Limiting the users who can login.
Disable root login and unsing only a standard user account.
Run SSH on a different port.
In Part 2 of Securing SSH we will now cover the remaining techniques:
Use Public Private keys for Authentication
Filtering SSH with iptables
Setting strong Cryptographic Algorithms
Use Public Private keys for Authentication
As we know passwords can be subject to brute force attacks and given enough time simple passwords can be broken. Using SSH public private key pairs for authentication is a more secure method. Its a more secure method of logging in than using a password due to the computational power and time needed to decipher the public private key pair through brute force. The private key is used on the machine from which you are logging in from and the public key is used on the server or machine which you are establishing an SSH session with. In addition to using the key pair you can use a passphrase to secure the key pair. Should the key pair become compromised you have a an additional fallback and time in which to remove the public key from server it is being used on.
First we need to create the key pair, you can create either an RSA (Rivest-Shamir-Adleman) or DSA (Digital Signature Algorithm) key pair. The default key size in Ubuntu is currently 2048 however you can specify the -b parameter for a high keysize for example ‘-b 4096’. In this example we are creating a keypair for the root login, you should ideally do this for a standard user however this is just to demonstrate the procedure.
In this example we are creating the key pair on the same test ubtunu 14.04 server as the one which we are going to be using the keys to actually access. In reality there are a number of ways and platforms from which to create the key pair, whether that’s on the server or client OS.
ssh-keygen -t rsa -b 4096
After the above command you will be prompted with some further questions, what and where the keys will be stored. Press enter and move on to accept the default files name, you can specify your own file name, the files will be created in the current working directory.
You will next be prompted to enter a passphrase, you have the option to enter one here. Doing so adds a layer of complexity for anyone that has already obtained the key pair and thus further hardens your configuration. If you enter a passphrase you will need to enter it in every time you ssh to the server.
The whole process will look like this:
SSH Key Generation using RSA 4096 key
If we now look in the ssh folder in the home user directory for root (or where ever you chose to save the files) we will see our key pair. The private key is called id_rsa and the public key is id_rsa.pub:
SSH Key files
At this point it would be wise to backup both sets of keys. You will need to copy off the private key for you to use from your local machine that you will be ssh’ing in from, we could do this in many ways either using winscp from a windows operating system alternatively we can view the private key and use copy and paste the contents from an existing session. Remember the folder is hidden, with the period in front of the folder name (.ssh) if your looking for it in winscp ;-).
We will need to move the public key into the ‘authorized_keys’ file on the server you are going to be using the keys for (the same server in our case), and restart SSH. The .pub file should be copied over to the correct profile you will be ssh’ing into.
cd .ssh
cat id_rsa.pub >> authorized_keys
service ssh restart
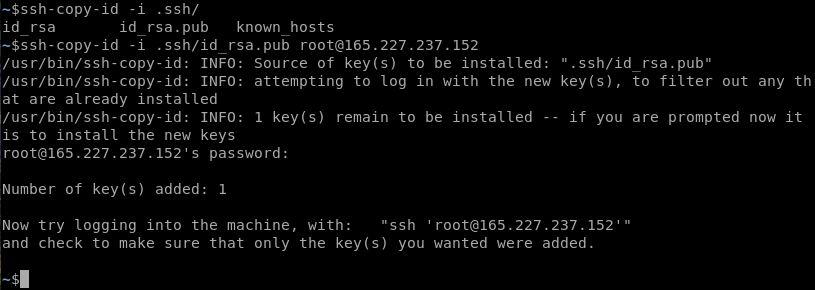
If I had created the key pair on my client machine I could use the ssh-copy-id command in order to get the public key onto the server like below:
At this point you are ready to test the rsa key authentication method. I would strongly recommend you test this at this stage whilst you still have regular username and password ssh authentication enabled, in case you have made a mistake and can’t get back in. If you going to be testing from putty or winscp you will need to use puttygen to convert your private key file into a format that putty can read which is a ppk file. This is a straight forward task.
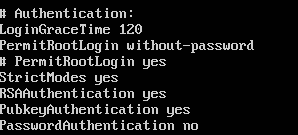
Once tested and you are ready to start using your key pair you will want to remove the ability for ‘root’ (and other user in this example) to login with a username and password. Only do this after you have successfully used your key pair and are comfortable with the process. In the ‘sshd_config’ amend the ‘PermitRootLogin’ to read ‘PermitRootLogin without-password’ and add a line that reads ‘PasswordAuthentication no’ like below.
Restart ssh service one final time. This will deny access via username and password.
Filtering SSH with iptables
I demonstrated the use of iptables in one of my previous posts here, so won’t be going into this again.
Setting strong cryptographic algorithms
In this particular section of the post we are going to look at how we can customize the cryptographic algorithms that SSH can use and further optimize these so we are only using the most secure ones available. To dig a little bit deeper here there are two specific issues we are going address. The first being the type of encryption mode that is being used, and the second being the use of weak MAC algorithms.
At the time of writing (as this will change) your average vulnerability scanner will detect ssh on port 22 and will try to negotiate a session with the service. In doing so it will detect the cryptographic properties that the server would like to use, in your typical out of the box setup CBC (Cipher Block Chaining) encryption mode and MD5 or 96-bit MAC (Message Authentication Code) algorithms will be configured, both of which are considered weak. The use of CBC encryption mode for SSH is currently scored as CVSS Base Score 2.6 equating generally speaking as a Low risk. We can correct this by disabling CBC encryption mode, and enabling a different type of mode such as CTR or GCM. The use of weak MAC is also scored with a CVSS Base Score of 2.6 equating again generally speaking as a Low risk. This can be correct by removing the use of MD5 and 96 bit MACs.
Amend or appending the following lines to the /etc/ssh/sshd_conf file will resolve this issue, there are other variations that you could use however this will rectify the issue:
This will be the first of two posts in the server hardening Series where we will discuss the Secure Shell (SSH) service. I will cover the options available to us for hardening SSH. SSH is a cryptographic network protocol used for remote management over an insecure (or less secure) communication channel. Whether this is a web server, an appliance or a firewall, out on the internet or in your local subnet. For example most remote Linux based servers have SSH enabled in order for administrators to remotely manage them rather than being directly in front of the server/appliance with a monitor at the console. According to arstechnica (2015) Microsoft is also to introduce native support for SSH in 2015 – so watch this space.
There are a number of hardening techniques that we can undertake to further secure the SSH service from an out of the box typical install. These include:
Disabling SSH Protocol 1 and using Protocol 2. (Part 1)
Limit the the users who can login. (Part 1)
Disable root login and use a standard user account. (Part 1)
Run SSH on a different port to 22. (Part 1)
Use Public Private keys for Authentication. (Part 2)
Filter SSH with iptables (demonstrated in one of my previous posts here) (Part 2)
Setting strong cryptographic algorithms (Part 2)
I will be demonstrating these tasks on Ubtuntu 14.04. however the options and configurations will be very similar across the different Linux distributions.
Disabling SSH Protocol 1 and using Protocol 2
Disabling SSH Protocol 1 is done in the following file ‘/etc/ssh/sshd_config’, so using your favorite text editor nano, vi, leafpad etc (mines nano) open up the ‘sshd_config’ file and find the protocol line and ensure it has a the ‘2’ parameter next to it like the below:
# Protocol 1
Protocol 2
Limit the the users who can login
Locate the authentication section again in the file ‘/etc/ssh/sshd_config’, and add in the line ‘AllowUsers Adam Mark’ and any other usernames as needed. This should be used in conjunction with disabling the root login. This will only let ‘Adam’ and ‘Mark’ login for example.
AllowUsers Adam Mark
Disable root login and use a standard user account
Locate the authentication section and specifically the ‘PermitRootLogin yes’ and either comment the line out with a # and add a new line in or change the parameter to ‘no’.
# Authentication:
LoginGraceTime 120
# PermitRootLogin yes
PermintRootLogin no
Run SSH on a different port to 22
This can clearly be achieved in a number of different ways depending on how your infrastructure is configured. For example you could change the port on your SSH Service in the sshd_config file or adjust port forwarding/translation rules on your firewall or router. The main goal of this exercise is to obfuscate the SSH service to a potential attacker, we must be clear here this doesn’t protect the port in any way however does distract from the fact port 22 is not open for business. I say again this will not protect you against an attacker with enough intent, an attacker with enough experience will have scanned all 65k ports and verified all services on all open ports. Never the less if somebody has only scanned the top 1k ports its still an option, but should not be relied upon. I’m not going to get into the debate of ‘security by obscurity’ in this post. From the following file ‘/etc/ssh/sshd_config’, locate the ‘port 22’ line and change the number parameter to the unused port of your choice
# I have changed the default SSH port from 22 to 3333
Port 3333
I have added a comment in the line above as a reminder here to allow the next person to see what I have done for any troubleshooting purpose. You never know when you will move on and the next person needs to administer the box, this is useful to them. 😉
In most cases the SSH service will need to be restarted in order for the changes to take effect. From a terminal: (I always add a ‘-v’, optional for verbose)
Service ssh restart -v
As always I would suggest you try these out first in a test environment making one change at a time before changing your corporate machines.
All too often web servers are setup with fairly standard configuration. The HTTP Headers display various information from time stamps, cookie info and also server version.
Server version information especially should be removed from the HTTP headers as it allows an attacker to identify what the underlying server and web server version is. If vulnerabilities lie in the stated version, an attacker can concentrate there efforts towards that version identified on your system more easily.
The below configurations should be set for minimal server version info.
Linux/Apache/PHP:
In the /etc/php5/apache2/php.ini file find the line ‘expose_php = On’ and set the parameter from ‘On’ to ‘Off’ as below:
; Decides whether PHP may expose the fact that it is installed on the server
; (e.g. by adding its signature to the Web server header).  It is no security
; threat in any way, but it makes it possible to determine whether you use PHP
; on your server or not.
; http://php.net/expose-php
expose_php = Off
This will remove the ‘X-Powered-by’ option from the HTTP header thus removing your PHP version and OS version information.
In the /etc/apache2/conf-available/security.conf locate the ‘Server Tokens Full’ line and change the parameter from ‘Full’ to ‘Prod’ this will give the least amount of information. Unfortunately without changing this hard-coded parameter and recompiling apache yourself there is no way to reduce this information any further.
# ServerTokens
# This directive configures what you return as the Server HTTP response
# Header. The default is 'Full' which sends information about the OS-Type
# and compiled in modules.
# Set to one of:  Full | OS | Minimal | Minor | Major | Prod
# where Full conveys the most information, and Prod the least.
#ServerTokens Minimal
#ServerTokens OS
#ServerTokens Full
ServerTokens Prod
In the same file locate the ‘ServerSignature On’ line and change the parameter from ‘On’ to ‘Off’, or comment out the existing line and add a new one in with the ‘Off’ option as below.
The ServerSignature isn’t actually information from or displayed in the HTTP headers, it is however information that is displayed at the bottom of for example a 404, 403 default page, which again will give away information about your system. Better still use a custom 404 or 403 page however if you don’t have custom pages this is the next best thing.
# Optionally add a line containing the server version and virtual host
# name to server-generated pages (internal error documents, FTP directory
# listings, mod_status and mod_info output etc., but not CGI generated
# documents or custom error documents).
# Set to "EMail" to also include a mailto: link to the ServerAdmin.
# Set to one of:  On | Off | EMail
ServerSignature Off
#ServerSignature On
And as usual you should test these configurations out in a test environment first before your main production web servers.
Having good Patch managment is essential, and being able to keep on top of your microsoft patching is paramount to good security. It is all too easy to get caught behind in keeping systems upto date, since almost all software needs patching these days. Clawing your way back from out of date patches on servers can be a nightmare however automating patch managment if setup correctly with correctly configured maintenance windows makes life easier. Using products like WSUS, or better still SCCM 2012 R2 and having well built resiliant system architecture, can remove the pain from this task. Having a robust patching policy, and management buy in from the business is also essential. This enables the IT team to bring servers down at an appropriate time for that inevitable reboot is just as important and can make the process run far more effectively. Does this bring into question whether this is an IT issue, a resourcing issue or a business strategy issue? Getting down time approval from a section of the business can be tricky without managment buy in, however, not letting the IT team take down that all important business critical system for patching is in itself a risk. A risk assement needs to be carried out by the business as to whether they delay remediating that zero day vulnerabilty vs letting the IT team patch the server and losing potential revenue whilst the server is down vs patching the system which subsequntly causes a system failure. All businesses should be asking themselves ‘what are my vulnerabilities?’. Subsequently what is the impact vs likelihood of this resulting in my overall risk? Of course this will be a case by case decision, with multiple factors, ie what is the patch fixing, the system archetecture etc. This needs to be weighed up against the consenquenses of not applying a patch ie can you afford to be hacked…
How do I know which cipher suites to select for my web server?
This is a common issue, sysadmins have their web servers up or vpn servers configured. However they are often using older SSL protocols and older cipher suites that are now vulnerable to attack in certain scenarios. We need to understand what a cipher suite is actually doing in order to select the correct ones.
For SSL/TLS connections a cipher suite is selected based on a number of tasks that it has to perform, the client uses a preferred cipher suite list and the server will normally honor this unless it also has a preferred list, set by the sysadmin.
Initial Key Exchange, the Asymmetric Encryption: This will most commonly be RSA, however the following are options; RSA ( Ron Rivest, Adi Shamir, and Leonard Adleman), DH (Diffie-Hellman) or ECDH (Elliptic Curve Diffie-Hellman).
RSA key length should be 2048 bit minimum. ECDH and others should be an equal strength, note the ECDH key length will be significantly lower due to the way the algorithm works! The Asymmetric Encryption is only being used in the initial key exchange and for the session symmetric encryption key. The Asymmetric encryption method could be used for the data transfer however the computational power needed is far higher than the symmetric Encryption due to the key size.
Session data, the Symmetric Encryption: The most commonly used three ciphers we see in use being RC4, 3DES and AES, careful selection of ciphers is required here:
RC4 (Rivest Cipher 4) although used almost everywhere is now considered weak, and being phased out by Microsoft. This should be avoided.
3Des (Triple Data Encryption Standard) uses DES and encrypts three times hence the ‘triple’. The original DES uses a weak key length and is considered weak.
AES (Advanced Encryption Standard) 128 bit block size using 128, 192 and 256 bit keys to encrypt data, is all good.
Many other options are available that are not so common include Blowfish, Twofish, Serpent etc. I won’t be going into the different ciphers here or the difference between Block (3DES+ AES) and Stream (RC4) on this page, I’ll save this for another blog.
Digital Signature – The digital signature is used to verify the server.
Integrity check – Here SHA-2 or SHA 256 (Secure Hash Algorithm) should be used. MD5 and SHA1 are being phased out due to weaknesses. SHA1 will still be seen on certificates however Google Chrome will now show a warning for this since October 2014. Microsoft has a deprecation policy indicating SHA1 issued certificates should not be used after 1/1/2017.
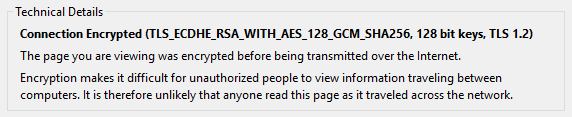
With all that being said, lets look at a typical cipher suite. Below is what you might commonly see in the likes of Firefox if you click on the padlock in the address bar and then click on more information.
Cipher suite in use in Firefox
Lets look at the cipher suite below for an example. We’ll break down the individual blocks to see what it actually all means.
TLS_ECDHE_ECDSA_WITH_AES_128_GCM_SHA256
TLS – The protocol in use ECDHE – Elliptic Curve Diffie-Hellman key-exchange using ephemeral keys. More on ephemeral keys later, however this is what is going to give you that all important ‘Perfect Forward Secrecy’. Marked with the E at the front or behind for Ephemeral. ECDSA – Elliptic Curve Digital Signature Algorithm, used to create the digital signature for authentication. AES_128 – Advanced Encryption Standard 128 bit key size, used for the session encryption method for data. GCM – Galois/Counter Mode an operation for block ciphers designed to provide both data authenticity (integrity) and confidentiality. GCMAC – provides authentication only. SHA256 – Secure hashing Algorithm 256bit used for message integrity.
With the above knowledge and knowing the current vulnerabilities in SSL and TLS we can now make an informed decision and build the cipher suites we would like to use in Windows and Linux.
I have added a basic guide for changing SSL TLS cipher suites that Windows Server IIS and Linux Ubuntu Apache2 use. Allowing only secure ciphers to be negotiated between your web server and client is essential. This guide will go through how to change and select the different ciphers for both Windows server 2012 R2 and Ubuntu 14.04 in order to help mitigate some of the vulnerabilities in the SSL/TLS protocols.
Read further on the Resource page for changing SSL TLS Cipher Suites here.