Just a quick post on the LocalAccountTokenFilterPolicy setting. What it is why we have it. As a pentester and administering windows systems I’m bumping into this all the time. The classic scenario being your trying to access the C$ of machine with a local account, and being blocked. You check all the usuals; firewall, creds etc and are banging your head against a brick wall. Its more than likely to be the Remote User Account Control (UAC) LocalAccountTokenFilterPolicy setting in Windows that is stopping you. Depending on what type of account you are connecting with ie Domain or Local depends on whether the UAC access token filtering will take affect, it will not affect domain accounts in the local Administrators group, only Local accounts. Even if the Local account is in the Administrators group, UAC filtering means that the action being taken will run as a standard user until elevated. Think of when you launch CMD or PowerShell logged in as an Admin account, its run in the context of standard user until you elevate, or re launch as an Admin. So when we try to connect to the C$ with a Local account that is in the Administrator group we are blocked by UAC. Disabling LocalAccountTokenFilterPolicy will allow us to connect.
When the Remote User Account Control (UAC) LocalAccountTokenFilterPolicy value is set to 0, Remote UAC access token filtering is enabled. When it is set to 1, remote UAC is disabled. We can set this with the following one liner:
The same scenario can be said for running a credentialed or authenticated Nessus scan with a local account that is part of the Administrators group. For Nessus to enumerate the system it will connect to the C$. It will fail unless the LocalAccountTokenFilterPolicy is set to 1. There are other pre-requisites, these are out of scope of this post however.
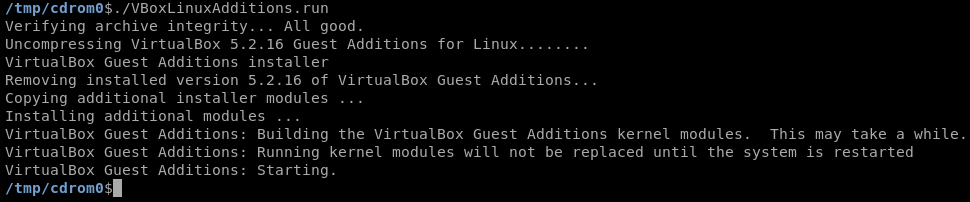
Problems with VirtualBox Guest Additions in Kali. This post serves more of a reminder to myself however this might also serve as help to others. Troubleshooting problems/issues with VirtualBox Guest Additions. I think its safe to say I use VirtualBox a lot, I will be lucky if a day goes by where I’m not in VirtualBox using a VM. I also therefore use and rely on Guest Additions working correctly features such as, mapped drives back to the host, USB, display options are all useful to name a few. It can be frustrating sometimes when Guest Additions breaks, either a mapped network drive disappears or your display has shrunk. Once all the usual checks have been done to troubleshoot I normally move on to VirtualBox Guest Additions. I also use Kali, where its also fair to say I have the most issues, now this might be because I probably use it the most in terms of a VirtualBox VM or that Kali 2.0 is rolling and thus based on Debian Testing. As such we have a multitude of updates happening constantly both to packages and underlying operating system. The following is my usual check list and 99% of the time sorts out the issue for Kali 2:
Update VirtualBox to the latest version.
Then update VirtualBox Guest Additions to also the latest edition.
In this post we look at how we can automate our security updates and packages that can be updated for a Ubuntu Server 18.04.1 LTS including scheduled reboots. Automatic Updates in Ubuntu Server are a real win.
This is a fairly straight forward affair, we will be working in the unattended-upgrades package, this can used to automatically install updates to the system. We have granular control, being able to configure updates to all packages or just security updates, blacklisting packages, notifications and auto reboot. A very useful set of features.
Lets look at the main configuration file /etc/apt/apt.conf.d/50unattended-upgrades.
A couple of key lines in this file will want our attention. Firstly this will depending on what type of updates you want to automate. If you know the software that runs on the server well enough, and depending on the criticality of the service it provides you have the following options for the type of updates to automate, uncommenting ‘//’ the various lines will give you those type of updates:
This next section of the file dictates what packages should not be upgraded, ie if you have a certain set of dependencies and don’t want to the software to upgrade due to comparability issues list them here:
// List of packages to not update (regexp are supported)
Unattended-Upgrade::Package-Blacklist {
// "vim";
// "libc6";
// "libc6-dev";
// "libc6-i686";
};
To get notifications for any problems or package upgrades add your email address to the below section:
// Send email to this address for problems or packages upgrades
// If empty or unset then no email is sent, make sure that you
// have a working mail setup on your system. A package that provides
// 'mailx' must be installed. E.g. "user@example.com"
Unattended-Upgrade::Mail "email@email.com";
The next two sections dictate when the server should be rebooted and without confirmation. Here we have the Unattended-Upgrade::Automatic-Reboot option set to ‘true‘, and unattended-Upgrade::Automatic-Reboot-Time set to ‘02:00‘ am.
// Automatically reboot *WITHOUT CONFIRMATION*
// if the file /var/run/reboot-required is found after the upgrade
Unattended-Upgrade::Automatic-Reboot "true";

// If automatic reboot is enabled and needed, reboot at the specific
// time instead of immediately
// Default: "now"
unattended-Upgrade::Automatic-Reboot-Time "02:00";
To then enable the automatic updates edit the file /etc/apt/apt.conf.d/20auto-upgrades. Create the file if it doesn’t exist, add the below text, the frequency of the update procedure is dictated by the number in quotes next to each item. For example everything with a 1 in it will happen everyday and the 7 represents once a week.
A couple of useful log files to keep an eye on are: /var/log/unattended-upgrades/unattended-upgrades.log. This will give you information about the updates and whether a reboot is required. /var/log/unattended-upgrades/unattended-upgrades-shutdown.log and also issuing the command last reboot will also give you information about any restarts that are required or have happened.
I hope this been helpful and keeps you current with your patching!
Setting a static IP address in Ubuntu 18.04.1. Oh boy where to start. The name Bionic Beaver or netplan.
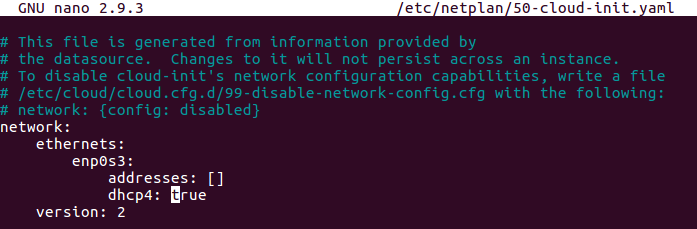
OK lets concentrate on netplan, and what’s happened with networking in Ubuntu 18.04.1. Setting a persistent static IP address has changed a little in the new release of Ubuntu, where as before we would have modified the interfaces file we now modify a .yaml file in /etc/netplan directory. Netplan is the new kid on the block for configuring networking in your Beaver. Its not all that different, or difficult once you know how. However the standard is pretty precise in terms of how we configure the file. If you look in your netplan directory you may have a 50-cloud-init.yaml file this is where the configuration is stored. Lets go ahead and modify the netplan directory to set a static IP address:
This is how our standard /etc/netplan/50-cloud-init.yaml file looks like:
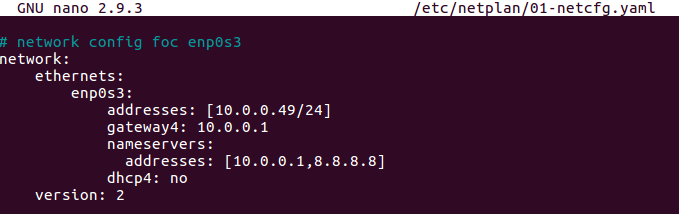
To set a static IP address I’m going to copy the current config into a new file called 01-netcfg.yaml for further configuration.
Take care of the spacing within the yaml file. It will not take tab completion, and will require spaces for the indentation, the number of spaces will not matter, as long as each section is appropriately indented with spaces.
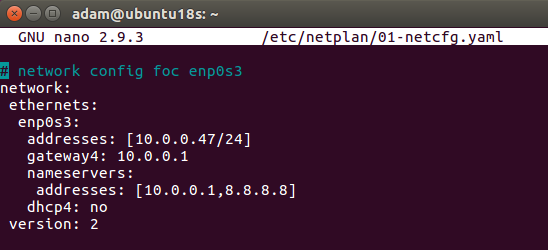
For example you could use this:
Indenting each section with 1 space also works:
All that’s left to do is to apply the netplan config with:
sudo netplan apply
If you do get errors you can use the debug feature:
I posted recently about implementing Linux password complexity here and wanted to follow it up by posting about account lockout policy. Linux account lockout policy is often overlooked, this post will show you how to implement simple controls to keep you in check. Brute force attacks are trivial to perform, not having a lockout policy (and password policy) could end you up in hot bother. With a lockout time configured this will at least slow down your adversaries and very least annoy the hell out of them. I would always suggest you use a public/private key pair for SSH access and disable password authentication specifically for this service.
Linux account lockout policy is controlled by Pluggable Authentication Modules (PAM) more specifically pam_tally and pam_tally2. These modules can be configured in Debain/Ubuntu in the /etc/pam.d/common-auth, and in RedHat and Centos based distros /etc/pam.d/system-auth. Pam_tally as the name might suggest is a count for logins (ie tallying up logins). The module has various options to configure, it will maintains a count of attempted logins, can reset counts, and deny access based on too many incorrect attempts, set lockout time etc.
Lets look at an example of how we might configure this within Ubuntu 18.04.1.
If we check what PAM modules are installed ‘man -k pam_’ we see that pam_tally and pam_tally2 are already installed.
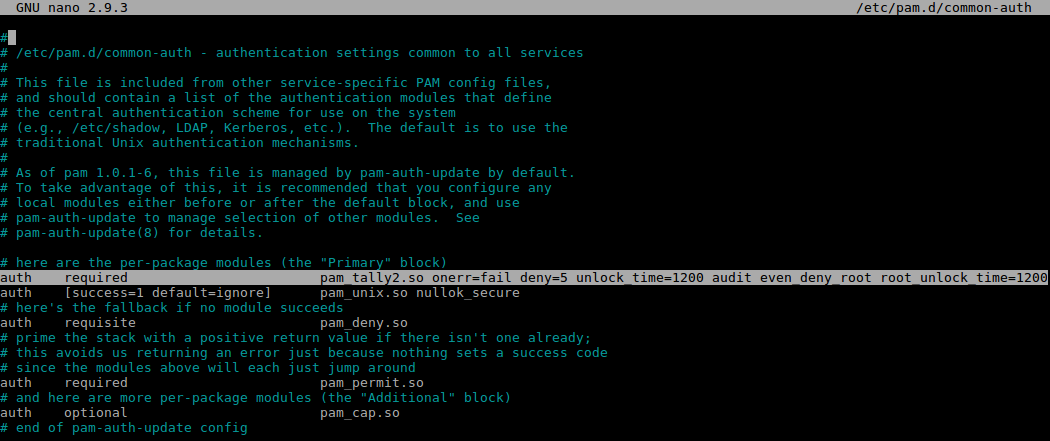
I have added the highlighted line into the /etc/pam.d/common-auth file:
According to the Ubuntu man pages here normally failed attempts to access the root account will not cause the root account to become blocked, to prevent denial of service, this can be overriden with an optional argument which we will discuss later.
Our settings are:
onerror=fail : Upon an error issue a fail. deny=5 : Deny access if the count for this user exceeds 5 attempts. unlock_time=1200 : This will lock the user out for 1200 seconds (20 mins) if the max allowed attempts is exceeded. audit : This will log the user name into the sys log if the user is not found. even_deny_root : Careful with this one, this will lock the root account out. root_unlock_time=1200 : This will lock the root account out for 1200 seconds (20 mins) if the max allowed attempts is exceeded.
These changes are instant, no need to reboot or restart any service.
All that’s left to do now is to test our configuration on our test server. In the /var/log/auth.d file we can see pam_tally2 is racking up the login attempts and is denying access.
Linux Password Policy is often overlooked. This post is to raise awareness how we can up our game in terms of password complexity for Linux systems. Setting up password complexity in Linux specifically Ubuntu Server more specifically 18.04.1 is achieved through Pluggable Authentication Modules (PAM). To authenticate a user, an application such as ssh hands off the authentication mechanism to PAM to determine if the credentials are correct. There are various modules that can be modified within PAM to set-up aspects like password complexity and account lockout and other restrictions. We can check what modules are installed by issuing:
sudo man -k pam_
By default Ubuntu requires a minimum of 6 characters. In Ubuntu this is controlled by the module pam_unix which is used for traditional password authentication, this is configured in debain/ubuntu systems in the file /etc/pam.d/common-password (RedHat/Centos systems its/etc/pam.d/system-auth). Modules work in a rule/stack manner processing one rule then another depending on the control arguments. An amount of configuration can be done in the pam_unix module, however for more granular control there is another module called pam_cracklib. This allows for all the specific control that one might want for a secure complex password.
A basic set of requirements for password complexity might be:
A minimum of one upper case A minimum of one lower case A minimum of least one digit A minimum of one special character A minimum of 15 characters
Password History 15
Lets work through on a test Ubuntu 18.04.1 server how we would implement this. First install pam_cracklib, this is a ‘pluggable authentication module’ which can be used in the password stack. ‘Pam_cracklib’, will check for specific password criteria, based on default values and what you specify. For example by default it will run through a routine to see if the password is part of a dictionary and then go on to check for your specifics that you may have set like password length.
First lets install the module, it is available in the Ubuntu repository:
sudo apt install libpam-cracklib
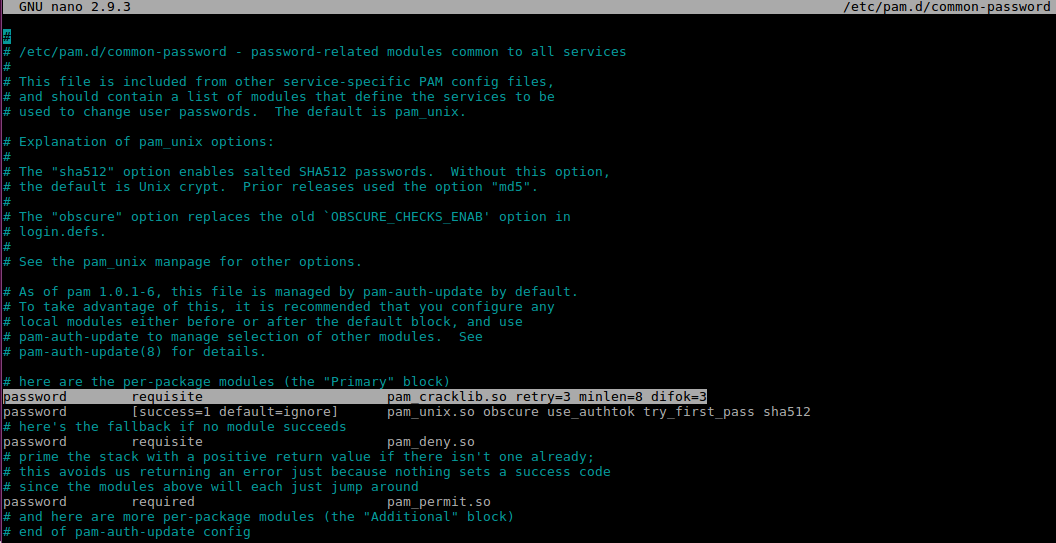
The install process will automatically add a line into the /etc/pam.d/common-password file that is used for the additional password control. I’ve highlight it below:
We can then further modify this line for additional complexity. working on the above criteria we would add:
ucredit=-1 : A minimum of one upper case lcredit=-1 : A minimum of one lower case dcredit=-1 : A minimum of least one digit ocredit=-1 : A minimum of one special character minlen=15 : A minimum of 15 characters.
note the -1 number represents a minimum value to subtract from the minlen value. There is nothing to stop you incresing this, for example ocredit=-3 would require the user to add 3 special characters.
Password history is actually controlled by pam_unix so we will touch on this separately.
Default values that get added are:
retry=3 : Prompt user at most 3 times before returning an error. The default is 1. minlen=8 : A minimum of 15 characters. difok=3 : The amount of character changes in the new password that differentiate it from the old password.
For password history first we need to create a new file for pam_unix to store old passwords (hashed of course). Without this password changes will fail.
Add the ‘remeber=15‘ to the end of the pam_unix line and your done, at least for now. Both lines should look like this:
These changes are instant, no need to reboot or restart any service.
Now all that is left to do is test your new password policy. Whilst this does provide good password complexity I would always suggest you use a public/private key pair for SSH access and disable password authentication specifically for this service.
In certain scenarios whilst pentesting there may be a requirement to control your bandwidth from your testing device, otherwise known as traffic shaping. In this post I will walk through how we can do some Traffic Shaping in Linux. All testers should be accountable for the amount of traffic they generate while testing. This is easily achievable in a few different ways, some better than others. I’ll walk through how we can achieve this in this post. It is always a good idea to log and monitor the amount of traffic you are sending and receiving. I will typically do this with ‘iftop’, I will open this before sending any traffic.
iftop looks like this:
Here we can see sent, received and total accumulation in the bottom left. In the bottom middle are the peak rates. Over to the right hand side we can see the transmission rates for 2, 10 and 40 second intervals. Couple of interesting toggle switches you can use while iftop is open being ‘h’ for help, ‘p’ to display port and ‘s’ and ‘d’ to hide/show source and destination.
On to the traffic shaping. In most Linux distros Tc (traffic control) is available, this can be used to configure traffic manipulation at the Linux kernel level. Tc is packaged with iproute2 the shiny new(ish) tool set for configuring networking in Linux.
In my view Tc is reasonably complex to configure if you simply need to reduce your bandwidth for an interface. Enter Wondershaper. Wondershaper allows you to limit your bandwidth in a simple manner. It does this using Tc. Wondershaper is available through the Apt repository where Apt is being used.
You can limit your traffic on an interface to 10Mbps upload and download like below. Values are in bits.
wondershaper [interface] [downlink] [uplink]
wondershaper eth2 10000 10000
To clear the limits set:
wondershaper clear
To see the limits set use:
wondershaper eth2
Testing…
Using iPerf we can test the bandwidth reduction by wondershaper. The setup that I am using for this test is two virtual machines with two cheap physical USB 10/100 Ethernet adapters passed through to each virtual machine and physically connected via an Ethernet cable. Interfaces are set to 100 Full. Running iperf with no restrictions give us the following results:
I’m not surprised by the 55.5Mbits/sec rate.
Throttling our connection to 10Mbits/sec with wondershaper:
Great, we see a distinct change in bandwidth running consistently across 10 seconds lower than 10 Mbits/sec.
Throttling the connection further to 1 Mbit/sec:
And again we see our bandwidth dropping further to less than 1Mbit/sec.
Other ways I have seen been offered up as solutions are turning auto-negotiate off and setting your link speed and duplex. However I would argue this is not traffic shaping. It may work in certain circumstances, however I have had mixed success with virtual machines. This doesn’t give you the granular control of Tc and wondershaper.
Conclusion: A very useful tool for controlling your bandwidth in Linux. For a quick fix use wondershaper for either more granular control dive in and configure Tc manually.
In this post we will look at how we can use the Burp Suite’s Macro functionality to re establish a valid authenticated session on a website. Essentially creating a burp suite macro: Auto Login feature when we get logged off. One issue you may face when carrying out an authenticated web application assessments is as you carry out input validation testing on various parameters etc, you may get kicked out of your authenticated session or you no longer have a valid session for whatever reason and need to re-authenticate before you can continue. This is especially frustrating and common when running an active scan. To get around this issue we can set up some custom session handling rules to allow us to re-establish a valid session. This essentially tells Burp Suite to do something (ie login) based on a set of known conditions. For example we can create a login macro which is replaying the authentication post request to the server if a certain response condition is met on a regular request.
They say a picture speaks a thousand words so lets walk through an example. Or skip to the bottom where I demo in a video. In this example we will use our classic favourite WordPress to demonstrate. I should say that each web app is different and no one site/login will be the same, however this should give you an idea of what is achievable, (although understand this is just scraping the surface of what is possible 🙂 ).
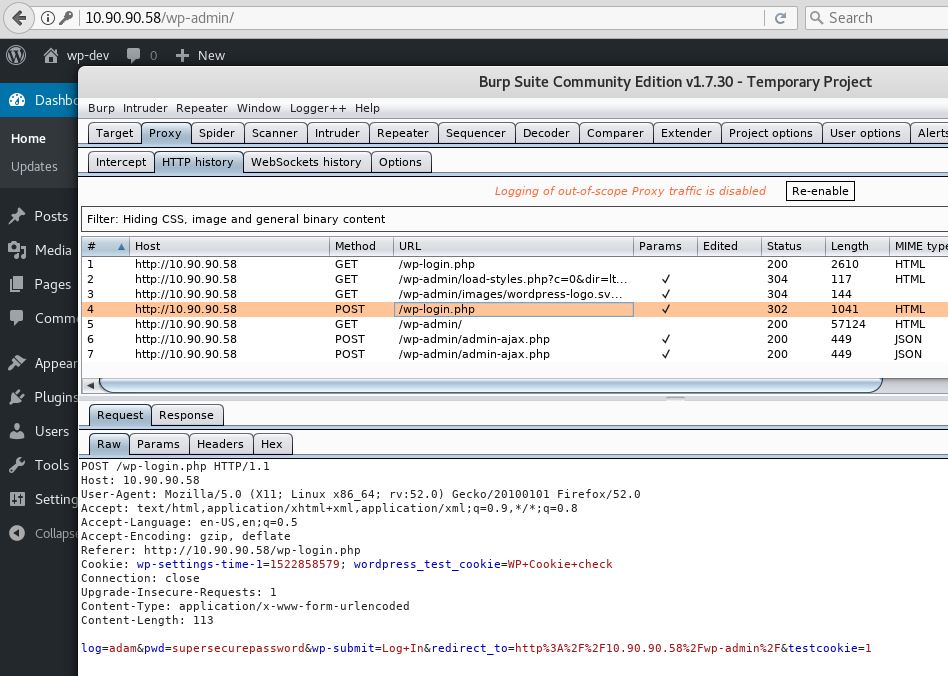
Lets get started, if we authenticate to WordPress, we can see the following post request as normal. We will use this later in our macro.
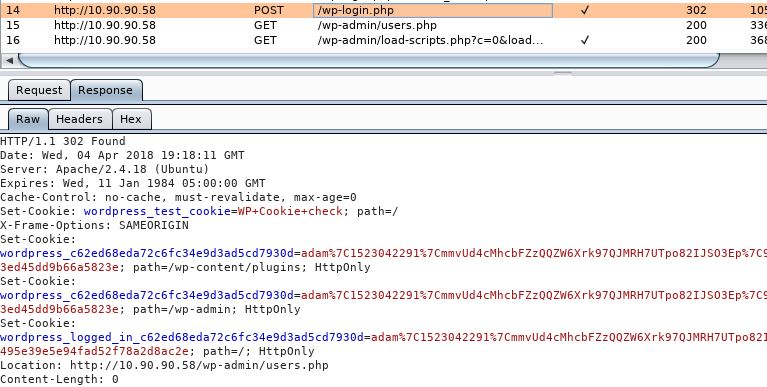
…and the response:
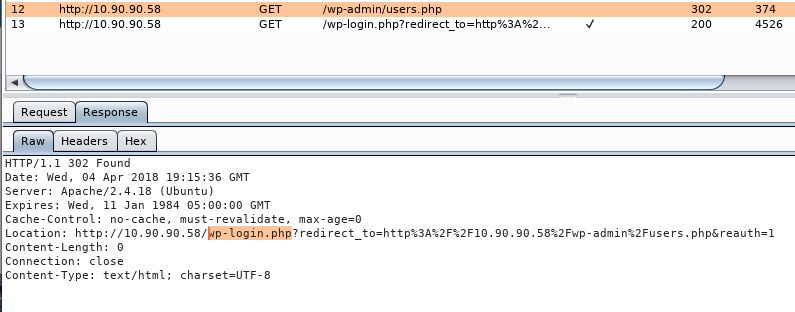
Lets also look at what a invalid session response looks like if we logout and try to request http://10.90.90.58/wp-admin/users.php:
We now have a good understanding what our authentication request looks like. Pay close attention to the ‘Location:’ redirection header response, and the difference between both a valid session and invalid session looks like. For a valid session we see the redirection to …/wp-admin/users.php for an invalid session we see the response redirecting us back to wp-login.php. We will use this enumerate a valid session later on.
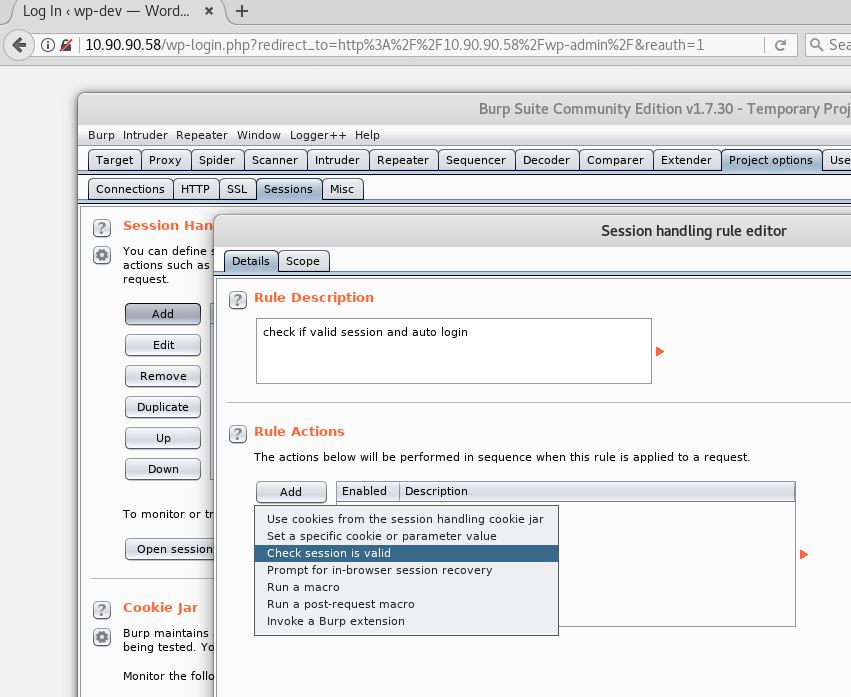
Lets move to ‘Project options’ then on the ‘Sessions’ tab click ‘Add’ under Session Handling. Give the rule a name/description. Then go to ‘Add’ and select ‘Check session is valid’ like below:
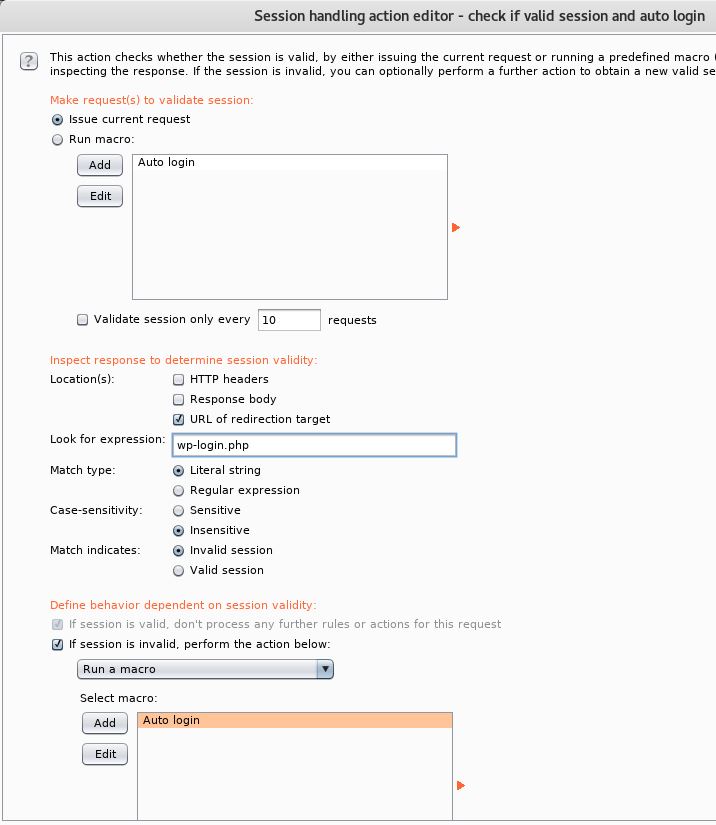
Here we are going to set the conditions, ie if this is present do this. In our case we want to identify an invalid session and if matches run a macro. So on the ‘Session handling action editor’ we can pretty much leave all the defaults as they are except for the string and macro action. However a quick run through of what we have selected is: we are basically saying; on every request if we get a redirect, look for the expression ‘wp-login.php’ match the type with a ‘Literal string’, the case is ‘insensitive’; if this is all true and matches its an ‘Invalid session’. Then ‘if session is invalid, perform the action below:’, select this box. This is where we would add our auto login macro function. The page should look like this:
The last set of instructions will vary from web app to web app and indeed you could modify the above to work differently and still be valid for WordPress. For example rather than looking for a redirect with the word ‘wp-login.php’ you could look for the expression ‘Hi, <span class=”display-name”>adam’ in the response body and match it as a valid session, ie if it doesn’t match this run the macro. We know the top banner will always have this in the response body in WordPress if logged in (obviously very specific to WordPress).
Equally we don’t necessarily need to validate the session we can just run the macro before each request, however this isn’t particularly efficient. The idea behind looking at the session state is to make the process as efficient as possible. This is the beauty about Burp Suite Macro’s they are very granular in what you can do, depending on what you are trying to achieve.
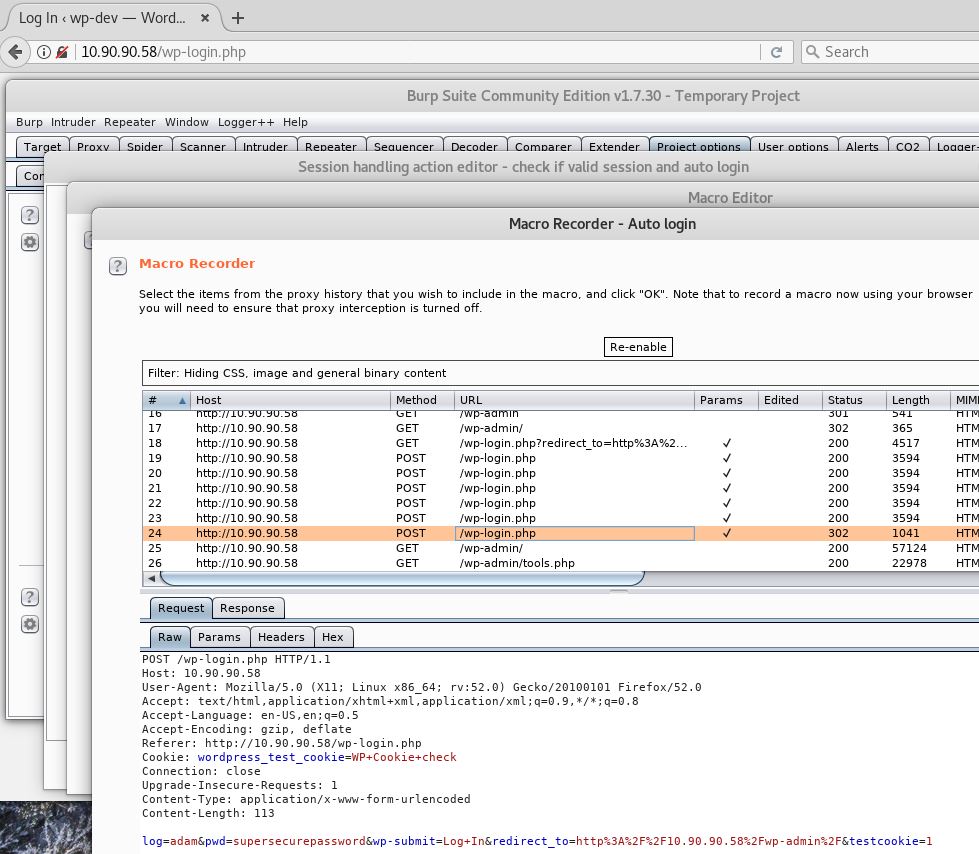
Now we are going to add our macro to auto login. Under ‘Select macro:’ on the same page click ‘Add’ and the macro editor will pop up like below:
Select ‘Record macro’ and select our post request which has the login like below:
At this point you can test the macro to see if it behaves in the correct way and also verify you have the right login creds. When ready select ‘OK’ on the ‘Macro Editor’ and ‘OK’ on the ‘Session handling action editor’.
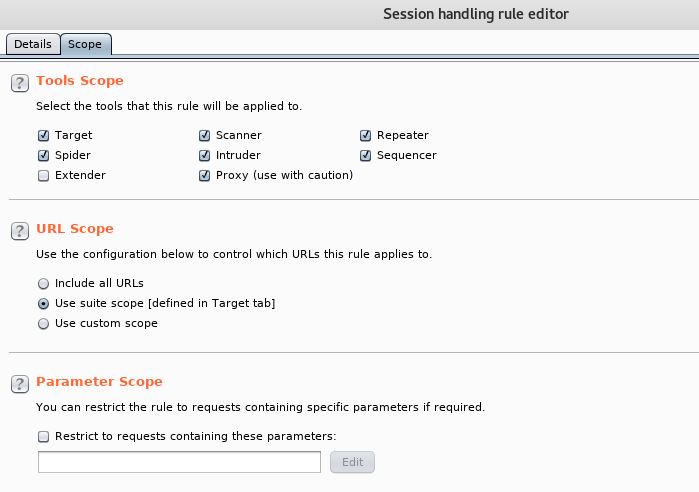
On the ‘Session handling rule editor’ screen select the ‘scope’ tab and select ‘Proxy’ as we want to see this in action in Firefox for testing purposes, in addition to this select the appropriate ‘URL scope’, you may have already added this your scope target tab:
Lets give it a try. So from the wp-login.php page we can see we are unauthenticated, if we try to access http://10.90.90.58/wp-admin/users.php we immediately jump to an authenticated screen without having to manually login! Great!
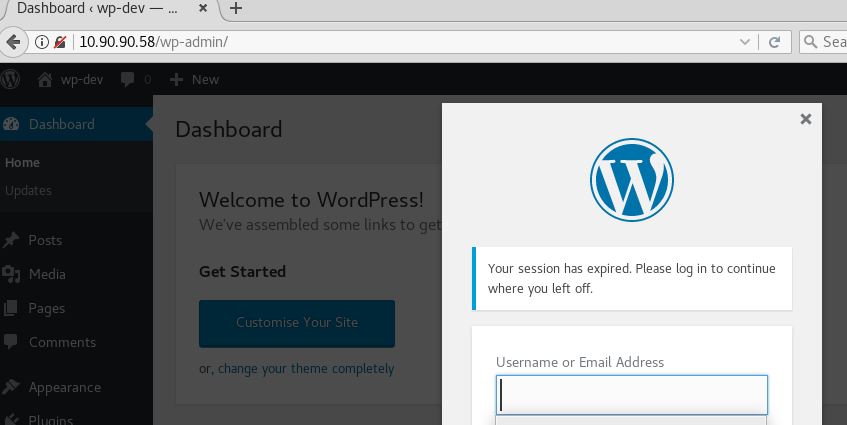
If we leave the page long enough we get your session has expired, if we try to access the wp-admin page again, we auto login. Ace!
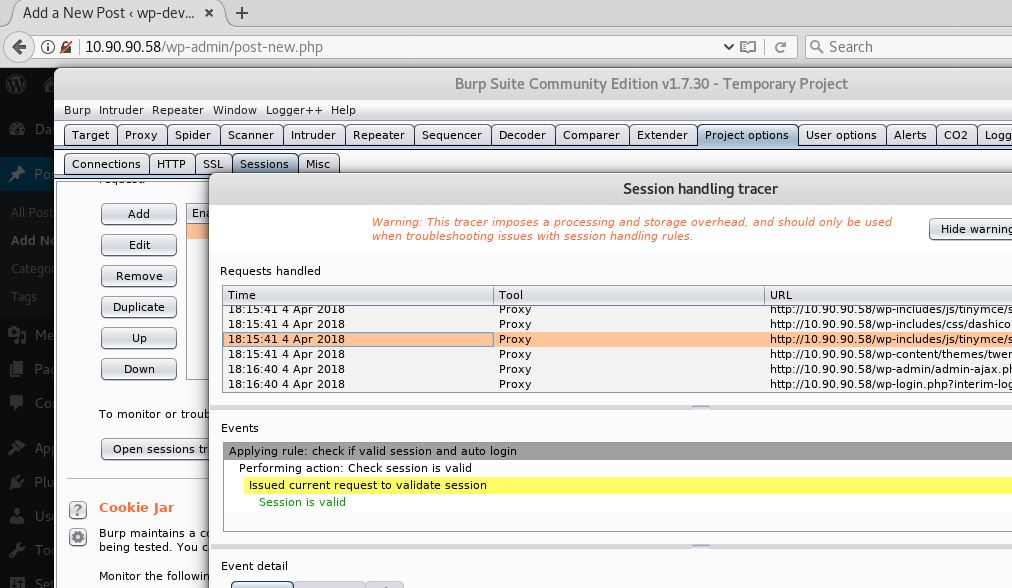
Ok, so lets backup slightly and verify what just happened. If we go back to burp we can use a handy feature called the ‘Session handling tracer’ to trace and troubleshoot the condition of the current request, to see if the session is valid or not valid and whether the macro has run or not run. Back on the ‘Project options’ page under ‘Sessions’ select ‘Open sessions tracer’ you should see the below:
Here we can navigate through the various request to see if the session is valid or not and if the macro has run of not.
Further to the above I have demonstrated this in the below video (sorry no audio this time, however you get the idea):
In this post we will walk through how to implement some of the most common security headers that crop up in Microsoft IIS 8.5 web application testing. Typically Burp, zap nikto will highlight missing security headers. I have covered some of these for Apache in earlier posts here. Now its time for the same treatment in IIS. Some of the headers I will look at in this session are:
X-Frame-Options header – This can help prevent the clickjacking vulnerability by instructing the browser not to in bed the page in an iframe. X-XSS-Protection header – This can help prevent some cross site scripting attacks. X-Content-Type-Options header – This will deny content sniffing. Content-Security-Policy – This can help prevent various attacks by telling the browser to only load content from the sources you specify. In this example I will only specify the source, ie my webpage however if you have content being pulled from youtube for example you will want to add this site also. HTTP Strict Transport Security header – This will tell the browser to only ever load https only, once the site has been visited.
Corresponding values for the above headers are described below.
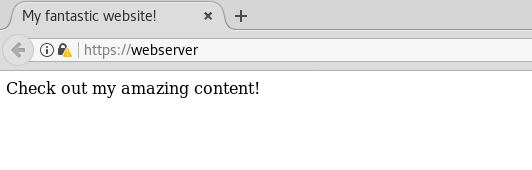
In order to lab this up we will use a vanilla Windows Server 2012 R2 server that has had the IIS role installed and configured and is serving just a simple single page running over HTTPS (only with a self signed cert for testing purposes), which looks like this:
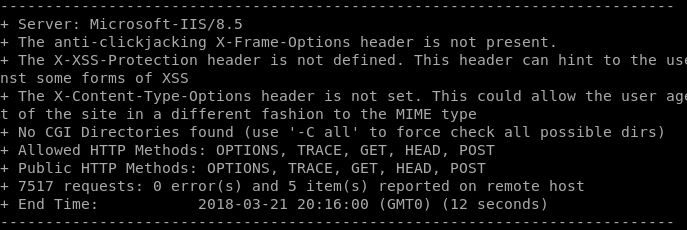
With completely standard configuration output from Nikto would give us the following results:
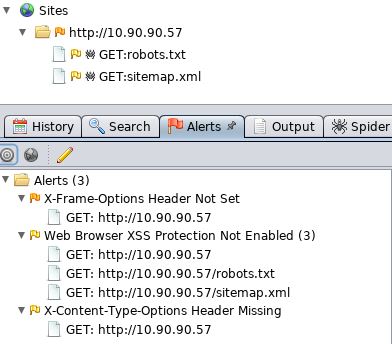
OWASP Zap would give us similar results (I did this whilst still on http, however you get the idea):
Granted there is next to nothing to actually scan on this pages, however this is really only designed to demonstrate how to implement the security headers.
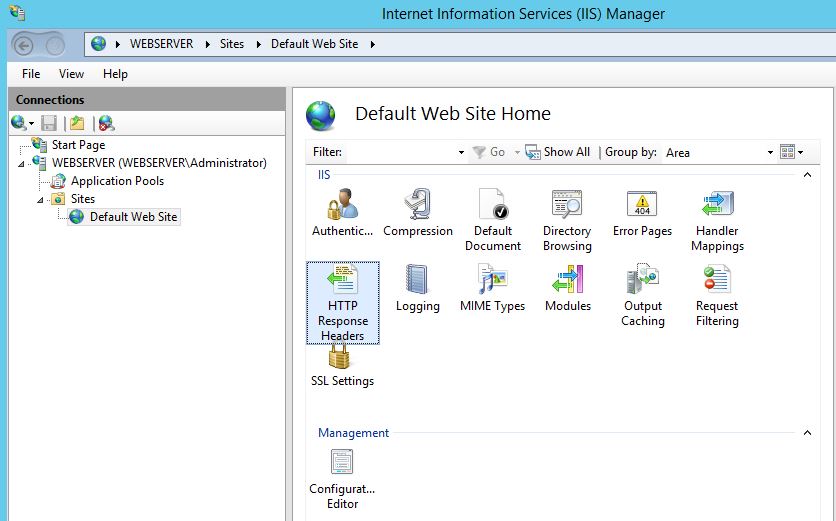
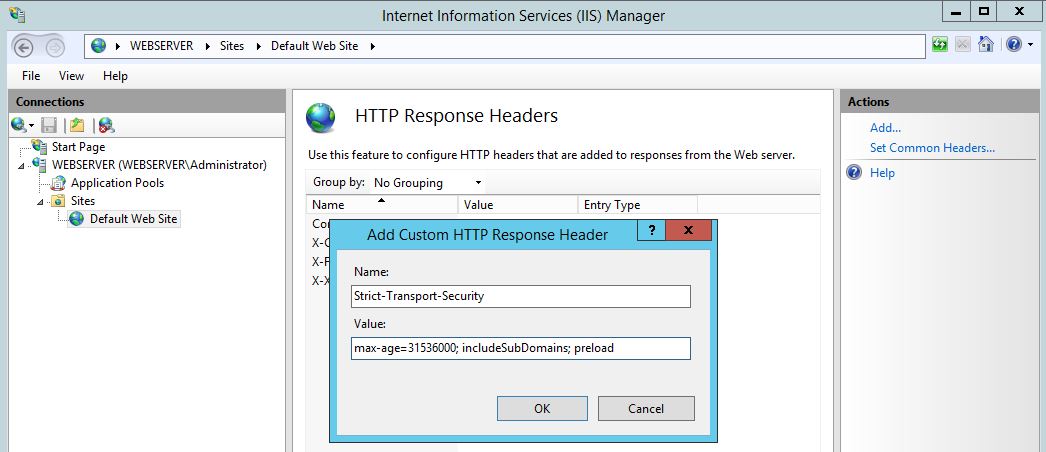
In the IIS console we will want to select the ‘HTTP Response Headers’, you can do this at the site level as I have done or at the webserver level which will affect all sites.
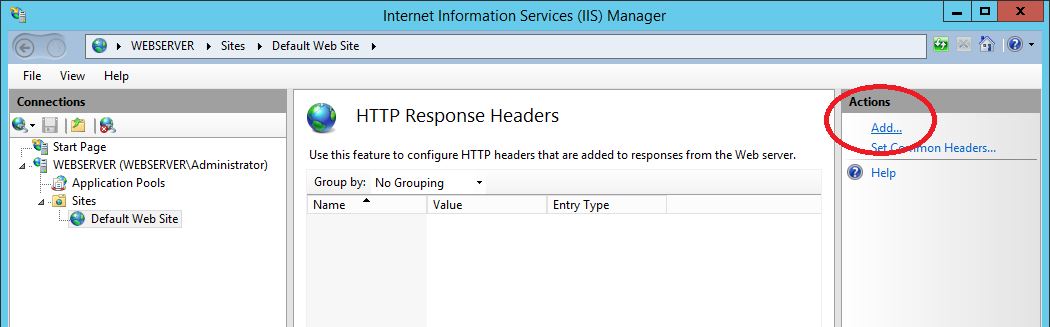
Next select Add from the left hand side:
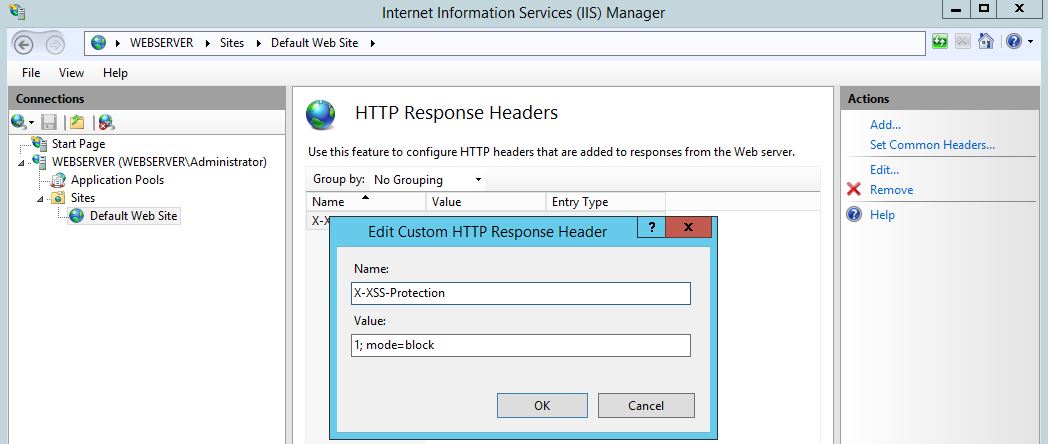
First we will add X-XXS-Protection security header, here we can use the value of ‘1;mode=block’, this essentially means we will turn the feature on and if detected block it. Other basic options consist of ‘1’ to enable or ‘0’ to set the header however disable the feature :
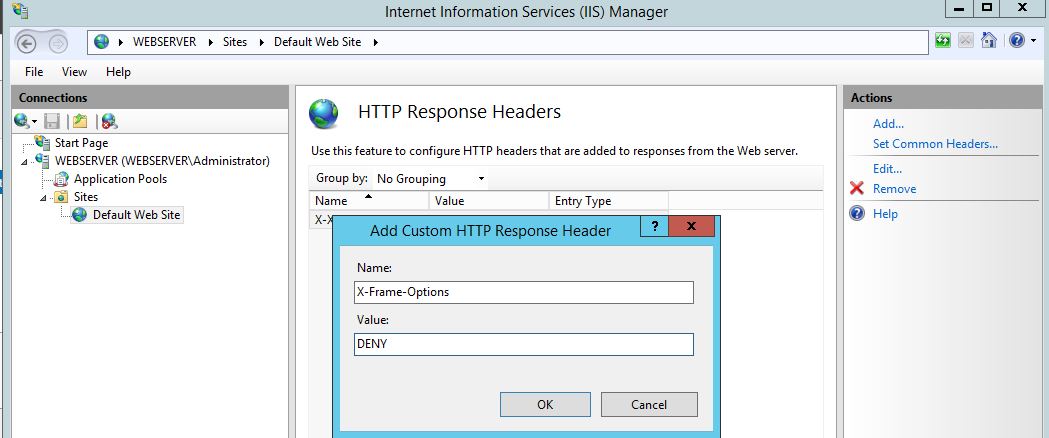
Next the X-Frame-Options security header, here we can use the value of ‘DENY’ to prevent any content embedding, however this maybe too strict otherwise there is ‘SAMEORIGIN’ to allow content from your site, another option is to use ‘ALLOW-FROM’ to allow content framing from another site:
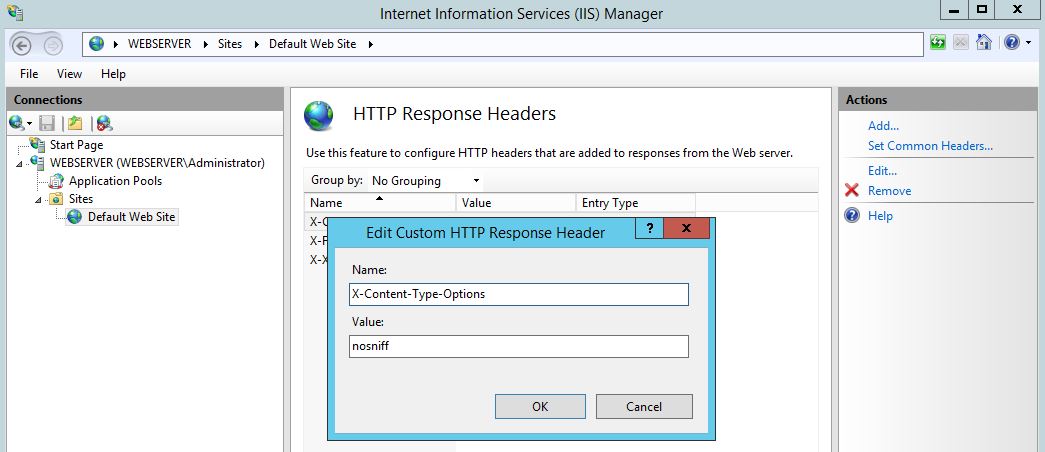
Next the X-Content-Type-Options security header, here we can use the value of ‘nosniff’:
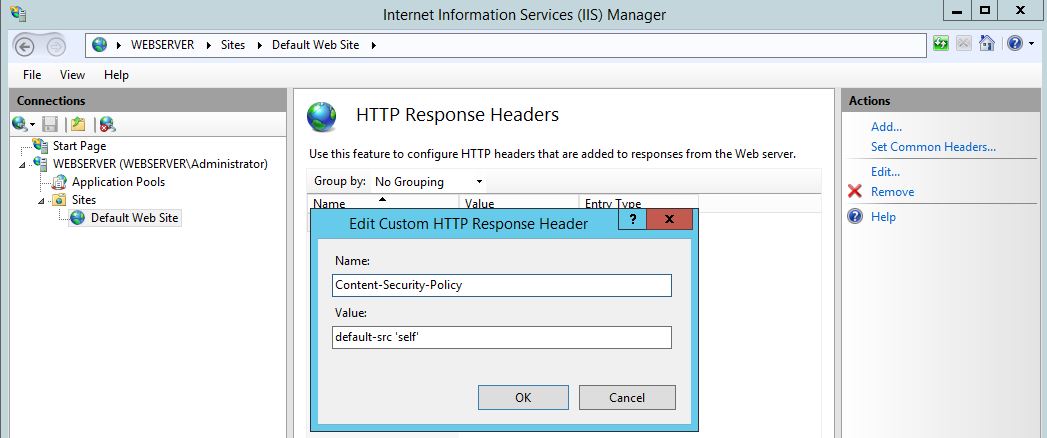
The content security policy header, here we are specifying a very basic policy to only load content from the source:
The HTTP Strict Transport Security header, here we are setting the max age the browser should honour the header request, to include all subdomains and the preload essentially means that if HTTP site is available only load via HTTPS so on a second visit load the config first before hitting the site:
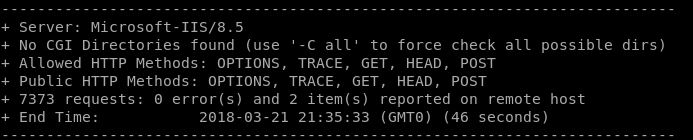
Re-running nikto gives us the following output, much better!
Hopefully this has helped harden your IIS web server just that little bit more!
This is just a quick post to raise awareness of one way we can help protect our Domain Admins Group in Active Directory. I have talked previously about privilege separation and the need within the Enterprise to reduce the credential foot print of high privilege accounts. As Microsoft describes in this particular article discussing best practices, Domain Admin accounts should only be used for build and disaster recovery scenarios and should not be used for day to day activities. By following this simple rule you are mitigating against having Domain Admin credentials being cached on workstations or member servers, and therefore less likely to be dumped out of memory should the box become compromised.
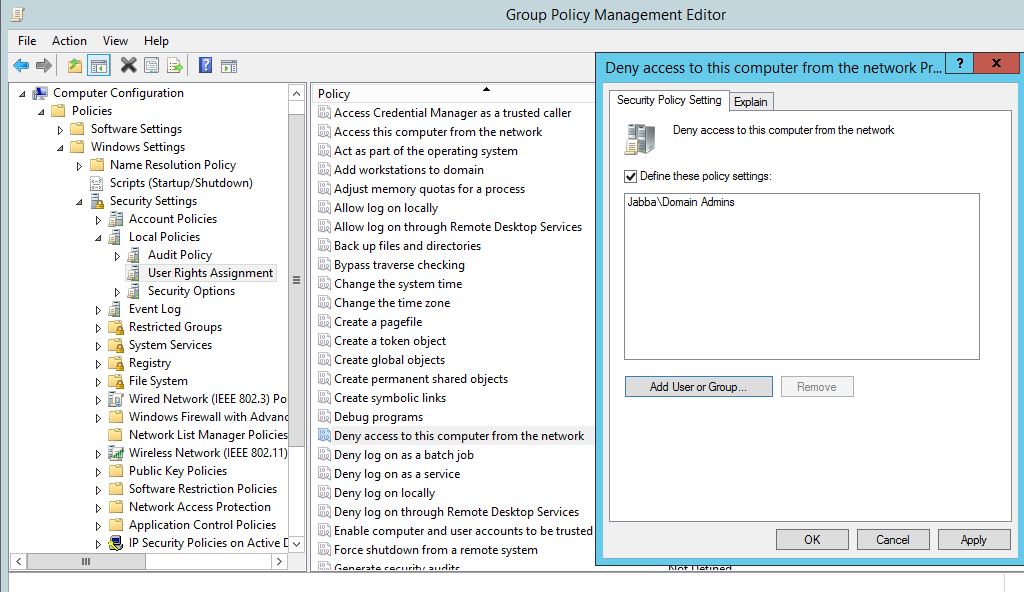
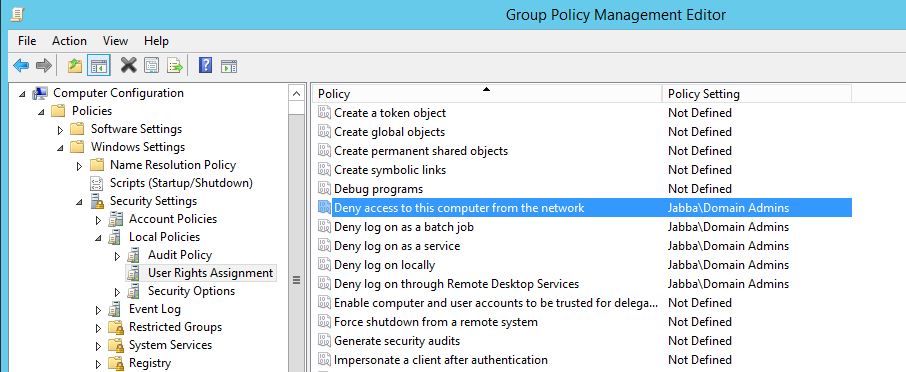
We can secure the Domain Admins group for both member workstations and member servers with the following Group Policy Objects from the following user rights policy in Computer Configuration\Policies\Windows Settings\Security Settings\Local Settings\User Rights Assignments:
Deny access to this computer from the network
Deny log on as a batch job
Deny log on as a service
Deny log on locally
Deny log on through Remote Desktop Services user rights
Lets take a closer look and create the policy:
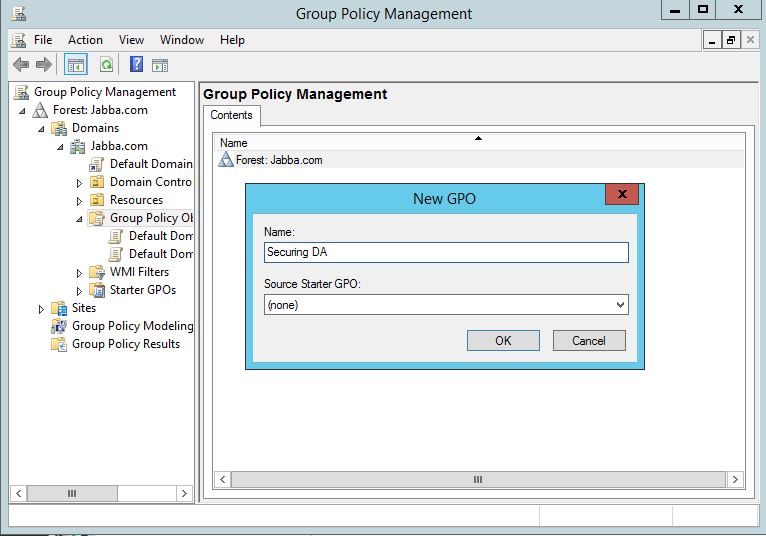
In our Group Policy Management console we will start off with a new policy:
Right click on the policy and click edit. Find the first policy ‘Deny access to this computer from the network’. Open it up and add the Domain Admins group to the list. Click ‘OK’.
Rinse and Repeat for the remaining policies:
Link the policy through to your computers and member workstations. Remember if your using ‘Jump boxes’ to administer your domain controllers you will need to create an exception for these and with a different policy.