Top Three Command and Control Exfiltration methods

Just a quick post to list out some of my favourite Command and Control (C2) exfiltration methods.

  1. Standard TCP connect using ‘Invoke-PowerShellTcp’ from Nishang framework. This is a super easy comprising of a netcat listener for the server and PowerShell for client side makes this a very accessible exfil method read about it here. How do we prevent this: block TCP access on the boundary firewall. No excuses for this one. In addition there is a whole host of client side mitigation, such as PowerShell logging and denying PowerShell execution etc.
  2. DNS tunnelling using dnscat. Well what can you say about this, if all else false this will probably get you off the network in most places. Read about this here. How do we prevent this: This is more challenging, first verify if DNS is actually required, for example if this is a server subnet, azure or AWS do your servers really need to resolve address that can’t already be taken care of by internal DNS Server not resolving names to the outside or could you use a static hosts file? Secondly various IDS and firewalls can be tuned to detect this type of DNS traffic, so for example does that DNS request really need to be that big/long, wow that is a lot of DNS traffic from that box? no probably not – its DNS tunnelling.
  3. ICMP tunnelling again using the Nishang framework, Mittal has written a nice client side PowerShell method for connecting, read about this here and the backend server here. How do we prevent this: block ICMP access on the boundary firewall. Its unlikely that you will need ICMP off the network.

Creating and mangling custom word lists!

Creating custom word lists:

In this post we are going through how to generate custom word lists with extra combinations based on an initial set of predefined words or generated words using John The Ripper. Why would we want to do this. Well you probably already have giant word lists that you can download from the internet such as the famous ‘rockyou’ list. Or passwords lists from breaches etc. What these huge lists don’t have are tailored words to suit your target specifically. For example we could use a tool called Cewl to spider a website and scrape all words on this site with a minumim length of 6 and a max of 10.  We could also add words manually that relate to that target specifically. We then have a very custom set of words to do with that target, in which to generating new words for. (Obviously for a penetration test of which you have authoirsation to test). We could then use another program such as John The Ripper (JTR) to generate iterations of those words, for example adding the year to the end of the word. (this is a classic)

In this example we will use the list ‘list1.txt’ as our starting point. We will then use commands to output a new file called ‘newlist1.txt’. We will use JTR in Kali to do this. JTR has a set of predefined rules that will generate us new words based on the original words in any given list. We will add custom rule sets in JTR to generate different combinations of the original word(s). This configuration is found in /etc/john/john.conf.

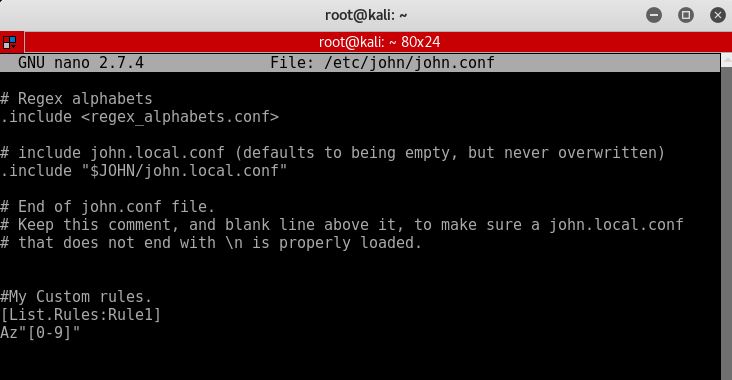
Lets get started with an example.  If we start with the list ‘list1.txt’ and add one word to keep things simple so we can see the words being generated by JTR and our custom rules. Lets start with the below rule which we will append to the bottom of our john.conf file like below:

Append the below text to the bottom of our john.conf file:

#My Custom rules.
[List.Rules:Rule1]
cAz”[0-9]”

like so:

custom rules in john.conf

Now use JTR to generate words using the below command:

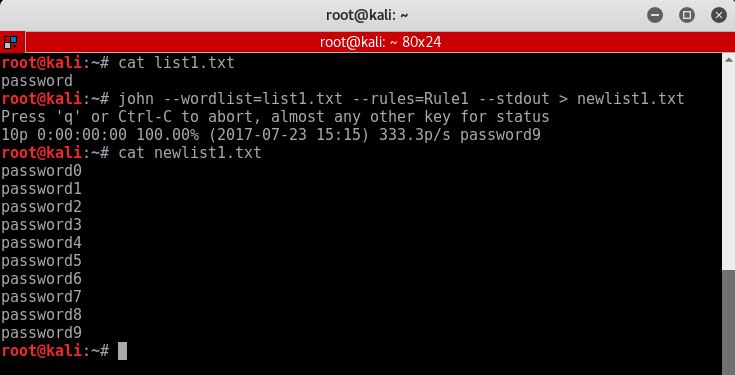
john –wordlist=list1.txt –rules=Rule1 –stdout > newlist1.txt

Which looks like:

new words generated by JTR rule1

As you can see this simple rule adds numbers 0-9 to the end of the word and adds it to the new list called newlist1.txt.

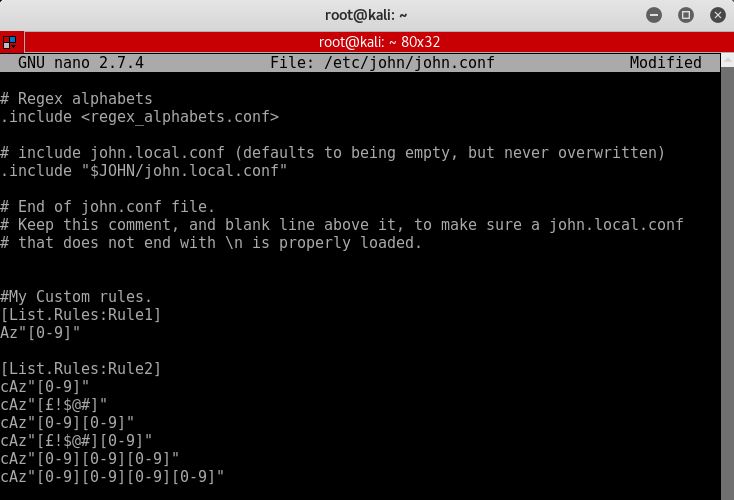
Lets try a few more rules how about the below, append the text to the bottom of your john.conf.

[List.Rules:Rule2]
cAz”[0-9]”
cAz”[£!$@#]”
cAz”[0-9][0-9]”
cAz”[£!$@#][0-9]”
cAz”[0-9][0-9][0-9]”
cAz”[0-9][0-9][0-9][0-9]”

custom rules in john.conf 2

Which will in turn generate us the below:

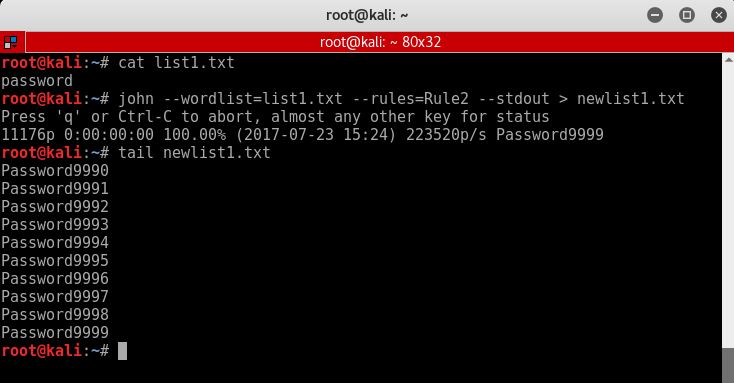
new words generated by JTR rule2

As you can see I have had to tail the newlist.txt file as john has created a huge list, 11176 to be precise.

There are multiple sets of rules available across the internet, for example Korelogic have rules check them out here. See below for some further example rules:

#My Custom rules.
[List.Rules:Rule1]
cAz”[0-9]”
cAz”[£!$@#]”
cAz”[0-9][0-9]”
cAz”[£!$@#][0-9]”
cAz”[0-9][0-9][0-9]”
cAz”[0-9][0-9][0-9][0-9]”

#Replace letters for numbers
[List.Rules:Rule2]
>2!?Aso0
>2!?Asb8
>2!?AsB8
>2!?As1!
>2!?AsA4
>2!?Asa4
>2!?Ase3
>2!?Aso0se3
>2!?Aso0se3si1
>2!?Asi1
>2!?Ass5

Enjoy.

Active Directory Delegation of Control

No you don’t all need ‘Domain Admin’ rights, that includes you Mr IT Manager!

Users in the IT Helpdesk don’t all need ‘Domain Admin’ rights to perform daily tasks like password resets, user group changes and logging into users workstations for fixes. In addition to this they should also elevate rights and authenticate with another account in order to perform Active Directory (AD) administrative tasks, I wrote about this here. We can delegate special permissions to a security group in order for that group of members to be able to reset passwords and perform other AD related tasks. We can delegate this level of control on specific Organisation Units (OU), so for example all users under that OU can be managed by different levels of IT Support and there corresponding AD security group, i.e. a group for 1st line IT Support called ‘IT Helpdesk ‘, ‘2nd line IT support’ and ‘3rd line IT support’ and so on, so we can have different levels of control. This means we give the permission to a group and in turn members of that group can perform special functions on the users that reside in that particular OU. Thankfully Microsoft have thought about this and there is a fairly straightforward way of achieving it by setting a set of stock permissions on the OU. To do this we can use the ‘Delegation of Control’ wizard in AD Users and Computers.

Delegation of Control Wizard

Ideally we want to split out our standard domain user accounts for standard non privilege duties like reading email and using Microsoft Word, then have a separate admin accounts ie ‘Adam-adm’ or ‘Adamadmin’ for the administrative privileges. These admin accounts can then be used to rdp directly to a separate management server which has the various tools installed. Tools like the Remote Server Administration tool set which has Active Directory Users and computers, DHCP and DNS etc.

Don’t use security groups you already have in your environment, create new groups. This might seem like it adds an extra complexity and more groups. However, if you botch your permissions on a group you are using for another function its not going to end well. If you later need to reverse changes or delete the group you can without fear of affecting other functionality.

Create a group for the help desk ie ‘IT Helpdesk’ for 1 st line staff. This should be used for password resets and group modifications etc.

Create a group for 2nd line support ie, ‘2nd line IT Support’. This should be used for all of the above including all other additional user account modification activities.

You may want to combine the first two groups into just one ‘IT Support’ group for smaller IT Teams. The point here really is to split out the duties so your helpdesk staff don’t have Domain Admin rights, and you’re not running elevated domain rights on your daily laptop/desktop, the principle of least privilege first should apply here. Only give the minimum required, no more.

Create a group for full Admins/3rd line support ie ‘3rd line IT Support’. This should effectively be used for all of the above tasks and any additional.

Keep the below points in mind when using the Delegation of Control wizard in Active Directory:

  • Always delegate permissions on a new AD group, not on one that is already in use.
  • Once applied to an OU there is no wizard to undo the changes. Changes will need to be manually undone.
  • You can re-run the delegation wizard again on the same OU to add additional permission, just not take away.
  • You can remove a newly added group from the security tab of an OU if needs be, (effectively reversing the changes).
  • Avoid setting permissions on individual user objects even if there is only one user, add the user to a group and make the changes on the group not the user. This is in case you need to revert changes. In addition to this you can always remove the user from the group.

Lets walk though an example.

As an example of how we can achieve this lets walk through the below lab. In this example we are going to delegate control in AD for password resets and user group changes for the ‘IT Helpdesk’ group, so that members of this group can carry out these tasks on domain users in the HR OU.

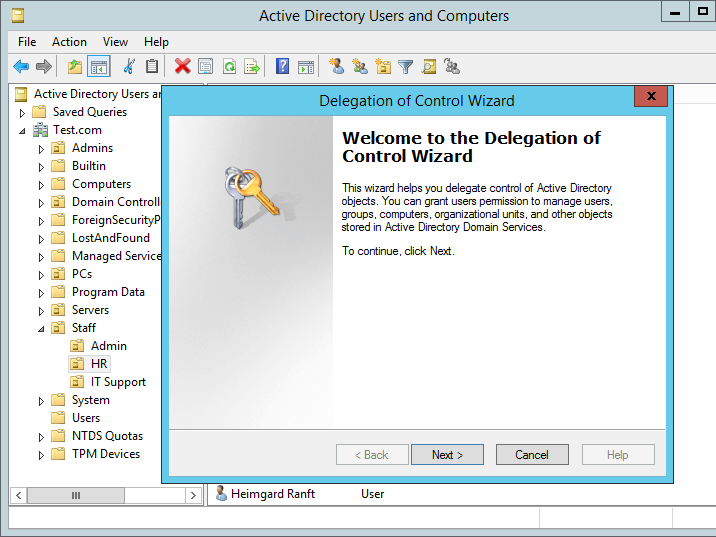
Right click on the HR OU and select the top option ‘Delegate Control…’ the wizard should pop up like below:

AD Delegation of Control Wizard

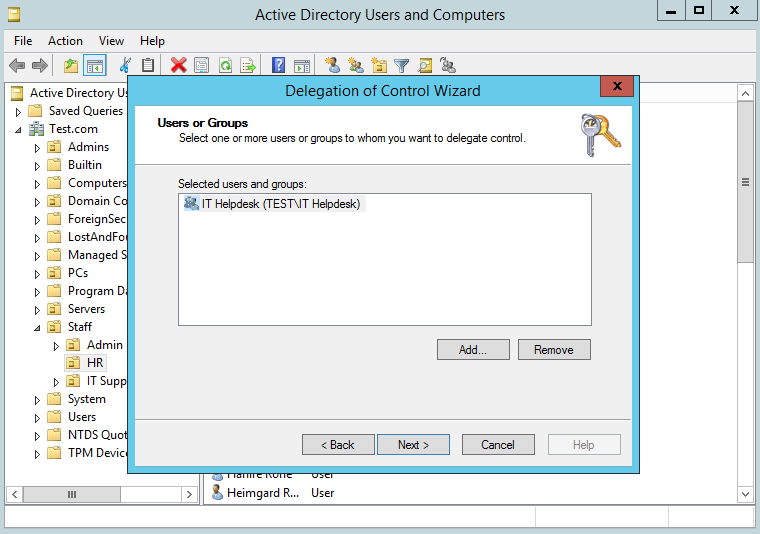
Select Next, and you will be prompted to add the group you want to grant the permissions too. In this case we will grant permissions to ‘IT Helpdesk’ as below:

AD Delegation of Control Wizard add group

Select Next. Now we will add the specific permissions that we want the ‘IT Helpdesk’ to have on users in the HR OU.

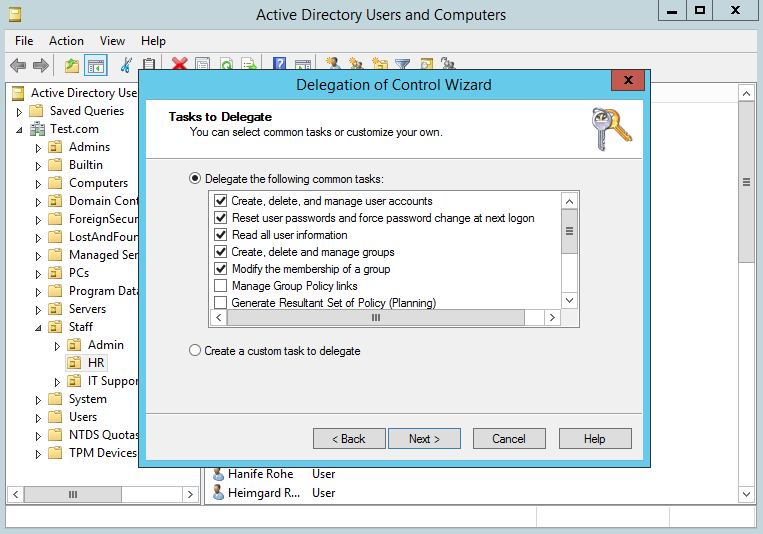
In this instance we are going to select the top five check boxes as these are a reasonable set of tasks that we would want our helpdesk staff to be able to perform. This obviously may be different from organisation to organisation depending on size and separation of duties. We will go with this as an example for now. Microsoft makes this very easy by grouping these tasks together in the form of the check boxes. We can go more granular than this if needs be,  however for now we will continue with the pre-defined options.

AD Delegation add permissions

Select Next, then Finish.

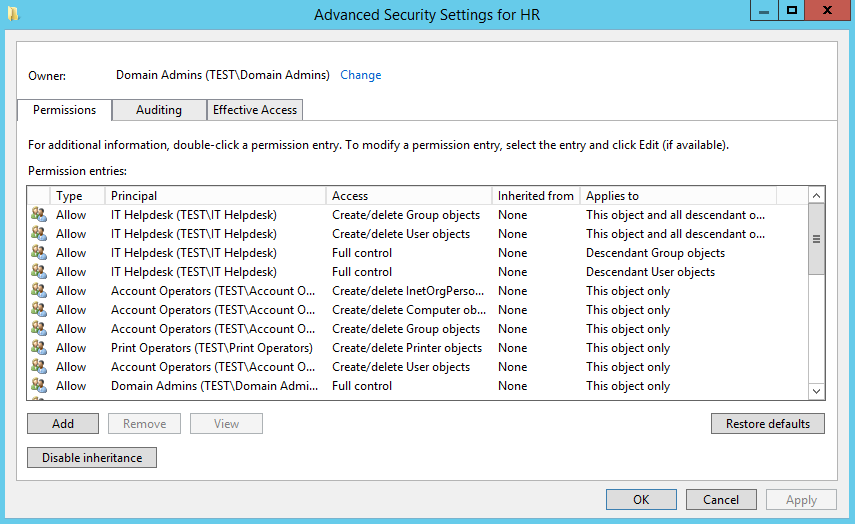
You can verify your permissions be selecting the OU right clicking on properties, selecting the ‘Security’ tab, the group in question should have ‘special permissions’, select advanced, your will then be able to view the permissions. The top four Access Control Entries (ACE) will have been added.

AD Delegation permissions

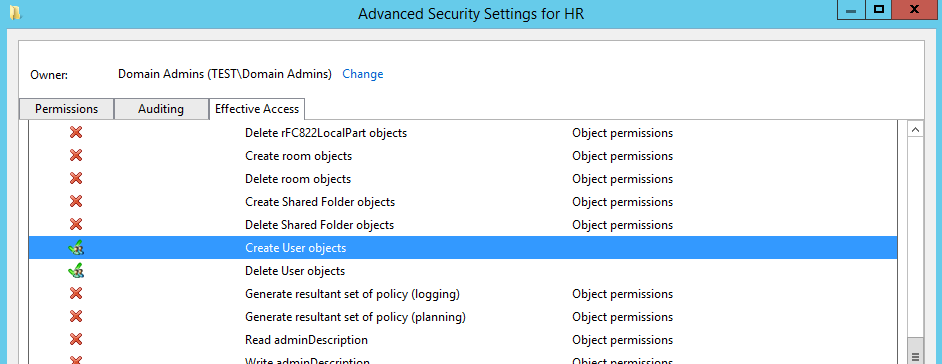
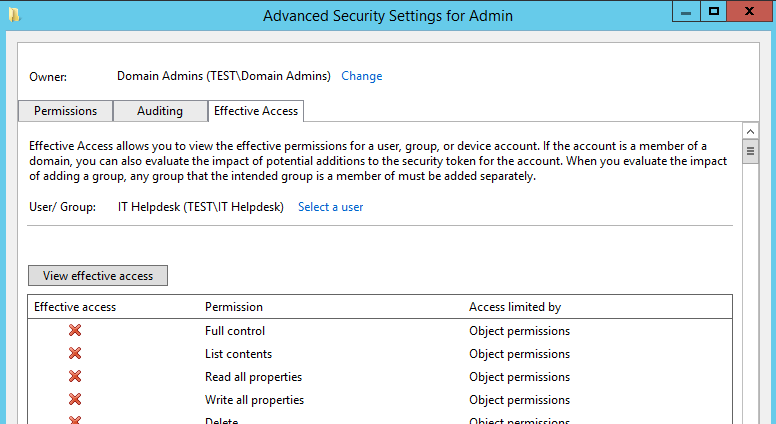
In addition to this, select the ‘Effective Access’ tab, add the group and verify that the four permissions Create/delete Group objects and Create/delete User objects have a green tick next to them. (they are spread out, so scroll down)

AD Delegation permissions

AD Delegation permissions

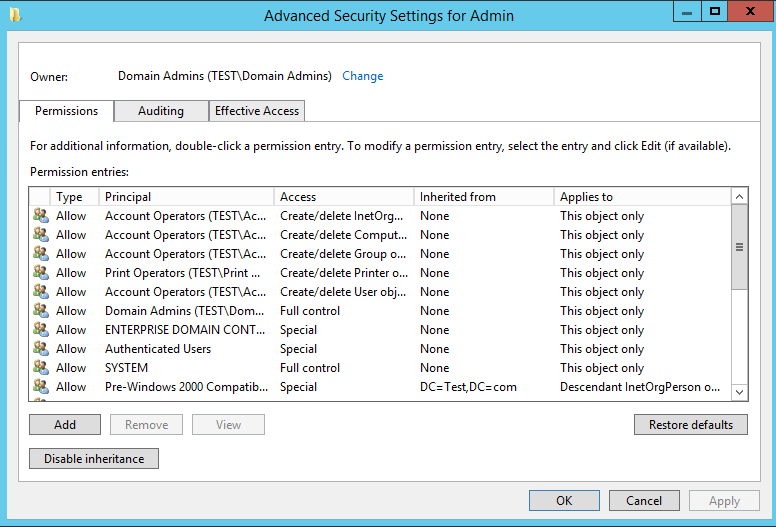
As opposed to an alternative OU such as our ‘Admin’ OU which doesn’t have any delegation on it. The default permissions are as below:

AD Delegation permissions

AD Delegation permissions


The next thing to do is test the effective permissions to ensure the new ‘adm’ users of the ‘IT Helpdesk’ group can for example change a password of a user under the HR OU. It also worth testing this on a user account that isn’t in that OU so you can see the difference and error message that you will receive if you don’t have permission.

Et voila. I hope this helps. Remember test test test.

Privilege Separation please…

No please don’t run ‘Domain Admin’ for daily tasks like reading email… use separate accounts and enforce privilege separation.

Separate user accounts should be used to perform Administrative tasks in Active Directory. Its far from ideal to be logged in to your daily work laptop as a Domain Admin to perform your business as usual tasks like reading email and surfing Facebook at lunchtime…

Ideally we want privilege separation for our accounts. Split out standard domain user accounts for standard non privilege duties like reading email and using Microsoft Word, then have separate admin accounts ie ‘Adam-adm’ for administrative privileges. These admin accounts can then be used to rdp directly to a separate management server which has the Remote Server Administration Tools installed for programs like AD Users and Computers, DHCP and DNS.

In Addition to having separate Admin accounts, don’t automatically add the account to the ‘Domain Admins’ group if it doesn’t need this level of privilege, (it most likely doesn’t) . Use the principle of least privilege first and delegate control using the AD Delegation of Control wizard. Its pretty straightforward to use. I wrote an article about delegation of control in Active Directory here.

MiTM Thick Client Web Services Testing.

This post walks through MiTM Thick Client Web Services Testing designed for testing thick client web applications for web services using burp and iptables on an internal engagement.

Scenario:

So you need to man in the middle web traffic for application testing on an internal test. This could be either a thick client application for web services that has no proxy settings. Or a client device that is using the system proxy settings (ie proxy settings controlled from Internet Explorer). Or proxying traffic from a client device through the browser as any other usual web application test.

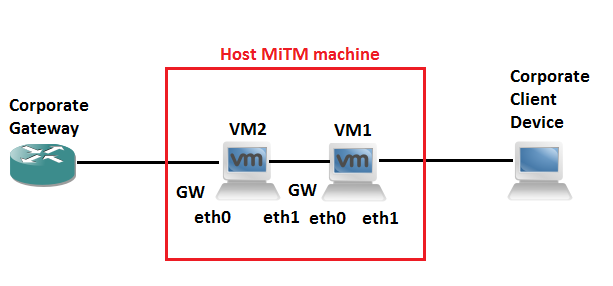
In this scenario the thick client application is installed on a corporate device. So we look to setup some sort of MiTM (Man in The Middle) scenario to watch and alter the traffic as we see fit. The client device IP address must remain the same (ACLs are in place for example or you are unable to change the IP address on the client device). A simple solution to this is two use two virtual machines on your testing laptop to get around having two default gateways with the same IP on one device. With some clever iptables rules we can essentially do a double nat type affair and spoof the client device on the corporate network, at the same time spoofing the gateway for the client device. Bingo MiTM nobody is non the wiser. I talk a bit more about iptables in this post.

If DHCP is used on the client device this is significantly simpler. Rather than using the same ip address range as the corporate network you can set this to an alternative IP and thus removing the need for two virtual machines supporting the double NAT scenario.

They say a picture paints a thousand words… so to bring it all together it the scenario looks similar to this:
Example 1 Configurable proxy settings on client device:

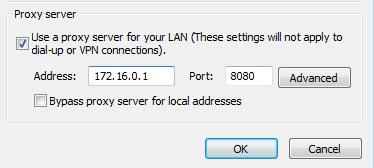
In this example the application on the client system is using the proxy settings configured for IE or Firefox. You are able to modify these and so you can redirect traffic to the proxy of your choice on 8080 for example like so. Note Chrome uses IE system settings:
Network Configuration:

Caution: Don’t use network-manager for this. Dual homing interfaces does not play nice in network manager. Stop the network-manager service first, verify it is stopped then continue to work in the standard networking service with the interfaces file.

service network-manager status

service network-manager stop

service network-manager status

service networking status

Now continue to work using just the interfaces file with the standard networking services.

Set the mac address of the eth0 on VM2 the same as the PC mac address

Ifconfig eth0 down

macchanger –mac 08:00:27:8D:CD:53 eth0

ifconfig eth0 up

On both VM2 and VM1:

echo 1 > /proc/sys/net/ipv4/ip_forward

VM2 interfaces file:

# This file describes the network interfaces available on your system
# and how to activate them. For more information, see interfaces(5).

source /etc/network/interfaces.d/*

# The loopback network interface
auto lo
iface lo inet loopback

auto eth0
iface eth0 inet static
address 172.16.0.2
gateway 172.16.0.1
netmask 255.255.255.0
dns-nameservers 8.8.8.8 8.8.4.4


auto eth1
iface eth1 inet static
address 192.168.0.2
netmask 255.255.255.0
dns-nameservers 8.8.8.8 8.8.4.4

**Gateway is always set on the forwarding interface.

VM2 iptables:

iptables -t nat -A POSTROUTING –out-interface eth0 -j MASQUERADE

VM1 interfaces file:

# This file describes the network interfaces available on your system
# and how to activate them. For more information, see interfaces(5).

source /etc/network/interfaces.d/*

# The loopback network interface
auto lo
iface lo inet loopback

auto eth0
iface eth0 inet static
address 192.168.0.1
gateway 192.168.0.2
netmask 255.255.255.0
dns-nameservers 8.8.8.8 8.8.4.4

auto eth1
iface eth1 inet static
address 172.16.0.1
netmask 255.255.255.0
dns-nameservers 8.8.8.8 8.8.4.4

**Gateway is always set on the forwarding interface.

VM1 iptables configuration:

iptables -t nat -A POSTROUTING –out-interface eth0 -j MASQUERADE

Using burp set your proxy to the listening IP and port.

Example 2: No proxy Settings/Thick client App or Web Services etc..

In this example you have a thick client app that doesn’t allow you to set a proxy and doesn’t use the system proxy settings. You can use ‘prerouting’ in IP tables on VM1. This will route traffic destination port 443 and ‘redirect this to port 8081 with this command:

iptables -t nat -A PREROUTING -i eth1 -p tcp –dport 80 -j REDIRECT –to-port 8080

iptables -t nat -A PREROUTING -i eth1 -p tcp –dport 443 -j REDIRECT –to-port 8081

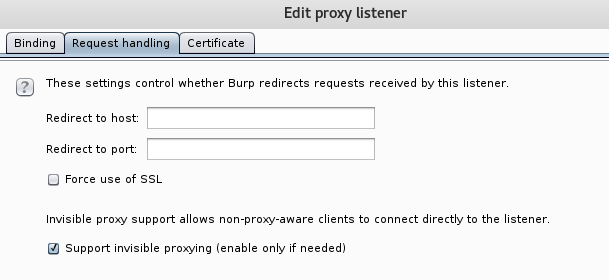
Then using burp configure your proxy to listen on all interfaces for 8080 and 8081 do this for as many destination ports as required. In addition to this ensure ‘Support for ‘invisible proxying’ is enabled.



Things to Remember!:

After every reboot IP forwarding and iptables will reset so check both on a restart:

cat /proc/sys/net/ipv4/ip_forward

iptables -t nat -L -v -n

To make IP forwarding persistent you can do the following:

Edit /etc/sysctl.conf and uncomment the ‘net’ line:

# Uncomment the next line to enable packet forwarding for IPv4

#net.ipv4.ip_forward=1


DNS: hostnames will need to resolve on both the client and proxy machine.

Its is useful to create a bash script for your config for each machine. Then on a reboot there is no faffery looking for the right commands simply run the bash script. Note – the nameservers are pushed to the resolve.conf to save bringing down and back up the interfaces, and restarting the networking. A sample script might look like the below:


On the proxy VM:

#!/bin/sh

service network-manager stop
echo 1 > /proc/sys/net/ipv4/ip_forward

echo nameserver 8.8.8.8 > /etc/resolv.conf

iptables -t nat -A POSTROUTING --out-interface eth0 -j MASQUERADE

iptables -t nat -A PREROUTING -i eth1 -p tcp --dport 80 -j REDIRECT --to-port 8080
iptables -t nat -A PREROUTING -i eth1 -p tcp --dport 443 -j REDIRECT --to-port 8081

This is definitely a labs worth! Hope this helps!
Disable Domain Users from Enumerating other Domain Users, Domain Admins and other objects!

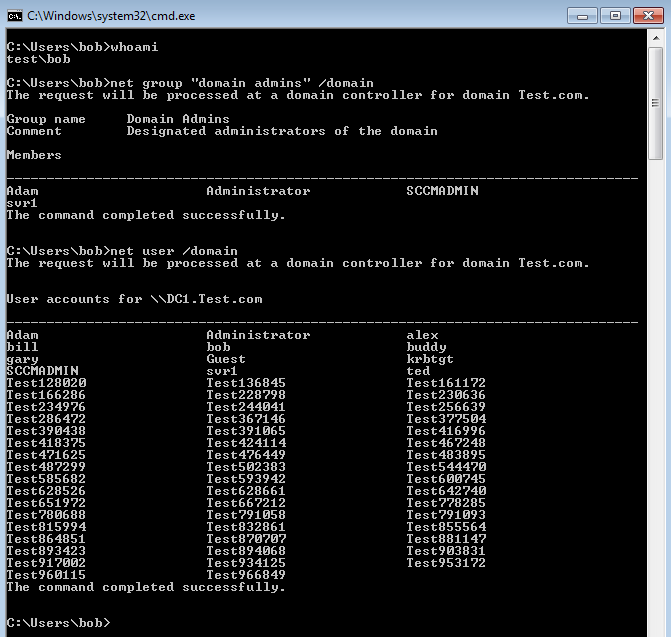
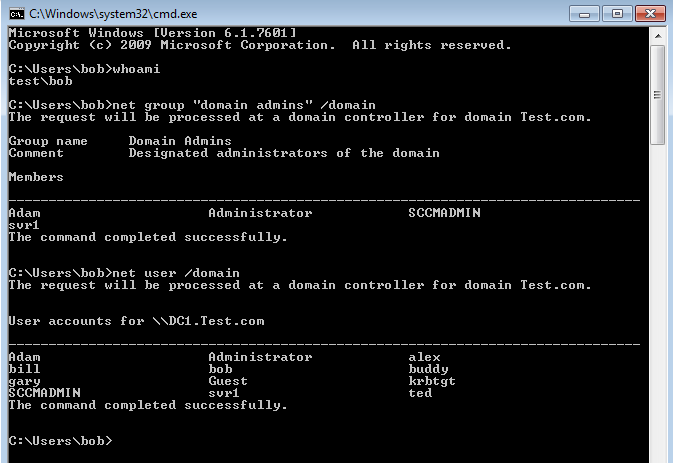
In this post we will walk through how to disable domain user enumeration. Disabling Domain Users from Enumerating other Domain Users, Domain Admins and other objects in Active Directory. Why might I want to do this? Well, once a domain user account has been compromised through exploitation, sooner or later the attacker is going to want to enumerate the domain further and gather ‘intel’, commonly known as situational awareness. During this process an attacker is going to want enumerate the domain and all its users including high privilege groups such as Domain Admins. This is a gold mine for an attacker as they can launch password spray attacks on those enumerated users. The attacker doesn’t have to guess the usernames as he/she can just query the domain, that’s half the battle won. The attacker will then use a single password such as Password1 against all the accounts, inline with the domain password policy avoiding account lockouts. By default any authenticated domain user can enumerate the entire domain, this is standard out of the box configuration for a domain controller. For example our test user ‘bob’ in our lab is a domain user, he can freely pull up a command prompt and simply enumerate all the domain users, domain admins and other objects such as computers and servers in the domain, just wonderful…(not!!).

disable domain enumeration

Microsoft why on earth would we want our domain users to enumerate our ‘Domain Admins’ group by default??

This just won’t do, so how can we fix it? We can deny read permissions to certain objects in the domain through the use of the access control lists (ACL) in Active Directory. A word of caution here, this is likely to break certain applications so the way we will go about this is in stages. For starters we won’t be modifying any permissions of any users or built-in groups. We will create a new security group called ‘Disable domain read’. We will then add users to this group that we want to deny the read permission for, so when a user of this group tries to read the domain they will get either no results or an ‘access denied’ message. Then add this group at various OU’s in the forest, ticking the deny read permission for that group, this will take affect on all users under that OU. This has the added benefit of simply being able to remove users from the group and also removing the group from any ACLs on OUs, should anything need to be reversed.

An Example

As with the above screen shot we can see that bob is able to enumerate the domain. Lets fix this. First we will create our group:

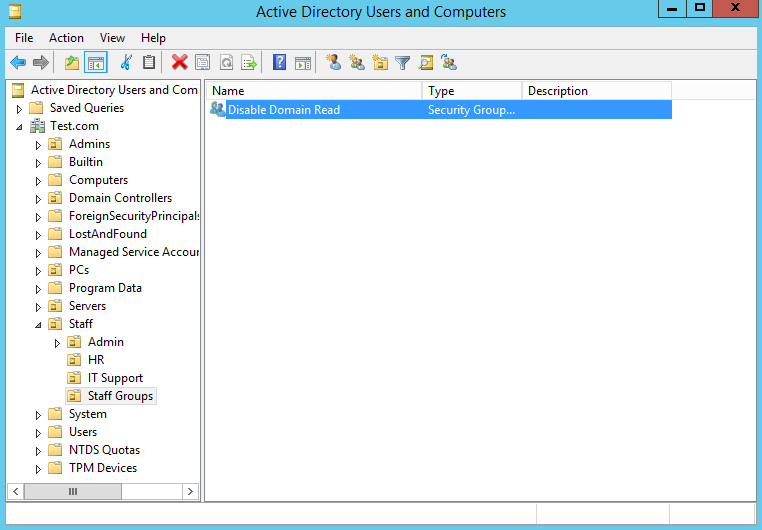
create disable domain read group

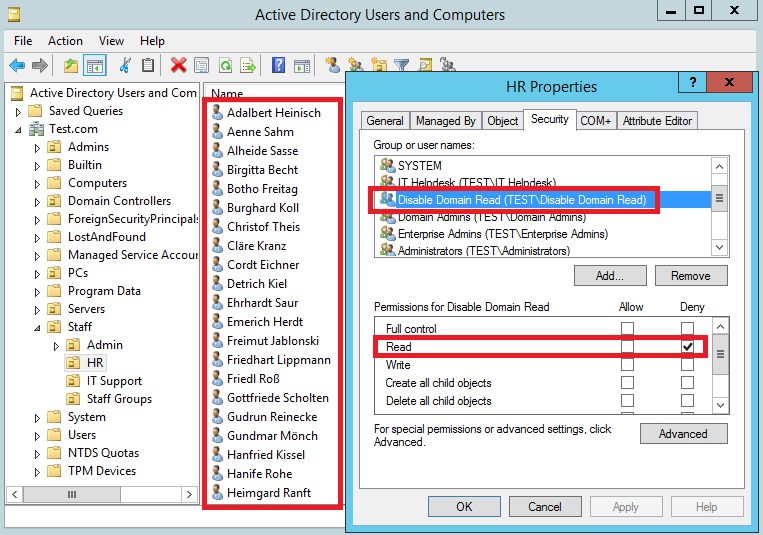
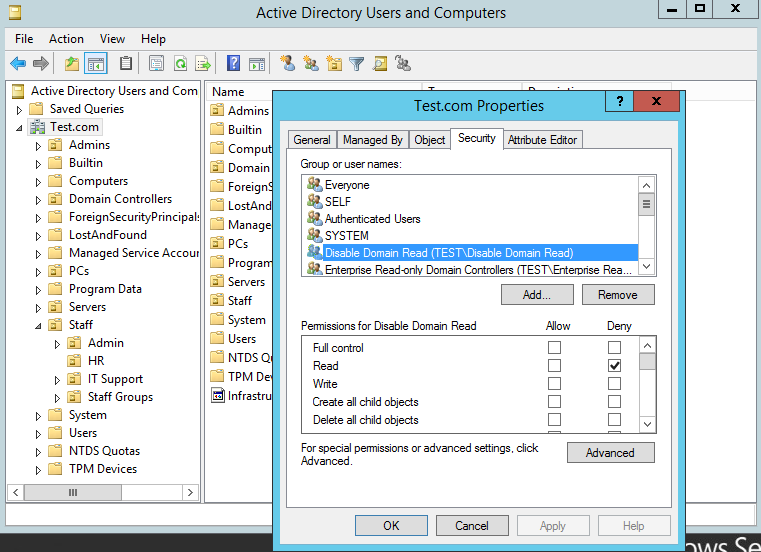
Now as a simple test we will add this group to the ACL of the HR OU. You can see in the below screenshot there are a list of users in this OU already. By making this change we will be denying the read permission on the OU and its contents for members of the group ‘Disable Domain Read’. So right click on the OU and select properties. Select the ‘Security’ tab, then ‘Add’, add in the security group, then select ‘Deny’ on the ‘read’ permission as highlighted in the red box.

Add group to ACL OU HR

Add ‘bob’ to the group and then lets try and enumerate the domain again. Lets see what happens:

disable domain enumeration

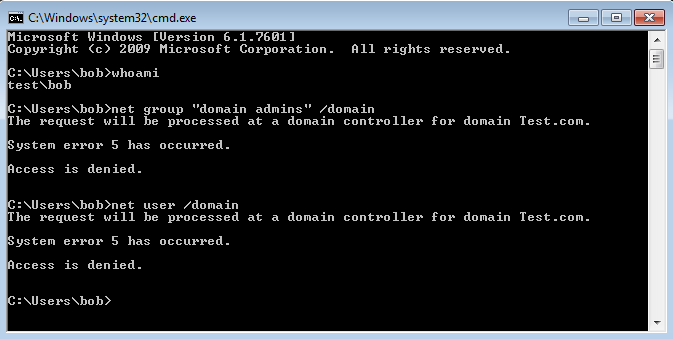
Great… bob has now been denied access to reading the users in the HR OU. However, can still see the ‘Domain Admins’ group. I have purposefully done the the configuration this way to show you how granular we can set the permissions. As the Domain Admins group isn’t in the HR OU it has not applied to that object. Now lets go to the other extreme and set at the top level for the entire domain. Apply the same access control entry (ACE)  at the domain level, this will filter down to all objects including ‘Domain Admins’. In reality you would want to be more granular than this, applying the ACE in ACLs within the domain at specific OUs, this will give you more control. However as an example lets proceed:

Add group to ACL for the domain

Lets reboot our domain computer and test again:

disable domain enumeration

Perfect, now our domain user is not able to enumerate other domain user accounts and more importantly the ‘domain admins’ group. This is the other extreme and will likely break things so you should apply at specific OU’s however hopefully this should give you a good idea of how powerful the permissions can be and granularity in which we can apply them.

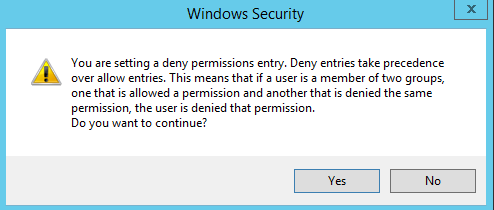
Using this method you should take into consideration that an implicit deny takes precedent over another ACE with the same permission. For example, if there were another ACE that explicitly was allowing the same action the deny would win and take precedent. This means that delegating rights to an OU after you have used this method to allow reading of permissions (ie the reverse) would not work.

Windows Security

This is why we have used a new separate security group just for domain users. If you were in a position where you needed a specific user or service account to be able to enumerate all domain users due to the way an application worked you could remove the user from the group and set alternative permissions on a new group with just that user in it.

Hope this helps. Remember test out your configuration before moving into production!

Setting up a quick DHCP server in Linux with dnsmasq

This is just a short post to walk through setting up a quick DHCP server in Linux with dnsmasq. In Kali Linux 2.0  to be precisely. You can read more about dnsmasq here. Why might you want to do this? Well, couple of reasons spring to mind whilst on a pentest, setting up application testing, network boot a laptop that’s under review or setting up a wifi/rougue access point are a few that spring to mind.

First install dnsmasq with:

apt-get install dnsmasq

Then edit the dnsmasq config file with your favourite editor:

nano /etc/dnsmasq.conf

The config that we might use in a couple of different scenarios would look something similar to the below. You can comment lines out that you don’t want with a ‘#’:

interface=eth1
server=8.8.8.8
dhcp-range=192.168.101.100,192.168.101.200,12h
dhcp-boot=pxelinux.0
enable-tftp
tftp-root=/tftpboot/
dhcp-option=3,192.168.101.1
dhcp-option=6,8.8.8.8,8.8.4.4

Once you have made your changes restart the dnsmasq service with:

service dnsmasq restart

Simple. Hope this quick tip helps.

Pivoting through SSH with dynamic port forwarding.

snmp-check UDP over SSH

Pivoting through SSH with dynamic port forwarding. Just a quick post about how we can pivot to an internal/dmz network through a host via SSH. This is a classic example of how we might want to pivot through one host to get to an internal or dmz network using SSH as a tunnel. We can essentially tunnel our traffic of this SSH tunnel via the compromised host to an inside network.

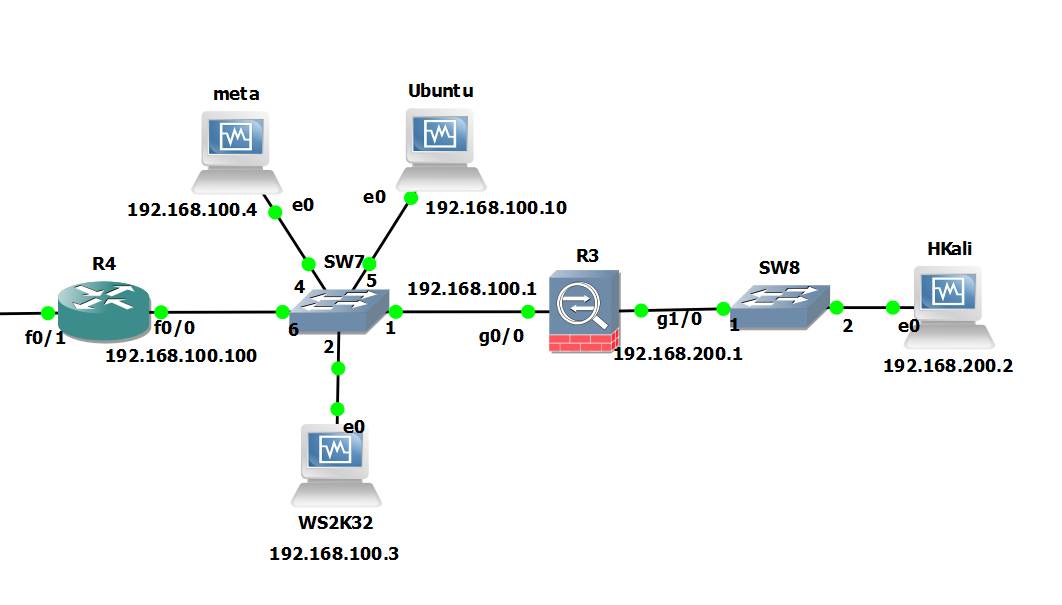
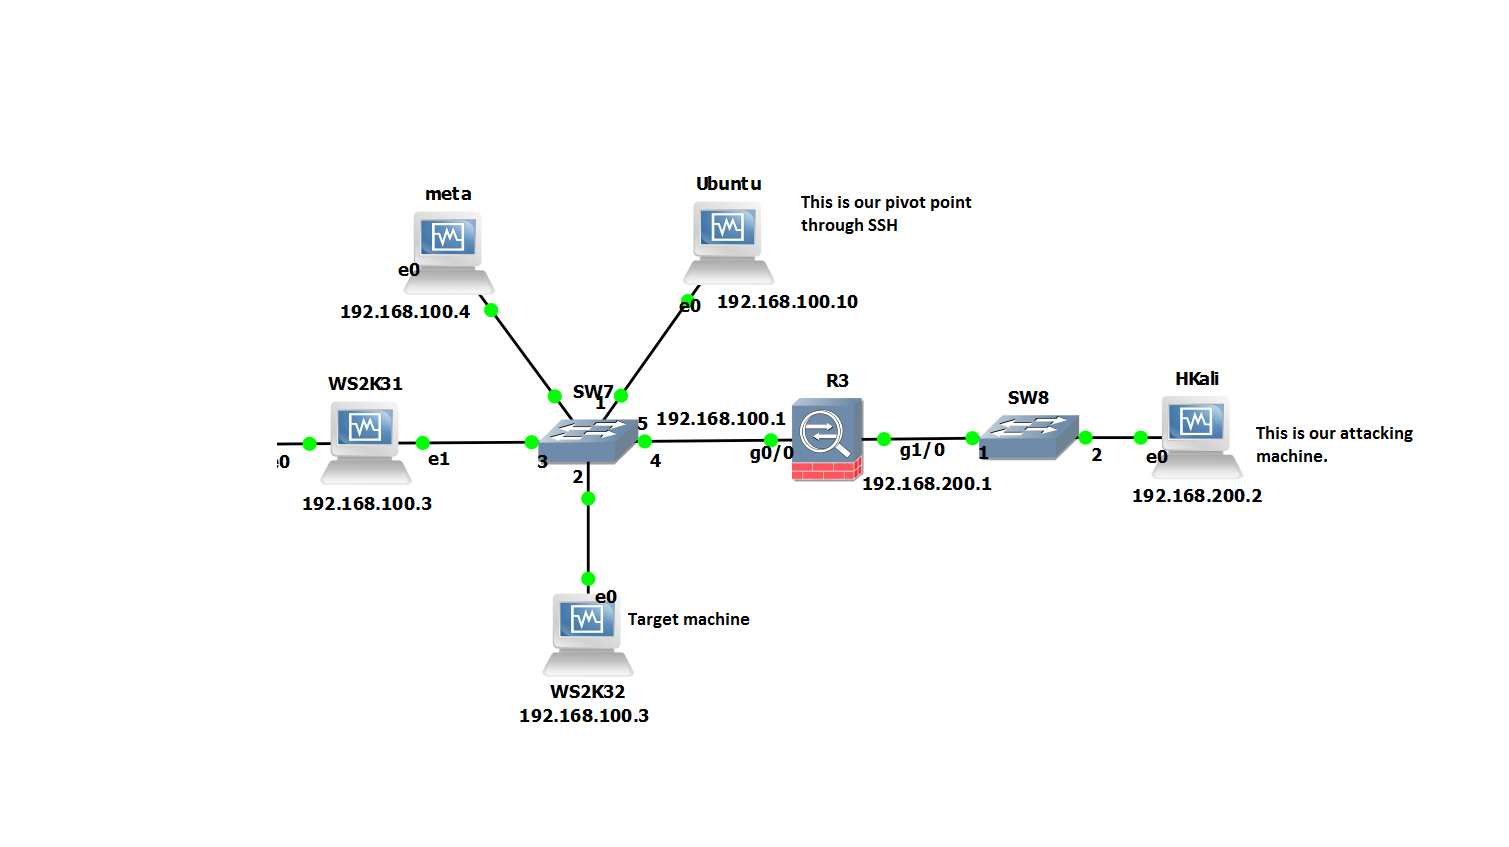
The scenario… A picture paints a thousand words… Essential our ‘Hkali’ machine is on the outside. Our Ubuntu Server is in the internal/dmz, this is going to be our pivot point.

So in this scenario the firewall is only allowing inbound access to our Ubuntu server, on port 22  from our attack box running Kali2.0 ‘HKali’. So from Hkali all we can see is port 22 open on 192.168.100.10. We suspect from our initial enumeration that other servers might be in this network. However, we want to check out the rest of the subnet ie ‘WS2K32’ and ‘meta’ to see whats actually there. Imagine we have compromised the ubuntu server already and have gained login details.

Starting at our attacking machine we will SSH into ‘Ubuntu’. In order to be able to forward traffic for any TCP port on through our SSH tunnel we will want to take advantage of Dynamic port forwarding and specify the ‘-D <port>’ command. This uses ‘Dynamic’ port forwarding feature of SSH. This will allow us to send other tools with Kali to localhost:1234 and thus onward onto any route able networks the ‘Ubuntu’ server can see.

Our command would look similar to the below:

ssh root@192.168.100.10 -D 1234

Before we go any further there are some useful additional options we can pass on the ubuntu server in the SSH command, these being below. However the minimum we need to specify is just the -D for dynamic forwarding:

-f: Sends the process to the background. If you do this you will have to kill the process ID rather than just closing the terminal window as it will already be closed. This is easy enough use ‘ps aux | grep ssh’ to get the process ID then ‘kill <ID number>’.
-C: Compresses the data before sending it through the tunnel, mixed success with this, so experiment.
-q: Uses quiet mode.
-N: Tells SSH that no command will be sent through once the tunnel is up.

If we take a look at our local network connections we can in fact see our ssh connections and also our localhost listening on port 1234.

netstat -antp ssh dynamic ports

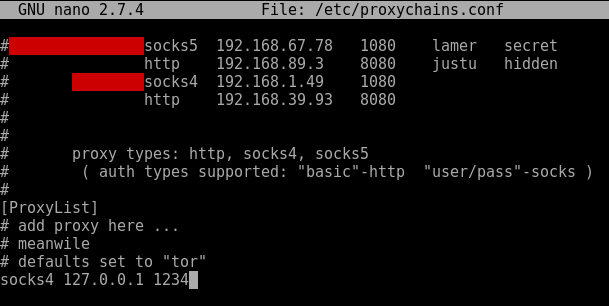
We can now use a socks proxy or equivalent to proxify our traffic through the SSH tunnel and onward to the inside network. For this we will use proxychains. Lets look at how we could do this using a socks4 proxy. First a look at our proxychains configuration. Lets open up /etc/proxychains.conf and ensure the the following line is set in the last line. (note the port should be whatever you used in the SSH command after the ‘-D’.

dynamic port forwarding SSH proxychains

Now we can proxify something like nmap through to the internal network. Bear in mind we can only proxify full TCP connect commands. So UDP traffic/tools such as snmp-check won’t work – however, we can proxify udp in an alternative way, I describe this here. Some tools won’t play nice with proxychains, so play around in your lab and experiment.

Enjoy!


Adding your own or custom exploits to Metasploit! Eternalblue, SambaCry?

Adding your own or custom exploits to Metasploit is easy. If your creating your own exploits for Metasploit  in ruby or want to import custom exploits that you have come across that are not in the main repository then you can follow these simple steps. Why might you want to do this? Well there are certain scenarios such as if you are creating your own exploits or scan scripts. Or you want to test out the bleeding edge exploits without moving to the development edition of Metasploit. For example the ms17-010 exploit or the SambaCry for Linux are currently available to add to Metasploit however are not in the main repo’s yet (at time of writing this). This will allow you to import the ruby scripts, add them to Metasploit an run them in your own labs.

Within Kali2.0 you will have a hidden folder in your root home directory called msf4/modules. Move into this folder and then simply create the following directories .msf4/modules/exploits/windows. Also a folder for Linux respectively .msf4/modules/exploits/linux.

You can then add your ruby scripts to these folders.

Adding custom exploit scripts to Metasploit

Then fire up Metasploit and run ‘reload_all’.

relaod_all Metasploit custom exploits

You should now be able to search or call your new scripts. Remember if your database cache isn’t built follow these steps here.

Add custom exploit scripts to Metasploit ms17_010

Hope this little tip helps.

Tunnel snmp-check and other UDP traffic over SSH

Today I will be walking you through how to tunnel snmp-check and other UDP traffic over SSH.

In this example we are tunnelling UDP over SSH to circumvent firewall rules on the outside. Our firewall rules are only allowing access into the other side of the firewall to TCP port 22 on a Ubuntu server. We don’t have access to any other TCP or UDP ports. The only method of communication into the environment is via SSH to our Ubuntu server. We will use this server as jump/pivot point for other traffic. Imagine we have earlier identified through cdpsnarf using SSH dynamic port forwarding and proxychains another router, we want to enumerate this further. Our next goal in this case is to try and enumerate SNMP UDP port 161 on target router with a public community string. This example could also be applied to all sorts of UDP traffic such as DNS for example were we want to tunnel our local DNS requests to a server behind a firewall. Zone transfer maybe?tunnel snmp-check and other UDP over SSH

Attack machine: Kali Linux 192.168.200.2
Pivot Server: Ubuntu 192.168.100.10
Target: GNS3 Cisco Router 192.168.100.100

We are going to do this by sending our local UDP traffic through netcat (handling UDP) into a fifo process back into netcat (handling TCP), through the ssh tunnel then in reverse the other end. Yes I know bit of a brain teaser! You can read more about fifo files here, they are similar to pipe in linux. In essence we are sort of writing the output to a file (without actually writing anything) then sending it on its merry way through netcat via TCP then down the tunnel. Its best we see this in the flesh with an example.

We begin on the Attack machine by running up the ssh connection, here we are forwarding TCP port 6666 on localhost to TCP 6666 on the remote pivot server:

root@kali:~# ssh -L 6666:localhost:6666 user@192.168.100.10

Then on the Pivot Server we create a fifo file for netcat to talk too:

root@ubuntu:/home/user# mkfifo /tmp/fifo
root@ubuntu:/home/user# nc -l -p 6666 < /tmp/fifo | nc -u 192.168.100.100 161 > /tmp/fifo

On the Attack machine we do similar:

root@kali:~# mkfifo /tmp/fifo
root@kali:~# nc -l -u -p 161 < /tmp/fifo | nc localhost 6666 > /tmp/fifo

In second terminal on the attack machine:

Run up ‘netstat -au’ to verify snmp is listening on the local machine.

UDP netstat connections

We can then simple run snmp-check to localhost.

snmp-check 127.0.0.1

snmp-check over SSH


Looking further down the information we discover the following:
snmp-check over SSH another netowrk


Another network interface, is this possibly the internal network and route to DA..? Maybe in the next post…

Bingo UDP and snmp-check over an SSH tunnel, awesome!