Windows Updates… the bit you need to do after installing them!
Bit of an FYI post really for the following updates KB2269637 KB2719662 MS15-124. The below are some Windows 7 hardening steps that are needed after installing Microsoft updates KB2269637 KB2719662 MS15-124. I see these a lot in organizations. Admins have installed all the patches however haven’t followed through with the extra steps that are needed. There are only a few updates that require some extra action. In most cases its a registry key that needs adding or modifying. In mosat cases these can be achieved through Group Policy. The below list isn’t all of them just a couple I have recently come across.
MS KB2269637: Insecure Library Loading Could Allow Remote Code Execution
In this post I’m going to be talking about LLMNR and NBT-NS. That’s Link Local Multicast Name Resolution (LLMNR) and Netbios Name Service (NBT-NS). They are backup name resolution processes that take place by default in windows networking to help your PC resolve names it requests. However are they really helping you or actually causing you more harm! I’l talk about why its bad, and why we should look to disable it.
Ok so what is LLMNR and NBT-NS, whats it all about?
Link Local Multicast Name Resolution (LLMNR) and Netbios Name Service (NBT-NS) are processes that take place by default in windows networking to help your PC resolve names it requests. When you PC needs to resolve the name or a server for example to an IP address it firstly uses the DNS server it has been assigned. If the DNS Server doesn’t have the record you requested, your PC will use LLMNR and then NBT-NS. With LLMNR your PC will broadcast across the local subnet and ask other machines if they have a record for the name you are trying to resolve. If no-one answers, your PC will then try NBT-NS in the same manner.
Lets see it in action, in the below wireshark we can see 10.0.2.2 (Windows 7 domain joined machine) querying 10.0.2.10 ( Windows Active Directory DNS Server) for the record of DC2. DC2 doesn’t exist, and as we can see the DNS server responds ‘No such name..’. The PC then proceeds to use LLMNR and broadcasts across the subnet. No response is given. The PC then tries NBT-NS and again broadcasts across the subnet, no response is given. No response is given as no-one on the subnet has that record, I just made it up to demonstrate LLMNR and NBT-NS.
Ok so why is this bad, surely its a good thing right..?
Well yes and no, more no these days. Ordinary and back some 10 years ago LLMNR and NBT-NS were used in helping resolve names. If the DNS Server was unavailable local hosts on the same subnet would help resolve names. However lets face it if your PC can’t use DNS its pretty much not going to be doing alot in terms of network connectivity and services. LLMNR and NBT-NS are just not needed anymore (usually). Attackers can take advantage of the LLMNR and NBT-NS broadcasts by replying to them with poisoned responses. The poisoned response can essentially trick the PC into thinking that it knows where the resource is. The PC then attampts to setup an SMB challenge response, in doing so sends its credentials along to the attackers machine. An attacker is able to capture the username and LM, NTLMv1 or NTLMv2 hash of the user making the request. This can then be subject to an offline brute force attack using several different programs such as John the Ripper or OCLhashcat. Or be reused in a PassTheHash or SMB relay attack.
Lets see it in action from wireshark.
We can see our usual DNS request, then an LLMNR broadcast goes out, as the DNS server has no record. Our attacker on 10.0.2.3 (a kali linux machine using Responder) sends a response back to our PC ‘Standard query response, DC3 is at 10.0.2.3’ this is actually the attackers machine fooling the PC. NBT-NS request hasn’t gone out at this stage as a response is received to the LLMNR. The PC is fooled into thinking the resource is at 10.0.2.3 and starts to negotiate an SMB session, passing along its credentials to the attackers machine.
What can we do to fix it?
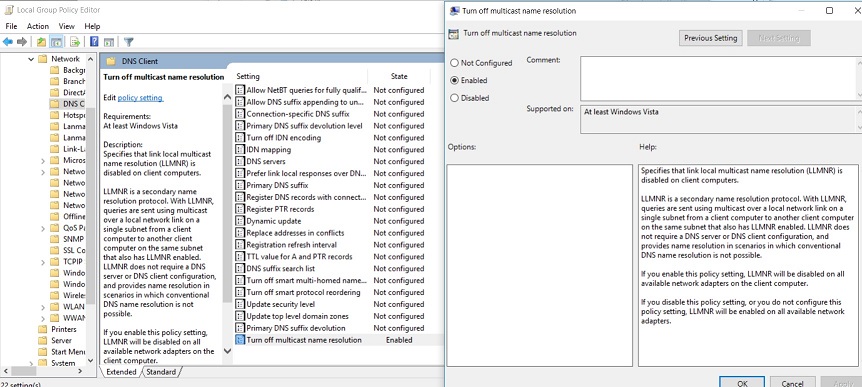
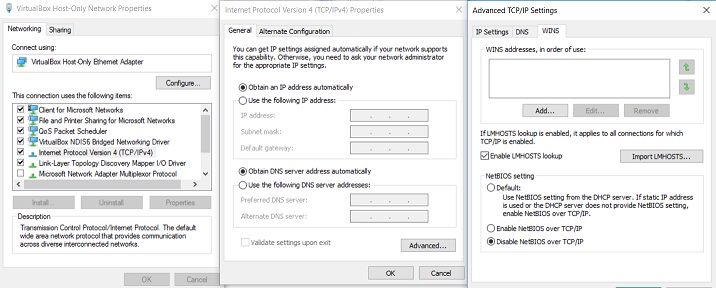
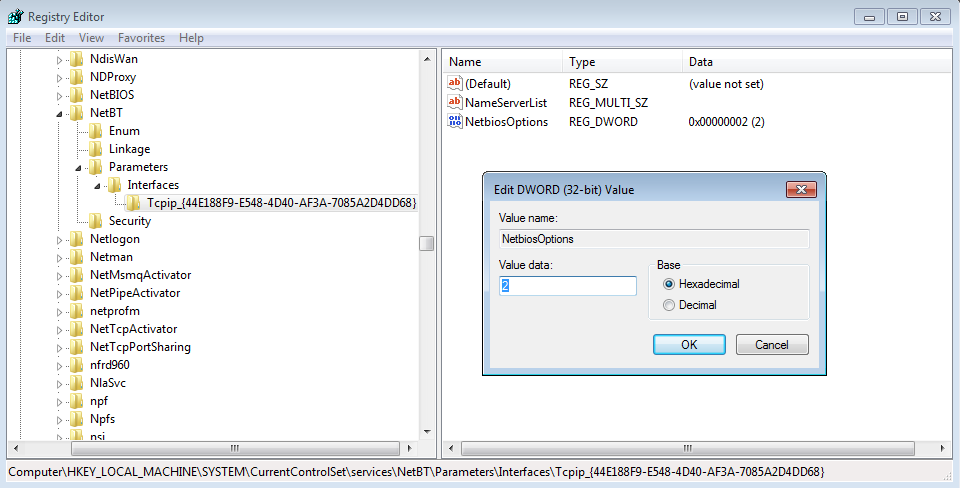
LLMNR and NBT-NS are old methods for name resolution. You may have legacy applications in your environment that may potentially still use LLMNR and NBT-NS for broadcast name resolution. Due to this thorough testing should be carried out first. If this is the case get onto the vendor for some answers as to why! Otherwise we can disable both via GPO and DHCP options. For LLMNR there is native GPO setting. For NBT-NS there is no native setting however it can be set in the registry. The registry key references an interface name which has its own unique GUID so can’t be changed in GPO via a registry key change (as the key will be different every time), however we can use powershell and do a ‘catch all’ on that key and thus script and then run via GPO. I’ll demonstrate below.
You can disable LLMNR via Group Policy in your domain or locally, go to:
The process for disabling both are in the below video:
It obviously goes without saying the appropriate testing, change control and usual roll out procedures should apply especially with a change like this.
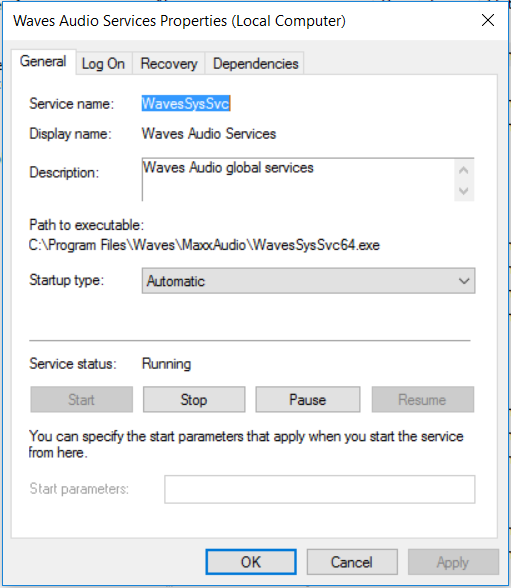
This is just a short write up on unquoted service paths, what they are, why they are bad and how we can fix them. A vulnerabilty scanner will often find these on an ‘Authenticated’ type of scan. However we can search for them via WMI (Windows Managment Interface) query or by manually looking through the services one by one. So what is an unquoted service path? It is the path/file location of the service-exe for a given service that isn’t wrapped in quotes, like in the picture.
OK, so what? Why are these bad?
The problem with unquoted service paths is that as windows starts up or as the service is started Windows needs to locate the service-exe for that service. (I keep saying ‘service-exe’, well we’ll come on to that in a sec!). It looks for the service-exe in the path specified in the ‘Path to executable:’ field of the service. If the path is quoted and contains white space in the path windows knows to go directly to the location. If the path is unquoted and contains white space, Windows will essentially query the different locations in the path until the service-exe is found.
Where the service path contains white space and is unquoted, an attacker can use this to escalate privileges from a standard user account. For example if the service is running as SYSTEM, an attacker can create a service-exe to say create an account and drop it in the local administrators group. The attacker would also need to have ntfs permissions as the standard user in the location in the path so ‘C:\’ might not be viable however further down the path might be. The attacker then restarts the service and the new service-exe will be executed by the service running as SYSTEM.
The service-exe I keep refereing to is special type of executable file that is used by services, its not any old exe you can’t just drop cmd.exe in the path unfortunatly…
If I can’t do an Authenticated Vulnerability Scan how can I find them..?
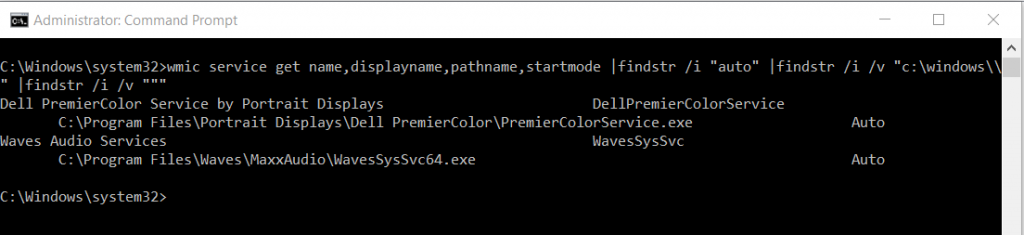
We can use two methods, we can either use WMI query or manually open up each service and check each one, then check the ntfs permissions of each location. We can use the follwoing WMI command from Common Exploits; this will filter out the automatic service and also look for unquoted service paths:
wmic service get name,displayname,pathname,startmode |findstr /i "auto" |findstr /i /v "c:\windows\\" |findstr /i /v """
Running the above wmi query will display something like the the following if present:
As we can see large mainstream manufactures still implment unquoted service paths!
I’ve found one, how do I fix it?
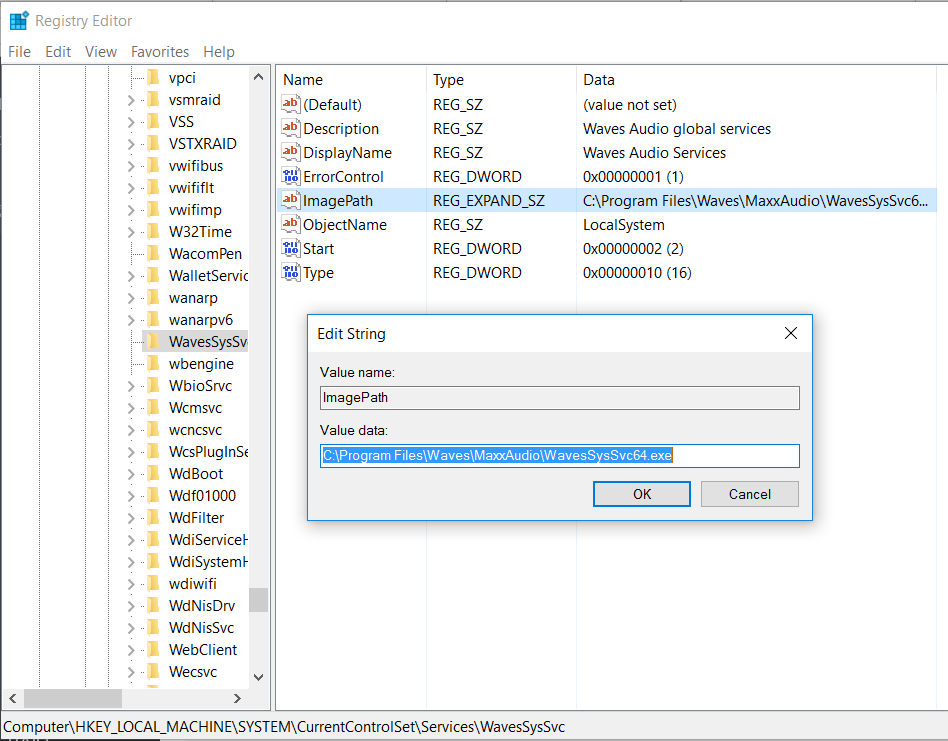
This is relatively straight forward however this should be tested before being rolled out into production (goes without saying). We need to add the quotes to our service path so windows know where to go for the service-exe directly immediatly, rather than searching each directory. We can do this through the registry.
Fire up the registry and navigate to the service as below:
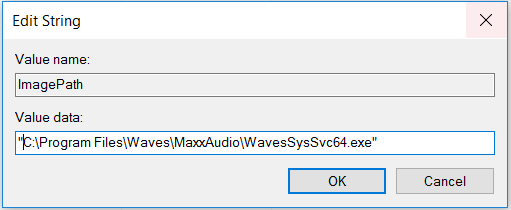
Open up the ImagePath string and simple add the quotes as below:
Restart the service and ensure the service starts properly. We can also open up the service and also re run the WMI query to ensure our affected service now has quotes. This will ensure any attackers should they manage to compromise the machine as a standard user, stop them being able to escalte privileges in this manner!
Hopefully this post will help you resolve the uquoted service path issue.
Cisco, AAA, Radius, Active Directory, Windows Server 2012 R2, NAP role, NPS its all going on!
Just a quick note to reference the following video on YouTube. This video demonstrates setting up Active Directory Authentication for Cisco Devices, such as Routers and Switches etc. This is using AAA on the router and RADIUS through the Network Access Policy (NAP) role in Windows Server 2012 R2, this in turn enables a Network Policy Server (NPS). The Windows server (the Radius Server) is registered in Active Directory which allows it to query the domain it is connected too for authenticating users in Active Directory to the Cisco IOS devices. You can control who has access to various network devices through rules created on the NPS. This can in turn be achieved in Active Directory via groups, binding those groups to privilege levels to pass through to deifferent devices.
For example you could have a group in AD called Network Admins which is tied to a prilivelge level 15 group rule in the NPS configuration. This rule would pass through the privilege level 15 setting through to the IOS configuration. Members of this AD group upon succesful authentication would then be granted privilege level 15 access on the router or switch.
Running MBSA on remote machine that is in a workgroup or different domain.
I thought I would share my findings on using MBSA (Microsoft Baseline Security Analyser) for targeting remote machines that are not part of the same domain or in a workgroup. This really is a great tool for enumerating OS patch levels.
We have two scenarios to run through; the first, running MBSA on remote machine that is in a different domain from the machine that it is installed on. The second, running MBSA on a machine that is in a workgroup. Ok no problem. Here is what we do.
First Scenario
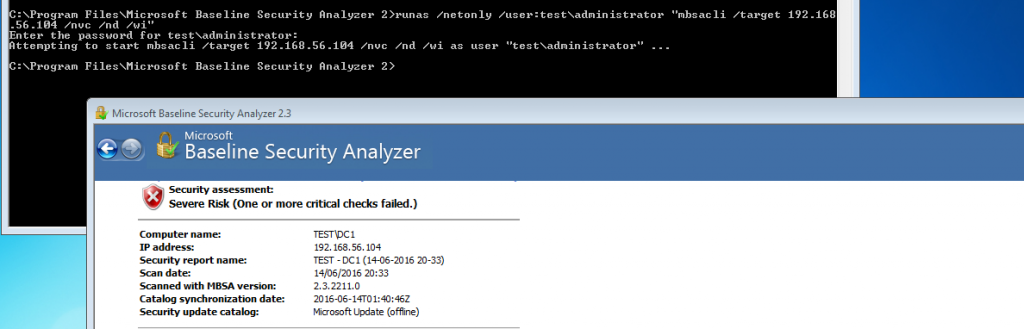
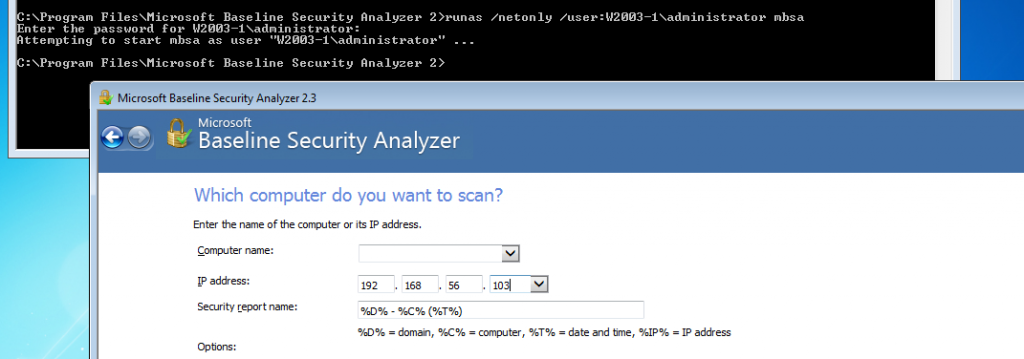
In the first scenario our target machine is a Windows Server 2012 R2 machine that is in a different domain to our MBSA host (Windows 7 Pro 64bit). Fire up a cmd prompt with admin privileges from the machine that you are running MBSA from, and run the following syntax:
A second command prompt will pop up and run, running the syntax as above:
If you wait a short while the MBSA command prompt will disappear when finished, from here you can open up MBSA and view the report:
In this example the target machine was in my virtualbox lab, in a domain called ‘Test’. The machine I ran MBSA from was a Windows 7 Pro machine in a workgroup (no relationship) other than IP connectivity. The cli syntax I used here was used to speed up the check, clearly only use this if you have the latest scan catalogue:
/wi – Show all updates even if not approved by wsus.
/nvc – Do not check for a new version of MBSA.
/nd – Do not download any files from MS update site when scanning.
Additional options:
/target <Target-IP>
/listfile C:\tmp\targets.txt
/catalog C:\tmp\wsusscn2.cab
Add: ‘>C:\tmp\MBSADC1.txt’ to the end of the syntax for a handy output to a text file.
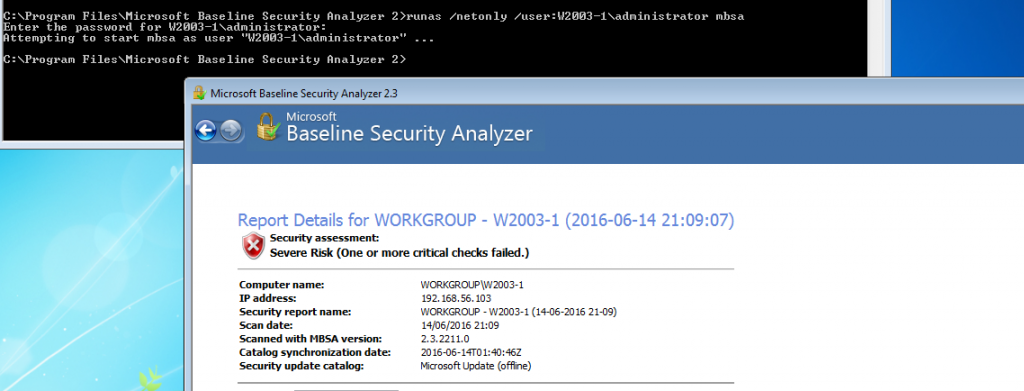
The second scenarios is a Windows Server 2003 machine that is in workgroup. The syntax is actually the same however your specifying the local machine name rather than the domain name. I have mixed this one up a little here by not using the cli, by just specifying MBSA the command simple fires up MBSA GUI as the account specified. The only thing to remember here is to add the IP address into the GUI.
runas /netonly /user:test\administrator mbsa
And again after the scan has finished the results can be view in the GUI.
I haven’t successfully managed to do this from a Windows 10 client yet, various forums would suggest it isn’t supposed to work with 10 however if you know please feel free to drop me an email or comment.
Securing Remote Desktop with Certificates from your Internal CA.
In this post I’m going to be following on from Part 1 located here, talking about further hardening the Windows Remote Desktop Protocol (RDP) with a certificate based system. The certificate is generated and signed by an internal Active Directory Certificate Authority (CA). The issue here being that you have no way of verifying the server or PC that you are trying to connect to via RDP. The machine that you are supposedly connecting to usually presents you with a certificate that is signed by itself, funnily enough known as a ‘self signed certificate’.
The Attack…
The play by an attacker here being that should they have exploited a vulnerability and been able to access your internal network (not for this discussion, however..), they could essentially respond to ARP request by modifying responses sent by an attackers machine. This is done by flooding the network with bad ARP responses, known as ARP poising, the whole attack is known as a Man In The Middle (MITM). There are many ways of carrying out a MITM attack, this just one of them. Once a MITM attack is in play and your arp cache is then poisoned you would essentially be connecting to an attackers machine. The attacker can then sniff the network traffic and all sorts of other rather bad things can happen, like stealing credentials.
A typical self signed certificate presented through RDP looks like the picture above, and clearly states the certificate is not from a trusted certificate authority. If your PC can trust the certificate that is presented by the machine you are connecting too, through the use of a bonafide signed certificate from your internal CA you would know whether or not the machine you are connecting to is genuine. More importantly, through the use of Group Policy you can specify that you are not able to connect to it unless you trust it. Thus preventing any bad MITM rdp sessions.
How do we fix it…
Carlos Perez has written up an excellent ‘how to’ guide from start to finish on how to setup this up. He walks through the certificate templates required for the RDP service. Also setting up group policy to deploy the certificate. This is a great guide so I’m not going to re-regurgitate his excellent work going through all the various screen shots, you can view it here at http://www.darkoperator.com/blog/2015/3/26/rdp-tls-certificate-deployment-using-gpo .
Free Active Directory Monitoring with PowerShell, keep an eye on those high privilege level groups!
Keeping an eye on privileged Active Directory groups is Important. We can do this by Monitoring Domain Admins with PowerShell. Groups such as ‘Domain Admins’ (DA) and ‘Enterprise Admins’ (EA) in Active Directory (AD) is vitally important within your IT shop. You need to be aware of any changes happening to high privilege level groups. Especially ones that have the level of access that DA and EA groups have. This of course also extends further than just administering AD privilege groups. In addition to these you may also want to monitor your high privilege level application groups. Such as Lync and SCCM. The worst case scenario is you find a username you not aware of has been dropped in your DA group. As soon as this happens you want to know and investigate immediately. You don’t need any fancy tools to monitor active directory groups. You just need a few lines of PowerShell coupled with the Send-MailMessage feature. Very quickly you have some powerful alerting.
Solution:
I’ve just pulled the below script together in a few minutes which very simple pulls the DA group and emails the contents to the desired location in the script.
$EmailBody = "The Domain Admin group has the following members verify these are correct:
              $currentmembers "

$currentmembers = (Get-ADGroupMember -Identity "Domain Admins").name | out-file -filepath C:\temp\currentmembers.txt

$Email = @{
            'From' = 'Active Directory Administrator <admin@test.lab>'
            'To' = 'adam@test.lab'
            'Subject' = 'Current Domain Admin Members'
            'SmtpServer' = 'my.smtpserver'
            'Body' = $EmailBody
        }
        Send-MailMessage @Email
This is just a simple script to query the contents of a group and mail it. What you would ideally want is a comparison of a before and after state. In addition some intelligence within the script. This would be to either; email you if any changes have been made including the additions. O alternatively do nothing if no changes have been made. Then schedule the script to run every 5 minutes with Task Scheduler. This allows you to have pretty good overview of your high privilege accounts. Such a script thankfully already exists over at TechNet https://gallery.technet.microsoft.com/scriptcenter/Detect-Changes-to-AD-Group-012c3ffa
Alternative tools do exist such as SolarWinds LEM and ChangeAuditor. However using PowerShell is free after all and requires very little effort to implement! As a bonus you’ll boost your PowerShell skills.
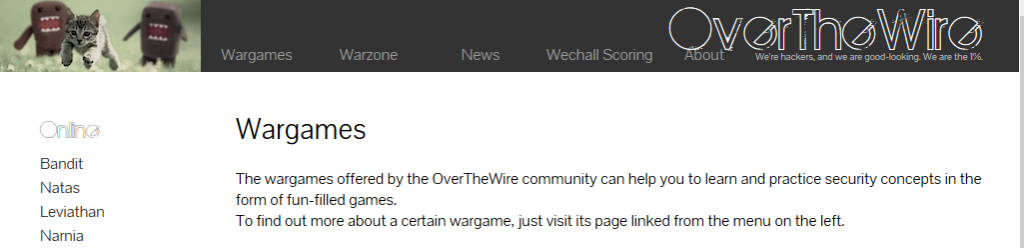
I just thought I would share with you all Over the wire – bandit this is fun hacking practice game that you can play on online through SSH. It very addictive and once you start you will want to progress through the levels. Not stopping till you have finished. I started this and had to finish it. You can find it over at http://overthewire.org/wargames/ I found this through ‘The hackers playbook 2’ book of pentesting tips and tricks found here http://thehackerplaybook.com/dashboard/
Over the wire is a set of text based games, brought to you in a ‘capture the flag’ type style game where you ssh into there servers and crack the puzzle or code. The first series called ‘bandit’ is relatively straight forward with 26 levels. You start the game with a username and password to login to their servers via SSH. You can move up a level each time cracking the puzzle and obtaining the password to the next level. The bandit series is a great intro in its own right to bash as you have to use and combine tools and functions like grep, sort, base64 etc in order to crack the code. Each level finds you figuring out how to view/capture a text string which is the password to the next level. Head over to http://overthewire.org/wargames/ and check it out.
Just a quick post to remind myself and others of the following Cisco Access Control List Guidelines that we should be aware of. I thought this would be good to post as a quick reference/lookup. This just gives a basic run down of how ACL’s should be implemented as per Cisco CCNA Security.
Ensure the last ACE that is processed has a ‘deny any’ or ‘deny any any’
ACLs are processed top down, as soon as as an ACE is matched the processing is stopped.
Make sure the most specific ACEs are at the top of the list.
One ACL per interface, per protocol, per direction.
Any new ACE’s that are added to an ACL are added to the bottom by default, unless specified.
Router generated traffic is not filtered by outbound ACLs
Standard ACLs should be placed as close to the destination as possible.
Extended ACLs should be placed as close to the source as possible.
As a mental note to myself more than anything however some one may also find this useful. These are the steps you need to take in order to recover or reset a Cisco Router Password. This was performed on 2800 series router. This may be different for other router models and the break key sequence may also be different for your favorite terminal software, however these are the outline steps required in order to re-gain access to you Cisco Router.
Connect via the console port.
Power cycle the router.
Issue the break sequence command on startup within 60 seconds of power up to put into ROMmon – ‘Ctrl-Break’ or ‘Break’
Change the config register with ‘confreg 0x2142’ command.
Power cycle the router.
skip the initial startup/setup procedure
move into privilege EXEC mode.
Copy the startup configuration to the running configuration.
Check the config with a show run – and change the password.
Change the config register back to the original setting (usually 0x2102) in Global Configuration mode with ‘config-register 0x2102’.
Save your changes and reboot to set the new config register.
Issue a ‘Show version’ to verify you have the correct config register:


 Just a quick note to reference the following video on YouTube. This video demonstrates setting up Active Directory Authentication for Cisco Devices, such as Routers and Switches etc. This is using AAA on the router and RADIUS through the Network Access Policy (NAP) role in Windows Server 2012 R2, this in turn enables a Network Policy Server (NPS). The Windows server (the Radius Server) is registered in Active Directory which allows it to query the domain it is connected too for authenticating users in Active Directory to the Cisco IOS devices. You can control who has access to various network devices through rules created on the NPS. This can in turn be achieved in Active Directory via groups, binding those groups to privilege levels to pass through to deifferent devices.

 the following Cisco Access Control List Guidelines that we should be aware of. I thought this would be good to post as a quick reference/lookup. This just gives a basic run down of how ACL’s should be implemented as per Cisco CCNA Security.
