
Configuring a IPSec Site-to-Site VPN Tunnels on a Cisco Router
I thought I would run through configuring IPSec Site-to-Site VPN Tunnels on a cisco router. I’m going to be covering at high level the basic principles needed to configure a IPSec Site-to-Site VPN. The fundemental principals can be used for the Cisco ASA Firewall or Cisco VPN concentrator. The VPN gateways in our example (the routers) are responsible for encapsulating and encrypting the outbound traffic which in a real world example this would from be from a site to a peer gateway at another site. This could be either through an MPLS network from an ISP or more commonly directly over the Internet. When the receiving gateway receives the traffic it strips away the headers, decrypt’s the content with the pre-shared key and forwards on the traffic to a host network on the inside.
In our example we are going to be using 3 networks with an IPSec VPN tunnel being established between two of the routers. I have added the extra network without the tunnel to demonstrate in wireshark the encrypted vs the non encrypted traffic. All three networks are connected to a switch which we are going to image as our either our Internet or MPLS connection.

An IPSec tunnel consists of 5 stages to establish and terminate its connection these are:
- An ISAKMP tunnel is initiated when the VPN gateway detects ‘interesting traffic’ which is defined by an ACL.
- IKE Phase 1 is established through negotiating the ISAKMP SA policy that is defined in the config.
- IKE Phase 2 is established through negotiating the IPSec SA policy.
- The IPSec tunnel is created and data can begin to be transferred Encrypted.
- The IPSec tunnel is teared down when either the lifetime of the session expires or the IPSec SA is removed.
Below is the extra config that is used for each router other than the initial config of a standard GNS3 router, this can simple be copied into global configuration mode. The config is split into three main sections the interface configuration, EIGRP configuration and the IPSEC configuration.
hostname RouterA
interface fa 0/0
 ip address 4.5.6.1 255.255.255.0
 no shutdown
interface fa 0/1
 ip address 10.0.0.1 255.255.255.0
 no shutdown
 exit
router eigrp 111
 network 10.0.0.0
 network 4.5.6.0
 no auto-summary
 exit
# Identify interesting traffic on RouterA to RouterB with the below ACL
access-list 101 permit ip 10.0.0.0 0.0.0.255 10.0.1.0 0.0.0.255
# Configure the IKE Phase 1 ISAKMP SA policy on RouterA
crypto isakmp policy 10
 encryption aes 256
 authentication pre-share
 hash sha
 group 5
 exit
crypto isakmp key cisco12345 address 4.5.6.2
# Configure the IKE Phase 2 IPsec SA Policy on RouterA
crypto ipsec transform-set VPN-SET esp-aes esp-sha-hmac
crypto map VPN-MAP 10 ipsec-isakmp
 description VPN Connection from RouterA to RouterB
 set peer 4.5.6.2
 set transform-set VPN-SET
 match address 101
 exit
interface fa0/0
 crypto map VPN-MAP
 exit
hostname RouterB
interface fa 0/0
 ip address 4.5.6.2 255.255.255.0
 no shutdown
interface fa 0/1
 ip address 10.0.1.1 255.255.255.0
 no shutdown
 exit
router eigrp 111
 network 10.0.1.0
 network 4.5.6.0
 no auto-summary
 exit
# Identify interesting traffic on RouterB to RouterA with the below ACL
access-list 101 permit ip 10.0.0.0 0.0.0.255 10.0.1.0 0.0.0.255
# Configure the IKE Phase 1 ISAKMP SA policy on RouterB
crypto isakmp policy 10
 encryption aes 256
 authentication pre-share
 hash sha
 group 5
 exit
crypto isakmp key cisco12345 address 4.5.6.1
# Configure the IKE Phase 2 IPsec SA Policy on RouterB
crypto ipsec transform-set VPN-SET esp-aes esp-sha-hmac
crypto map VPN-MAP 10 ipsec-isakmp
 description VPN Connection from RouterB to RouterA
 set peer 4.5.6.1
 set transform-set VPN-SET
 match address 101
 exit
interface fa0/0
 crypto map VPN-MAP
 exit
hostname RouterC
interface fa 0/0
 ip address 4.5.6.3 255.255.255.0
 no shutdown
interface fa 0/1
 ip address 10.0.2.1 255.255.255.0
 no shutdown
 exit
router eigrp 111
 network 10.0.2.0
 network 4.5.6.0
 no auto-summary
 exit
# Note there is no IPSec configuration on this router
I’ve broken down just one of the IPSec configuration below to explain what the various elements are, these need to match at both sites:
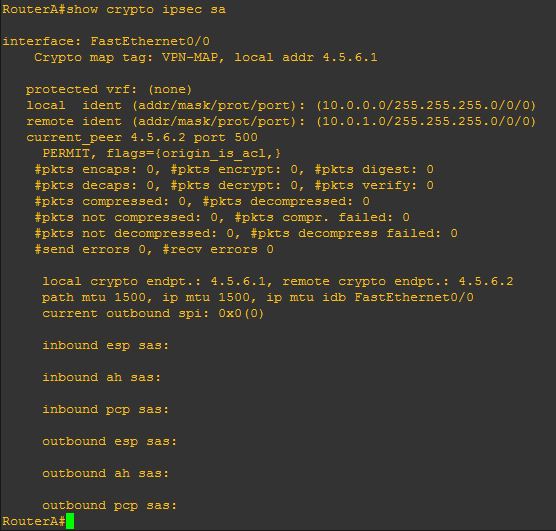
 Before generating any interesting traffic if we execute ‘show crypto ipsec sa’ from RouterA we can clearly see there has been no traffic captured by the ACL.
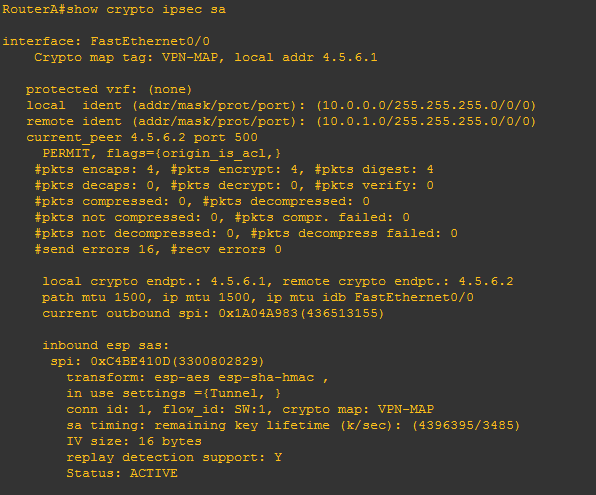
If we now generate some ‘interesting traffic’ such as a ping from PC1 10.0.0.2 to PC3 10.0.1.2 which will match our ACL that is specified in our crypto map, then re-issue ‘show crypto ipsec sa’ we will see from the stats that packets have been encrypted. Further to this we will see the inbound and outbound session will be ‘ACTIVE’.
To take this one stage further we will demonstrate the difference in the Encrypted IPSec traffic and ordinary traffic using wireshark. The capture will be taken from the link between RouterA and the core network. We will ping out from PC1 to PC3 (the encrypted traffic caught by our ACL) and PC2 to PC5 (the non-encrypted traffic that doesn’t match our ACL) simultaneously. This is what we see:
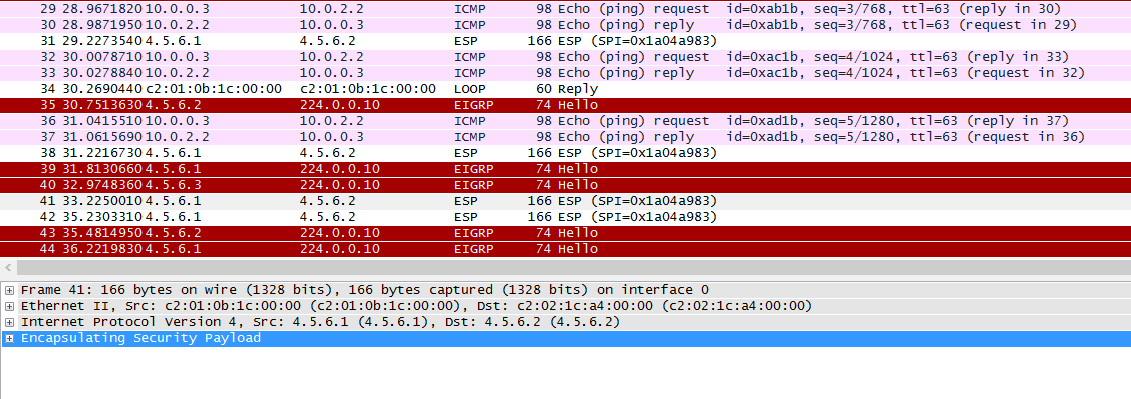
As we can see from the wireshark capture our encrypted traffic is shown in the Encapsulated Security Payload and our non encrypted traffic in the clear (the ping request and reply).