
I have spent many hours reading various blog posts and articles in my quest to get the Cisco ASA working in GNS3. Not just working but to a point where it runs stable, be able to save the running configuration, save the project in GNS3 and then reopen it all back up and for the configuration to be there working.
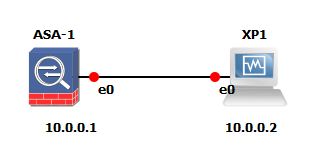
Here are the steps I have successfully used to get the Cisco ASA working correctly in GNS3. For this example I will be assuming you have already added the ASA and a workstation like XP to GNS3 in order to access the ASDM. We will just be working very simply with a single ASA and an virtual XP machine directly connected, as below.
Prerequisites:
Install the latest version of GNS3 at this time I was using ‘GNS3-1.3.8-all-in-one.exe
Setup your XP machine and import it into GNS3
ASA files you will need:
asa842-initrd.gz
asa842-vmlinuz
asdm-645.bin
Extra Files for the XP machine.
SolarWinds-TFTP-Server.exe
jre-6-windows-i586.exe
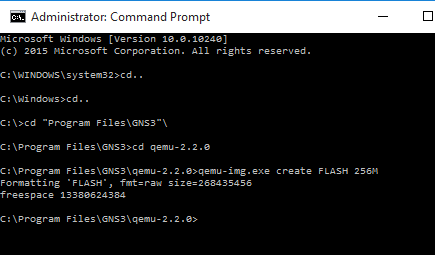
First we need to create a flash drive for our ASA, we can do this with qemu-img.exe as below:
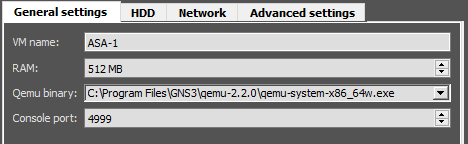
Now to configure the Qemu options, I use the below options:
Use 512MB and make sure the Qemu binary is set to use the latest exe:
Qemu-2.2.0\qemu-system-x86_64w.exe
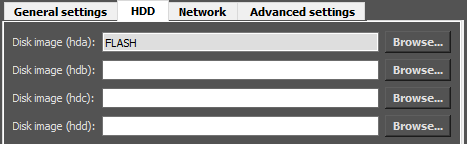
Browse and select the FLASH file previously created.
Untick the ‘Legacy networking mode’
I have had various instability issues with ‘Active CPU throttling’ ticked, at times the console has hung, so if you find this happens to you untick this.
You will have already added the initial RAM disk and Kernel image when added the ASA to GNS3.
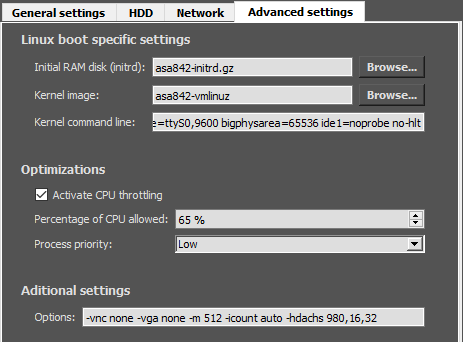
Set the Kernel command line to:
ide_generic.probe_mask=0x01 ide_core.chs=0.0:980,16,32 auto nousb console=ttyS0,9600 bigphysarea=65536 ide1=noprobe no-hlt
Set the ‘Additional Settings – Options’:
-vnc none -vga none -m 1024 -icount auto -hdachs 980,16,32
Make sure you apply the changes!
Apply these changes on the first start up!
When you start the ASA apply these changes first:
ciscoasa# copy running-config startup-config
ciscoasa# copy startup-config flash:
ciscoasa# reload
After the second boot sequence you can start making configuration changes.
Save your Project in GNS3 at this point.
Initial Configuration
Here is some initial configuration to get the ASA up and running.
ciscoasa# config t
ciscoasa(config)# int g 0
ciscoasa(config-if)# ip address 10.0.0.1 255.255.255.0
ciscoasa(config-if)# nameif inside
ciscoasa(config-if)# no shut
ciscoasa(config)# http server enable
ciscoasa(config)# http 0 0 inside
Once the ASA is up check connectivity between it and the XP machine with a ping.
Copying ASDM to the ASA
We now need to copy the ASDM image to the ASA. For this you will need to have the ASDM image on the XP machine and installed a simple TFTP Server such as SolarWinds-TFTP-Server.exe.
ciscoasa# copy tftp flash
Address or name of remote host []? 10.0.0.2
Source filename []? asdm-645.bin
Destination filename [asdm-645.bin]?
Accessing tftp://10.0.0.2/asdm-645.bin…!!!!!!!!!!!!
This should now be copying over the ASDM image.
Always use ‘copy running config startup config’ command to save configuration.
Disk Issues
I have encountered disk/flash issues occasionally when saving the running config, Cisco has a built in file check utility to fix these type of issues called the fsck utility. This does automatically run when you boot up the ASA however to manually run it run the following:
ciscoasa# fsck disk0